
One of the more common tasks a technician demonstrates during a Jamf implementation — known as a JumpStart — is creating a Self Service policy to install a printer. It’s a great demonstration of empowering users to help themselves and offloading repetitive work from support personnel.
With a few minutes of additional setup, Jamf administrators can take something like this basic Self Service policy and create a dual set of policies that’s even better.
Consider this scenario
HP printers are common throughout organizations but HP offers more than 650 Mac-compatible models. Rather than maintaining individual drivers for every model in the organization, an administrator can download a single Apple package with all these drivers and manage just one installer instead of multiple.
That’s great! But the package weighs in at 574 MB!
If a user were to install five HP printers from Self Service and each policy were to include the same 574 MB package, he or she would be installing more than 2 GB of redundant files. Over an average Wi-Fi connection, each printer may take up to five minutes to install.
How can a Jamf administrator install the drivers only when they’re needed?
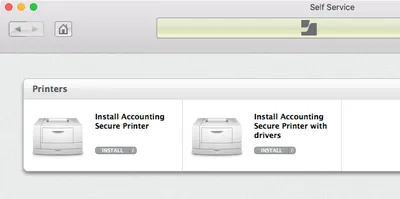
A basic Self Service policy
Let’s start with a basic Self Service policy to install a printer and drivers for the Accounting department. After using the Casper Admin application to capture printer settings and upload the HP printer drivers package to the Master distribution point, create the new policy:
1. Log in to the Jamf Software Server (JSS) and choose Computers > Policies. Click the New button.
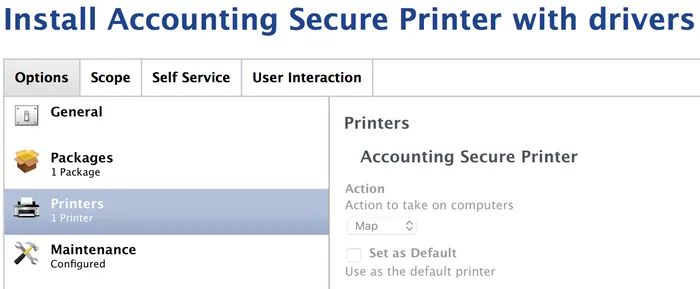
2. Under the Options tab, select the General payload. Name the policy something like “Install Accounting Secure Printer with drivers”, add it to a category, but don’t enable any triggers. Set the execution frequency to Ongoing.
3. Select the Packages payload and add the “HP Printer Drivers v5.0 for OS X” installer. This is the 574 MB package from Apple.
4. Select the Printers payload and add the printer for the Accounting department.
5. Select the Maintenance payload and enable Update Inventory. Remember, always update inventory when adding to, modifying or removing something from a client.
6. Under the Scope tab, set Target Computers to All Computers.
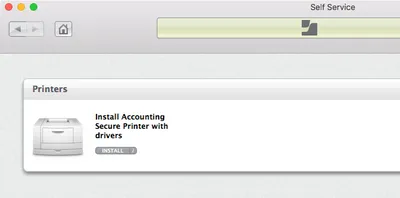
7. Under the Self Service tab, enable “Make the policy available in Self Service”. Add an icon and assign a category such as “Printers”.
8. Finally, under the User Interaction tab, set the Complete Message field to “The Accounting Secure Printer is installed and ready to use.”
9. Save the policy, verify it appears in Self Service and test.
Note how long Self Service needs to run this policy. Again, over a typical Wi-Fi connection this may be a few minutes.
A new smart group
Now, let’s add some intelligence to the JSS so it will only install that large HP printer driver package if needed. Otherwise, it should only install the printer itself.
First, build a smart computer group to identify all Macs with the HP drivers already installed.
1. In the JSS, choose Computers > Smart Computer Groups. Click the New button.
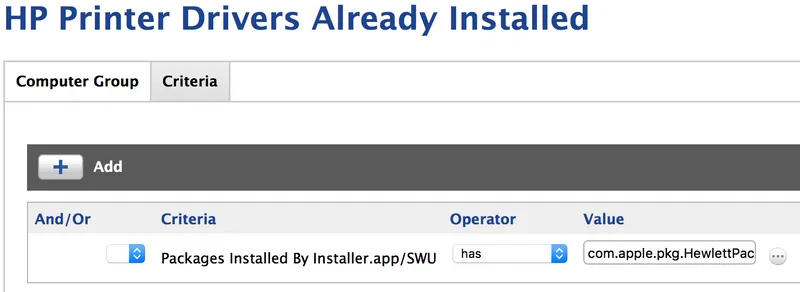
2. Under the Computer Group tab, name the group something like “HP Printer Drivers Already Installed.”
3. Under the Criteria tab, choose the “Packages Installed By Installer.app/SWU” item. (Click the Show Advanced Criteria button first, if necessary.)
4. Set the Operator drop down menu to “has”.
5. In the Value field, type “Hewlett” to filter the results and then click the ellipsis button ( … ) to the right. If the JSS returns no results, manually install the driver package on a Mac and run “sudo jamf recon” in Terminal to update the installed packages list.
6. Choose the com.apple.pkg.HewlettPackardDrivers (or similarly named) item and save the smart computer group.
7. Test that the new smart group works correctly by clicking the View button and verifying the results.
Build a second policy
Creating the second policy is easier than creating the first. It’s a clone of the original with just a few changes.
1. In the JSS, choose Computers > Policies > “Install Accounting Secure Printer with drivers” policy.
2. Don’t edit the policy. Instead, click the Clone button at the bottom of the policy’s page to duplicate it. Cloning the original policy starts a second new policy with identical settings.
3. Under the Options tab, select the General payload. Set the name of this new policy to something like “Install Accounting Secure Printer”. (Note this name doesn’t include “with drivers”.)
4. Select the Packages payload and click the “minus” button in the upper right corner to remove the printer drivers package.
5. Under the Scope tab, set Target Computers to Specific Computers.
6. Click the Add button > Computer Groups tab and add the new “HP Printer Drivers Already Installed” smart computer group.
7. Save the policy, return to Self Service and refresh its window by pressing Command + R. Verify the second printer policy appears in Self Service.
A simple tweak
Good so far! Now, one policy will install the printer and drivers and the other will only install the printer. But if the Mac already has the HP drivers installed, why is Self Service displaying both policies?
Remember, the first policy is scoped to All Computers. It’s going to appear in Self Service on every Mac. The second policy is scoped only to those computers with the drivers already installed. If Self Service shows both policies, the current Mac falls into both scopes.
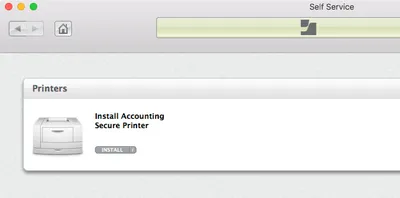
With a simple tweak, Self Service should display only the one needed policy:
1. In the JSS, choose Computers > Policies > “Install Accounting Secure Printer with drivers” policy. (This is the original policy.)
2. Under the Scope tab, leave Target Computers scoped to All Computers and choose the Exclusions tab.
3. Click the Add button > Computer Groups tab and add the new “HP Printer Drivers Already Installed” smart computer group. Although this policy is scoped to all computers, excluding the smart group of Macs with the drivers installed hides the policy from them.
4. Save the original policy, return to Self Service and refresh its window by pressing Command + R. Now, only the policy installing the printer without installing the drivers appears. Test re-installing the printer using this policy.
Note again how long Self Service needs to run this policy. It completes in just a few seconds because it avoids installing the HP drivers. In the end, this saves the user time and mitigates frustration waiting for the policy to complete.
And more...
Other ideas for dual Self Service policies include installing software with the first policy and using the second policy to uninstall the software. (Don’t forget to change the “Install” button to “Remove”.) Or create dual policies to help users switch between internal and external mail servers in Microsoft Outlook.
To the end user, a dual policy setup only ever appears as a single item in Self Service. He or she will never realize it’s changing dynamically to show just what’s needed based on inventory information in the JSS.
Subscribe to the Jamf Blog
Have market trends, Apple updates and Jamf news delivered directly to your inbox.
To learn more about how we collect, use, disclose, transfer, and store your information, please visit our Privacy Policy.