
Jamf School: Return to Service
Improve your iPad management workflows with Apple's Return to Service in Jamf School.

iPad management in Jamf School: Return to Service
If Jamf Pro can do it, so can we!
One of the hurdles every Jamf School administrator must address when erasing and re-enrolling iPads is “How do I get the device back on the network?”
In the past, the end user would have to touch each device to enter any credentials required to connect it to the appropriate Wi-Fi. This can be problematic and time-consuming in any environment.
What is Return to Service?
With the release of iPadOS 17, Apple engineers provided a new tool for administrators: Return to Service.
“With Return to Service, MDM can send an erase command including Wi-Fi details, and an optional MDM enrollment profile, so the device can erase all data and automatically proceed to the Home Screen, ready to be used.”
What is the benefit of Return to Service?
Return to Service is a great resource for the Jamf School administrator. This new tool makes it easier to erase a device and get it back into the hands of students or staff members.
Technical requirements
When using Return to Service, technical constraints must be considered:
- Activation Lock must be disabled on the device.
- 802.1x and certificate-based networks are not supported.
- For a true zero-touch experience:
- Networks with captive portals are not recommended; they require user interaction.
- No credentials may be entered during the enrollment process.
Preparing for Return to Service
The following items need to be created in Jamf School in order to use Return to Service:
- A Network configuration profile with a Wi-Fi payload
- This profile is used by the iPadOS device to connect to the Wi-Fi network after the device has been erased.
- An Automated Device Enrollment profile
- This profile must be scoped to the iPadOS device so that it will reach out to Apple and be directed to Jamf School during the setup assistant process.
- A configuration profile with the production network (optional)
- A different production network can be scoped to the device for use after it finishes enrollment. This is only necessary if the enrollment and production networks are different from one another.
Create a network configuration profile
A network configuration profile, when included with Return to Service, allows the iPad a hands-free way to connect to the network during the setup assistant process.
To create this profile, navigate to Profiles, select Create Profile, select the Network configuration profile from the platforms list and select "Next.”
This choice makes the profile available in the network configuration dropdown when erasing devices using Return to Service.
More information about this profile can be found in the Jamf School Documentation: "Wi-Fi" under the section "Creating a Network Configuration Profile for Devices."
Note:
Profiles created for the iOS, macOS, tvOS platforms, or custom profiles that administrators upload are not eligible to be used as the network configuration profile in a Return to Service workflow. This applies even if they only contain network settings.
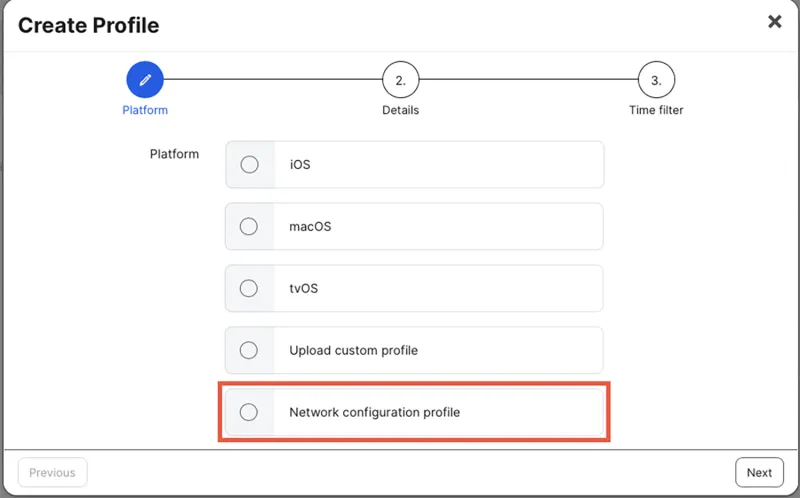
To create a new profile, select the network configuration profile at the platform menu.
The Automated Device Enrollment profile
Once the device has connected to the network and activated with Apple, the Automated Device Enrollment profile:
- Controls how the device enrolls in Jamf School
- Supervises the device
- Controls what setup assistant steps require the end user's input
To create an Automated Device Enrollment Profile:
- Navigate to Profiles
- Select Automated Device Enrollment Profiles
- Select "+ iOS" to create an Automated Device Enrollment Profile for iPadOS and iOS devices
- Select which steps the device will skip during the setup assistant
Learn more details in the Jamf School documentation "Automated Device Enrollment” article.
Note
If the Automated Device Enrollment Profile choice is not available under the Profile menu, ensure that Jamf School has at least one Server Token in Organization > Settings > Automated Device Enrollment.
Please wait 10 up to ten minutes from the time a device is scoped to an Automated Device Enrollment Profile before erasing the device. Changes to the device's information need to propagate through Jamf School and Apple School Manager.
Returning one device to service
- Navigate to Devices > Inventory in the Jamf School Portal.
- Select the device to open its device record (not shown).
- Select "Erase Device" button from the list of Quick Actions.
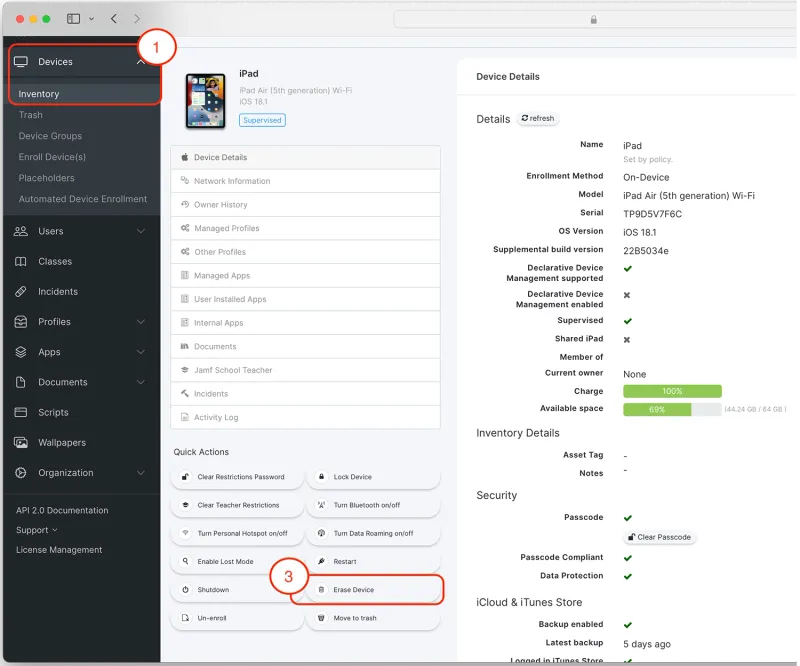
A device record in Jamf School.
The "Erase Device" button opens a new dialog window over the device record.
In the Erase Device window, do the following:
- Check the box for "Return to Service" and new options will appear.
- Under "Network configuration profile installed after erasure,” select the Wi-Fi profile that the device will use to connect to the network after it has been erased. This menu will only show network configuration profiles.
- Check the box for "Automatically scope network configuration profile to device” if this is a production network the devices will use once setup is complete.
- If the device is not scoped to an Automated Device Enrollment Profile, check the box "Install MDM profile after erasure."
- Select "Erase" and the command will be sent to the device along with any selected network configuration or MDM profiles.
The device will receive the workflow commands, erase the device and restart. Once the device restarts, it will advance through the Setup Assistant screens and automatically re-enroll into Jamf School.
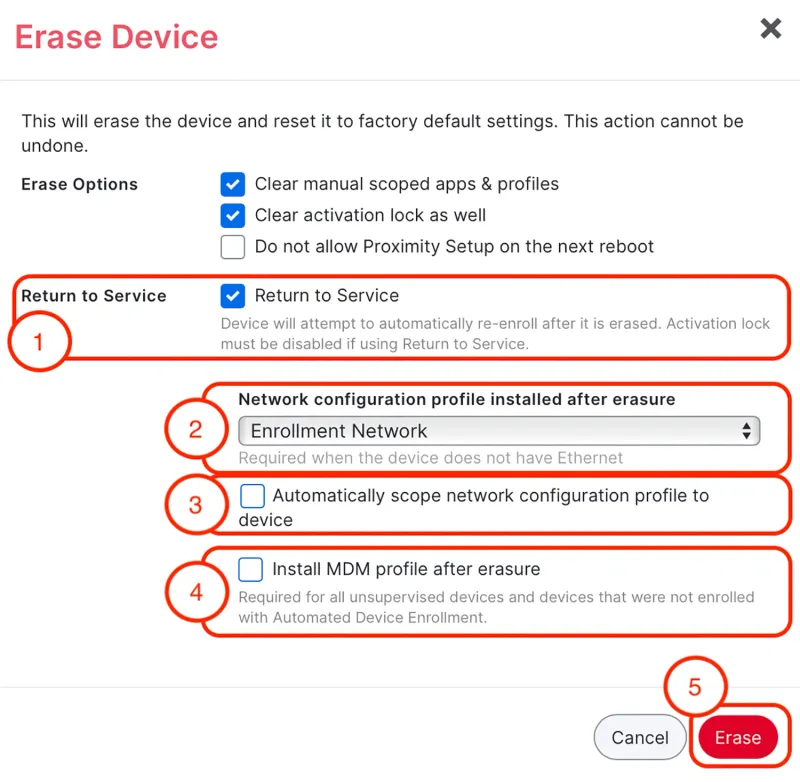
Erase device dialog for a single device.
Returning multiple devices to service
Once the workflow has been tested and any issues have been resolved, multiple devices can be erased and re-enrolled at the same time.
To return multiple devices to service:
- Check one or more of the boxes next to the devices on the Devices > Inventory screen
- Click the "Erase Devices" button
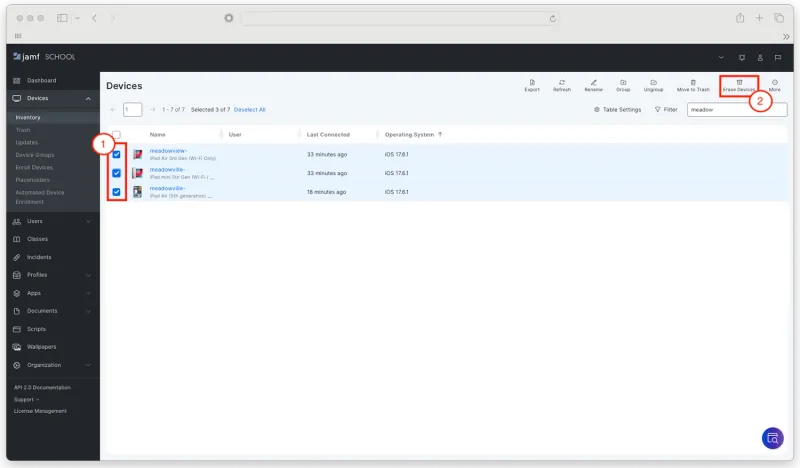
Selecting multiple devices to erase.
Jamf School displays the following dialog window over the inventory screen when multiple devices have been selected for erasure. Choose similar options as when a single device is erased.
- Check the box next to "Return to Service."
- Check the box next to "Install the MDM profile after erasure." This is required if the devices are not scoped to an Automated Device Enrollment Profile, and optional if they are scoped to an ADE Profile.
- Check the box for "Automatically scope the network configuration profile to device" if the network configuration profile in step 4 is for a production network.
- From the "Network configuration profile installed after erasure" dropdown menu, select the profile which the device will automatically connect to during the setup assistant after it has been erased.
- Click the "Erase" button and the workflow will be sent to the selected devices.

Erase devices dialog for multiple devices.
The devices will receive the commands in the workflow, erase and then restart. As the devices restart, they will automatically advance through the Setup Assistant screens and re-enroll into Jamf School.
Note:
The same trouble-shooting techniques used for a single device also apply to multiple devices.
If the devices do not connect to the Wi-Fi network automatically, ensure the correct Network configuration profile was selected in the Erase devices dialog.
If the devices do not re-enroll in Jamf School, make sure either the device is scoped to an Automated Device Enrollment Profile or the "Install MDM profile after erasure" box was checked in the Erase Devices dialog.
If the devices do not connect to the production Wi-Fi network automatically, ensure a profile with a network payload for the production network has been scoped to devices. Confirm the network information in the profile is valid.