
Study material
While this tutorial will be showing everything step-by-step, it will not provide a complete explanation of all the concepts and features of SwiftUI. Apple has a number of tutorials for developers:
These are (mostly) focused on building iOS Apps, but they do a great job of introducing key concepts of SwiftUI and how to use them in Xcode.
Add an app to the project
Open the project you created so far in Xcode. You can also get the sample project from the last part.
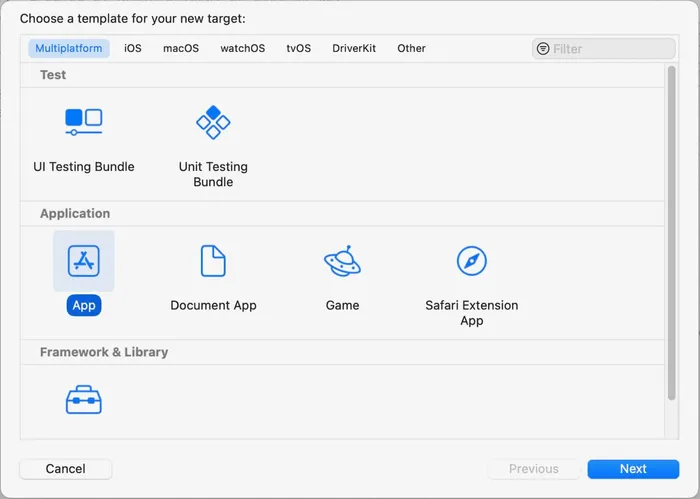
Choose "File > New > Target" from the menu. In the the panel that shows, select "Multiplatform" at the top and then "App."
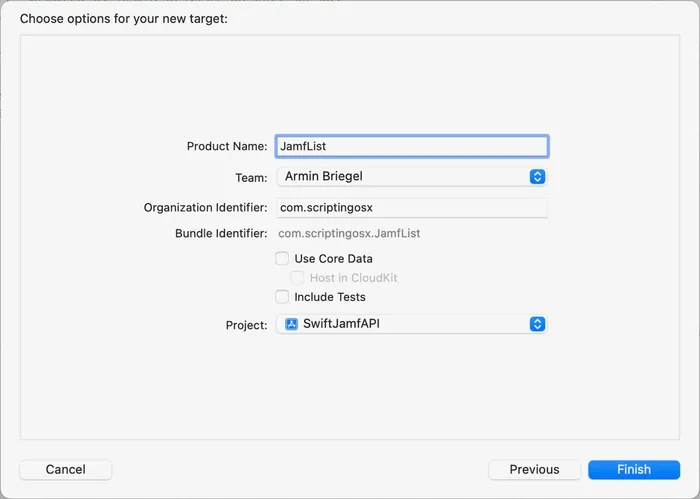
In the next panel, enter "JamfList" as the Product Name, make sure the checkmarks next to "CoreData" and "Include Tests" are not checked and the Project is the project you are working on.
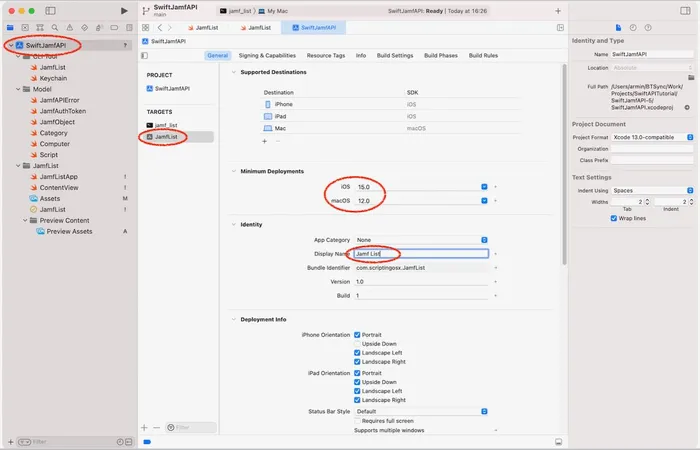
Before we can even start, there are a few settings that we need to add to our application target. In the project item list, select the blue project item at the very top. Select the app “JamfList” (with the gray app icon) under "Targets." Then make sure the "General" tab is selected. Under "Minimum Deployments," select "iOS: 15.0" and "macOS: 12.0."
Then under "Identity," enter “Jamf List” as the "Display Name" for our app.
Our project is now configured to build both the command line tool and the app. We still need to tell Xcode which one we are currently working on. Click on the scheme name in the tool bar. It should currently read "jamf_list" (the name of our command line tool). In the menu that pops up, select the “Jamf List” item with the app icon. You can also switch back to building and running the command line tool from the same menu, or you can select the Scheme from the menu: "Product > Scheme."

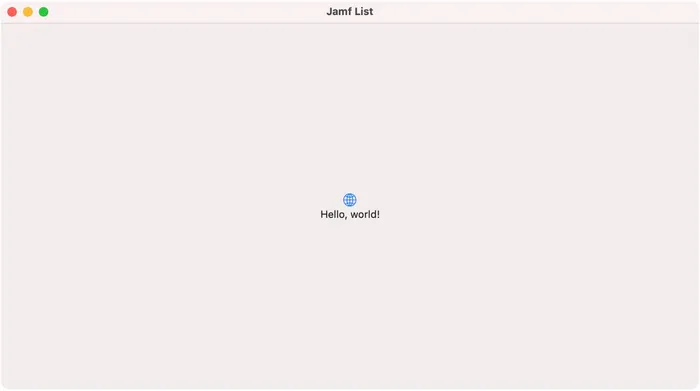
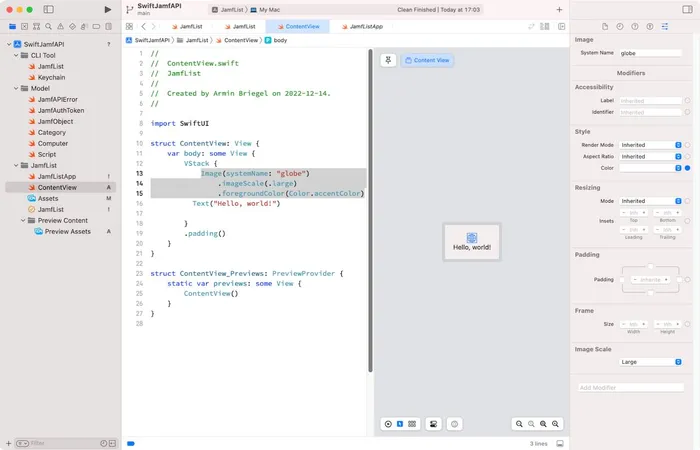
You can now hit the "Run" button to build and run the template app. You can also choose "Run" from the "Product" menu or use the keyboard shortcut command-R. Xcode will build the app and launch it. You should see a window with a globe icon and a “Hello, world!” text.
To SwiftUI… and beyond!
To see how the “Hello, world!” interface was generated, select the "ContentView" file in the project item list on the left. You should see the code that creates the globe image and the “Hello, World” text. You will also see a new, gray pane appear on the right of the code. If you don’t see this new, gray pane, make sure that "Canvas" is enabled under the "Editor" menu.
Right now, it probably says “Preview paused.” When you click that button, it will show a preview of the user interface right there next to the code. When you click on items in the preview, Xcode will highlight the code that generates them. When you select code, Xcode will put a frame around the UI element the code generates. You can also change attributes of the item in the "Attributes Inspector" on the right side of the Xcode window. If you don’t see the "Attributes Inspector," you can make it visible with "View > Inspectors > Attributes."
When you change code, the preview updates after a short delay. Though, quite frequently, Xcode will decide it is not worth trying to keep up with code changes (and errors) and you will get the “Preview paused” button again. When you are done with editing the code, just hit that button again or use the shortcut option-command-P.
If you haven’t already gained experience with the Xcode/SwiftUI interface in the tutorials mentioned above, take some time now to explore. Start with clicking on the text in the preview pane. The inspector panel on the right should change to showing attributes for the Text object. If you do not see this inspector, you can make it visible by choosing "View > Inspector > Attributes." In the inspector, change the font to "Title." The preview will show the new font size and also update the code by adding .font(.title) after the "Text" object. Experiment a bit with the various settings in the inspector. You can even add more elements to the UI from the "Library" that you get when you click the plus "+" button in the top right of the toolbar.
We are going to replace the template code anyway, so don’t be afraid. You can also choose to move the preview pane to be on the right or below the code pane in the "Editor > Layout" menu.
Sample me!
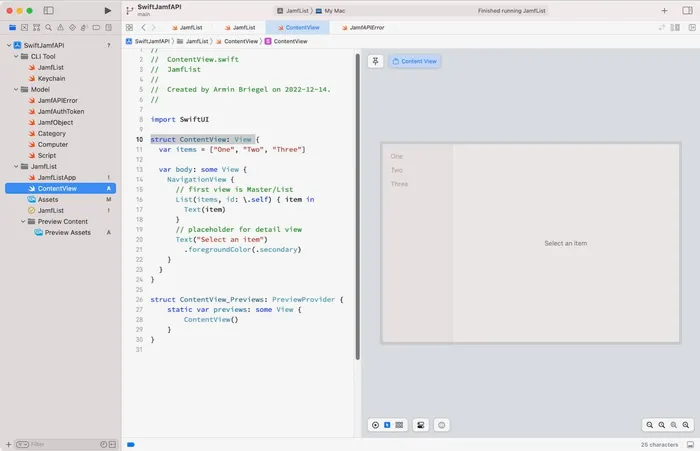
Before we connect the UI to the data model classes we built in the earlier parts, we are going to build the UI with some sample data. We are going to start with with text placeholders and then move on to "fake" Computer objects. In the "ContentView" file, replace the ContentView struct with the following code. Leave the "ContentView_Previews" struct at the end of that in place and the same.
At the beginning of our ContentView struct, we declare an array variable named "items," which will provide our sample data for now. Later, we will make that sample data more complex, and then (even later) connect it to the Jamf API using the model classes we built for the command line tool. But for now, a list of strings will do just fine.
The ContentView struct inherits its behavior from the SwiftUI View. That means it needs a "body" property that lists all the UI elements to display, along with modifiers that determine how they look and behave. This "declarative" syntax will seem a little strange at first, as it is different from the normal, procedural Swift code, but it is very useful for many tasks.
In that body, the first item we add is a "NavigationView." A NavigationView provides a standard "Master/Detail" setup, where a list of items is provided on the left side and detailed information on a selected item can be shown in the right panel.
Note: the Apple Developer documentation will tell you that NavigationView is deprecated, but the replacements "NavigationStack" or "NavigationSplitView" were only added in iOS 16 and macOS 13, so we will stick with the older view type for compatibility with macOS Monterey.
The first view in a NavigationView will be used as the List. Not surprisingly, there is a "List" view type in SwiftUI that we can use here to loop through our array of sample strings. The "id: .self" is some syntactical spice we have to add to make it work here, and we can ignore the details of that for now. It makes more sense to explain this when we switch to more complex types later. The list creates a "Text" view for each string in the items array. The second view in a NavigationView is used as the detail view. We are putting a placeholder in there for now. You should see the NavigationView with the three items and the placeholder in the preview pane.
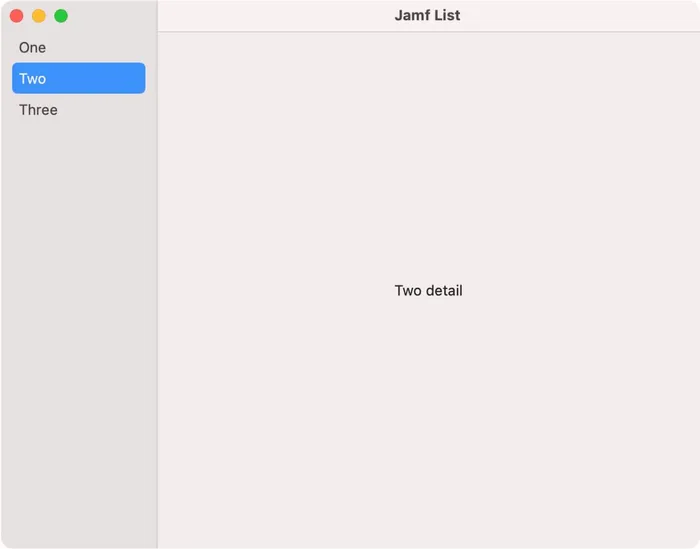
This is nice, but not yet interactive. To make the list and the detail view interactive, we need to use NavigationLink instead of Text placeholders. Replace the "Text(item)" inside the "List" with NavigationLink(item, destination: Text("\(item) detail"))
This will not change the preview in any noticeable way, because the preview does not simulate the interactive features of the UI elements. But when you run the project using the "play" button (or "Project > Run"), you will see our “live” app window, where you can select the items in the list, and the detail view will update to the detail placeholder text. Progress!
Adding detail
We want to expand what the detail view shows. So far we have only a line of text, but the Computer Object will have a lot of data that we could show. The "destination" argument in the NavigationLink expects a Swift view type. "Text" is the most simple view type, so it works well as a placeholder.
We could insert a whole hierarchy of view objects right here in the "destination" argument, but that would make our code unwieldy and hard to read. SwiftUI encourages the creation of custom view types for this purpose.
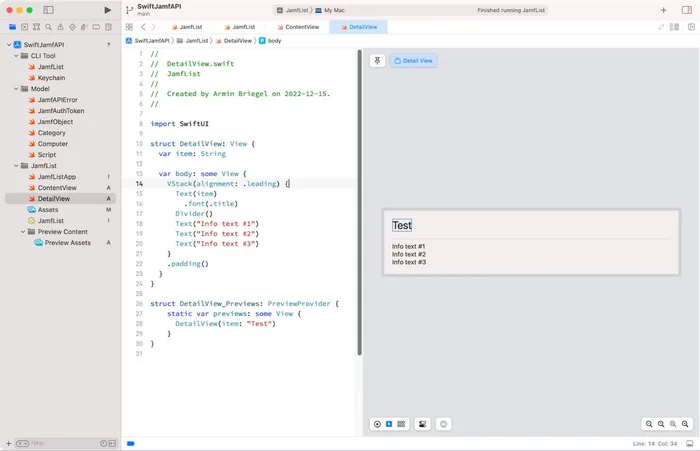
From the menu, choose "File > New > File…" In the template picker, choose “SwiftUI View.” (First icon in the third row.) Name the new file as "DetailView" and make sure the app target "JamfList" is selected and the command line tool target "jamf_list" is not. Click "Create."
Once again, the file template has a Text view with “Hello, World!” Replace both template structs with the following:
This generates a nice preview:
To add the detail view to our NavigationView, go to the ContentView file and modify the destination argument in the NavigationLink to look like this: NavigationLink(item, destination: DetailView(item: item))
Instead of putting a simple Text view into the right pane of our NavigationView, this will put our entire DetailView there.
Run the project and click on the item in the list to see the detail pane update.
Better sample objects
For now, our sample data consists merely of String objects. To continue improving our interface, we will need sample objects that are as complex as the Computer object data we will get back from the Jamf Pro API.
Nevertheless, we do not want Xcode to make API calls every time it shows a preview. We also want to avoid storing the credentials Xcode would need to get that data in the code or Xcode project.
We need a list of sample Computer objects with representative data that do not require API calls to a live Jamf Pro instance. The easiest way to get them is to generate them in code. (You could also have JSON in your project that you load and decode.) Create a new Swift file (not a "SwiftUI View" File) named "Computer-Sample" and paste the code from this file in the tutorial repository. (You can also download that file and add it to your project.)
This will generate an error, because this code defines an extension to the Computer type. While the code for the Computer object is in our project, we have not yet told Xcode that it should be part of our application target. Since the Computer type implements the JamfObject type, which use the JamfAuthToken and JamfAPIError types, we need to add multiple files.
You can select multiple files in the project file list by holding the command key. Select the JamfAPIError, JamfAuthToken, JamfObject and Computer files, then open the File Inspector ("View > Inpectors > File" or option-command–1) and enable the checkmark next to the JamfList application target in the "Target Membership" section.
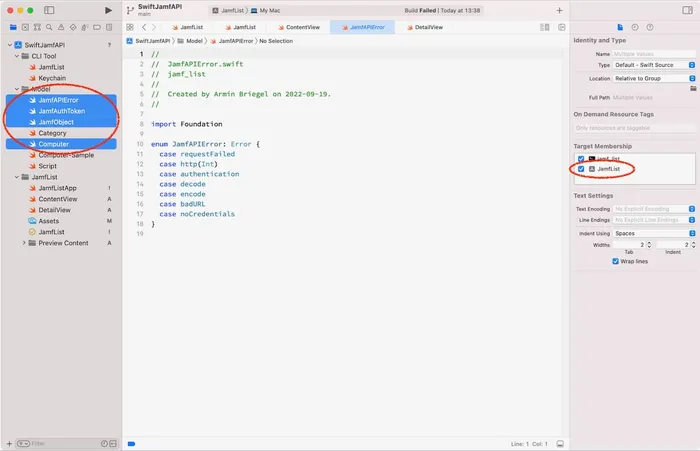
The "Target Membership" tells Xcode which code is shared among the targets and which is exclusive. Sharing code between targets can be extremely useful. Even though the command line tool was intended as a stepping stone, it is a functional tool with its own purpose and use. Changes we apply to the data model code as a result of building the UI might benefit the command line tool and with shared code will automatically be integrated in the command line tool target.
Note that we created a new file in the project that extends the functionality of the Computer object with sample instances. The way we have it set up now, the command line tool target does not "see" this extension. If at some point in the future you needed sample data in the command line tool, you could add it. Using extensions with separate files is a useful way of ordering code and functionality even within a single type.
The matter of identity
There is one change we want in the data types before we can proceed. Select the JamfType file and add "Identifiable" to the line declaring the protocol. It should look like this:
protocol JamfObject: Codable, Identifiable {
This adds the Identifiable protocol to the JamfObject protocol (and thus all our Jamf objects that implement JamfObject). It already declares the "Codable" protocol that we need and use to decode the JSON from the API.
The Identifiable protocol requires an "id" property, which should be unique and persistent. Since objects in Jamf Pro already have a numerical "id" attribute and Jamf Pro takes care of its persistence and uniqueness, we get the Identifiable functionality for practically free.
Implementing this protocol allows SwiftUI types to distinguish which objects are "different" by using this unique, persistent ID. Remember the strange "id: .self" syntax we had to use in the List view? We had to do this because the String objects are not identifiable. You can test this by adding a second “One” string literal to the items array. When you run the app, you will see two items labelled “One” in the list, but you cannot select either, since the NavigationView cannot uniquely identify them. The "id: .self" says it should use the value of the string itself as its ID, which is a nice shortcut for sample data, but with more complex data, you really to implement the Identifiable protocol.
After all this preparation, let’s actually take a look at the code of the sample Computer objects. There are eight static Computer objects for various Mac models and an array named "samples" that contains them all. The data inside the sample objects is mostly fictional, but since the sample objects are the same type as the objects we will fetch from the Jamf Pro API, they should behave the same.
Using the samples
We will start using the sample objects in the ContentView first. Replace the main struct in the ContentView file with the following code. Leave the ContentView_Preview struct as it is.
We are now getting the array of items to display from the ComputerSample extension. Since the Computer objects in the array are now "Identifiable," we can simplify the List syntax. Then we use the name of the computer object as the label for our NavigationLink and also hand over the name to the DetailView.
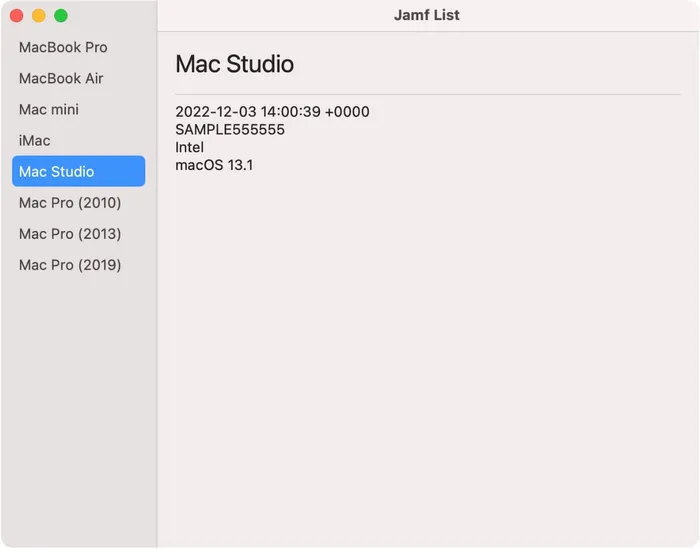
You should already see that the preview now shows all our sample computers. (You might need to un-pause the Xcode previews after all these code changes.) When you run the project, it should work as before, but now it uses the names of our sample computer objects.
Now, select the DetailView and replace both structs in that file with the following:
This will generate an error in the ContentView file. We changed the name and type of the property and need to update the DetailView initializer there. Return to the ContentView file and change the NavigationLink to:
Now, we hand over the entire computer object to the DetailView, which will display more data than just the name.
Conclusion
We have reached a point where the "mock" UI is good enough to proceed with the task of enabling the actual API calls in the app. You can find the sample project up to this point here.
This is still a very basic and plain UI, though. Feel free to experiment with the SwiftUI types and elements to improve on it. Some ideas might be:
- Add more information fields
- Add a list header (Section)
- Add labels to the information fields
- At the bottom of the list show how many devices are in the list
- Add an icon using SF Symbols to represent the model
While building out the interface with with Swift has been more complex than printing information to the Terminal output, it has not been that much more complex yet. This will change in the next part, when we tackle the task of connecting all the pieces, our User Interface, the connection settings and Keychain, and the Jamf Pro API together.
Subscribe to the Jamf Blog
Have market trends, Apple updates and Jamf news delivered directly to your inbox.
To learn more about how we collect, use, disclose, transfer, and store your information, please visit our Privacy Policy.