

In my time as a systems engineer at Jamf, I have spent many years working with our wonderful customers who always keep me on my toes when it comes to the new technologies we support. At the top of the list are education customers looking to leverage Apple’s Classroom app, integrate with Apple School Manager and set up Shared iPads — aka achieve the golden triangle.
Ideally, when implementing these education programs, everything would go off without a hitch. However, I do occasionally receive calls asking why certain components of the golden triangle aren’t working as anticipated. If this sounds familiar, take a deep breath and keep reading. You’ve found a place where you can get quick solutions if you ever run into snags.
A few prerequisites
This guide assumes that you’ve set up your Jamf server to integrate with Apple Education Support. If you haven’t done so already, or if you are not sure if that has been done, please refer to this article on enabling Apple Education Support.
Scenario 1: Troubleshooting Apple’s Classroom app
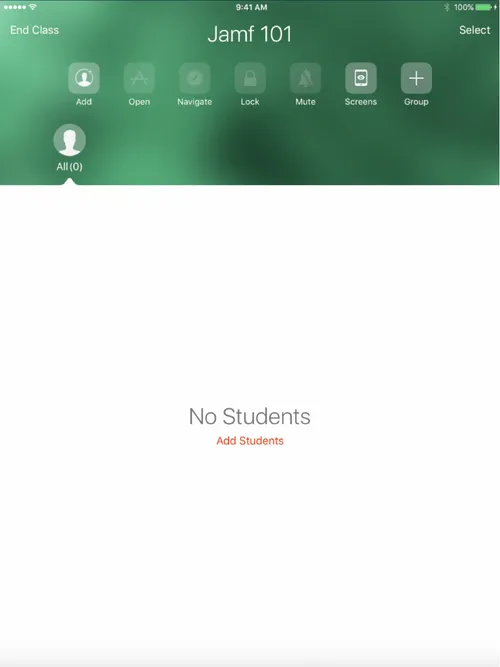
You believe you’ve set everything up correctly for teachers to utilize Apple’s Classroom app, but when one of them tries to load Classroom, they receive this error:
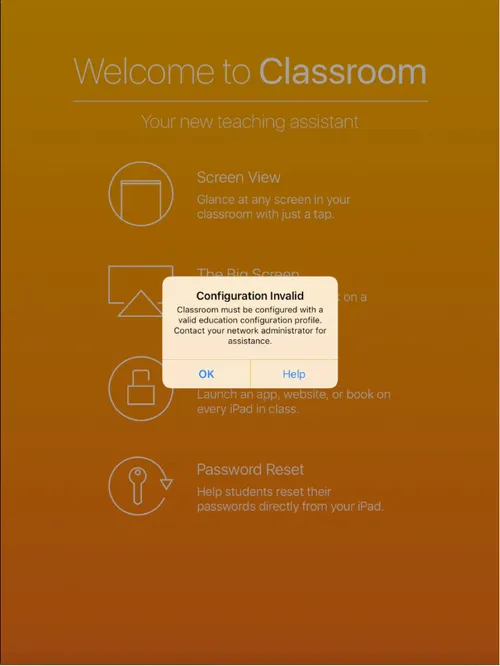
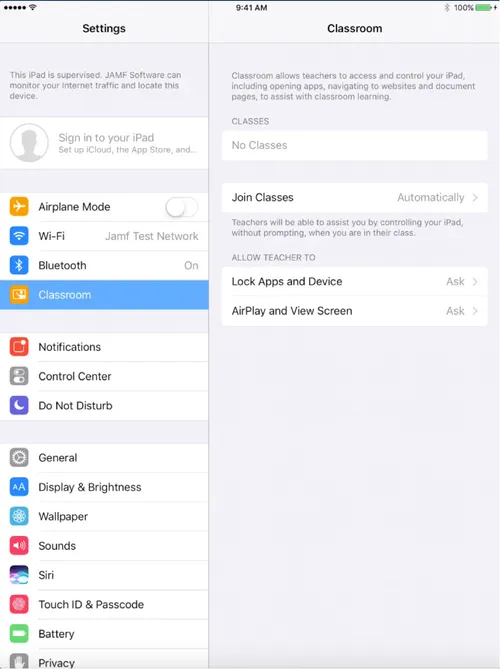
Don’t panic if this happens! It looks like you may not have set your teachers up in Classes within the Jamf server. To do that:
1.Under Mobile Device Management | Apple Education Support, you’ll need to select “Enable Apple Education Support". Keep in mind, we DON'T need "Enable Apple School Manager Integration" checked for the Classroom app to work.
2. Under Mobile Devices | Classes, you’ll need to create a class if you don’t have one already.
- For classes that don’t include any Shared iPads: Add students and the teacher. Select either the Students or Student User Groups to add students, and then perform a similar procedure for the Teachers and Teacher User Groups.
- For classes that are using a Shared iPad model: In addition to adding students and teachers, select Mobile Device Groups for your students in order for the Classroom app to load correctly.
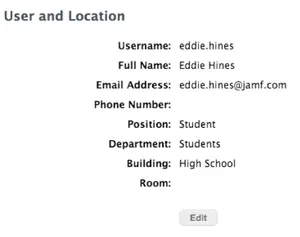
3. Do you have the teacher user and student user attached to a mobile device under the User and Location Information in the mobile device record? Make sure you hit the small "Save" button when adding them to the record; just hitting done on the mobile device record will NOT save new user and location info.
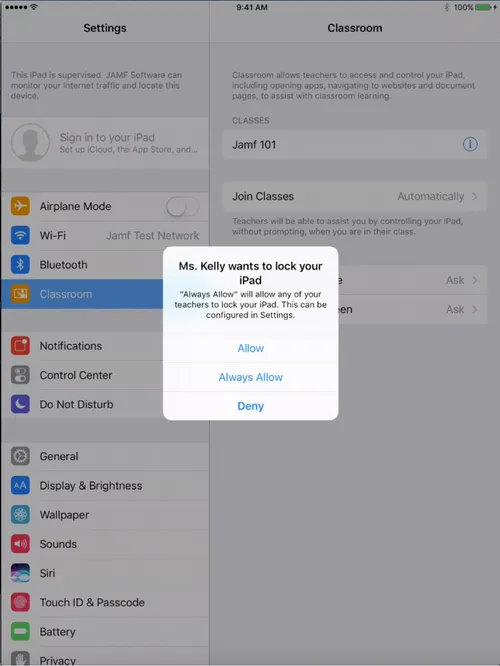
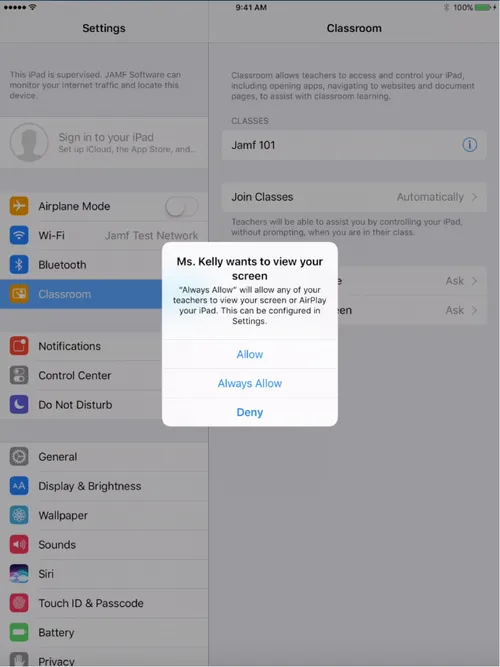
4. In those same mobile device records, do you see a pending/completed command for the "EDU" configuration profile? Currently, both the teacher and student iPad MUST have that profile installed in order to use Apple's Classroom app. If you don’t see this profile on the device:
Note: You can’t view the profile in Settings on Shared iPad, you must rely upon Jamf inventory.
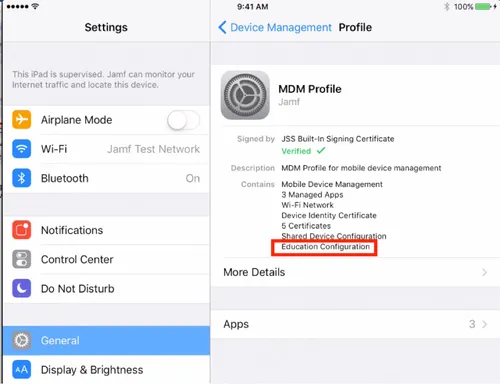
Or in the server under the device’s inventory record:

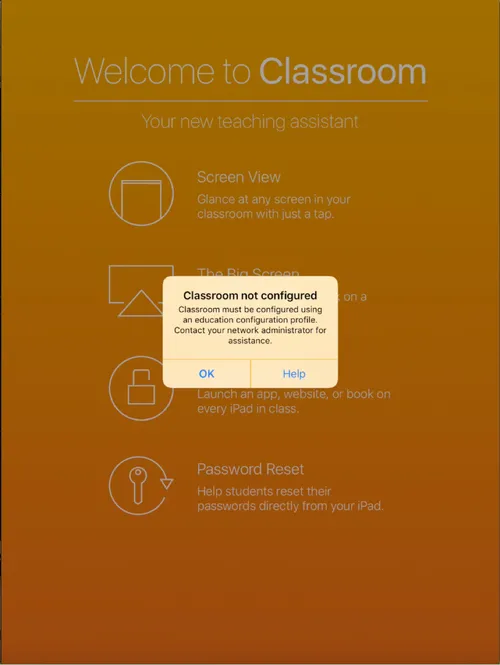
Then you’ll likely see this error on the device itself when trying to load the Classroom app:
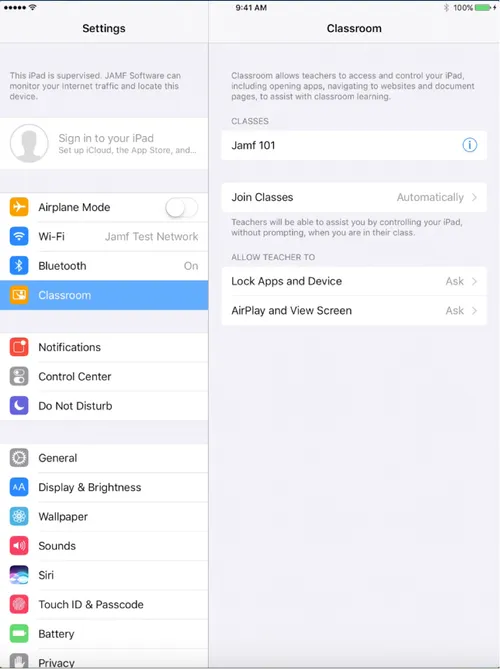
5. Once the profile is installed, you will be able to load the Classroom app on the teacher iPad.
Scenario 2: Troubleshooting Apple’s Classroom app version 2.0
You want to take advantage of the new features of Apple’s Classroom app, specifically features allowing teachers to create their own classes. A few different prerequisites need to be met for this to work. First, iPads must be on at least iOS 10.3. Second, the iPads CANNOT be included in any classes set up in the Jamf server (specifically, they cannot have the EDU configuration profile mentioned above.)
What does this process look like?
1. On the teacher iPad, make sure Apple’s Classroom app is installed.
2. Once the app is installed, open Apple’s Classroom app and create the new class.
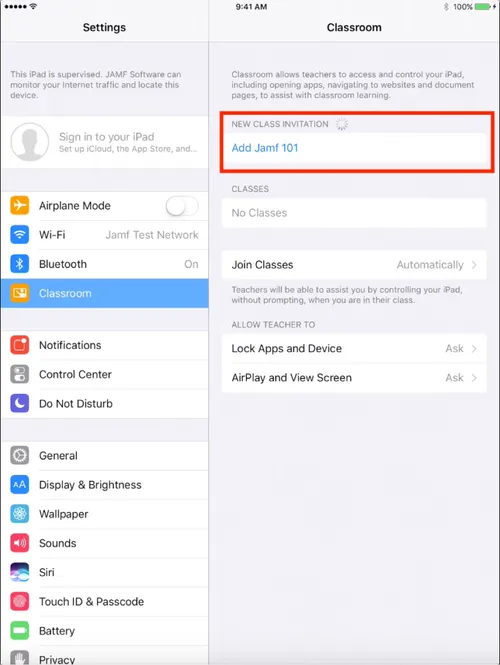
3. Select the newly created class. You should see that no students are present in your class. To add them, select the “Add Student” text.
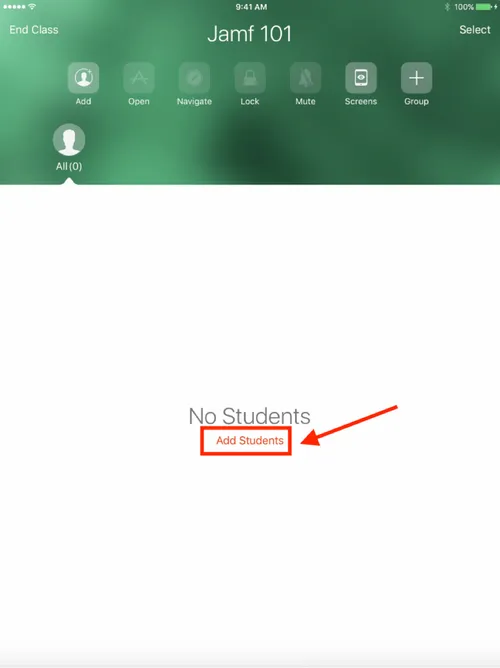
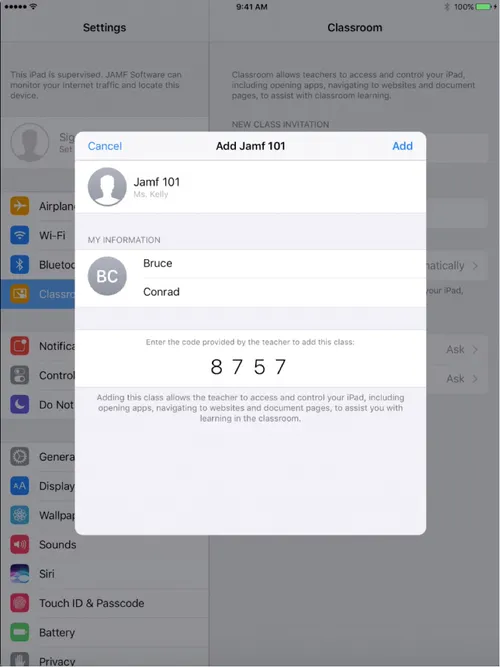
4. When you select that text, you’ll see a code that students must enter on their iPad.
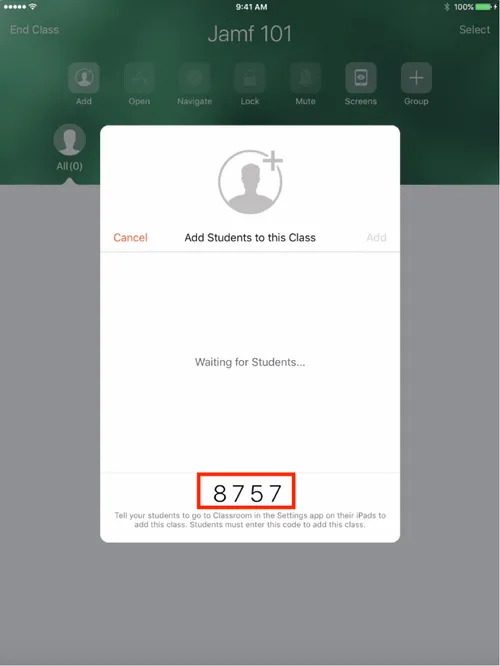
For the students to see the teacher’s class, they must navigate to Settings | Classroom. The student must be within range of the teacher in order to see the newly created class in this section.
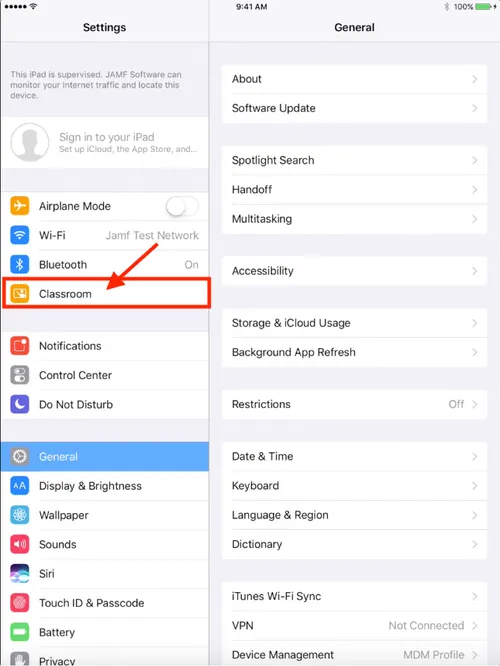
What if I don’t see Classroom on the student iPad under Settings?
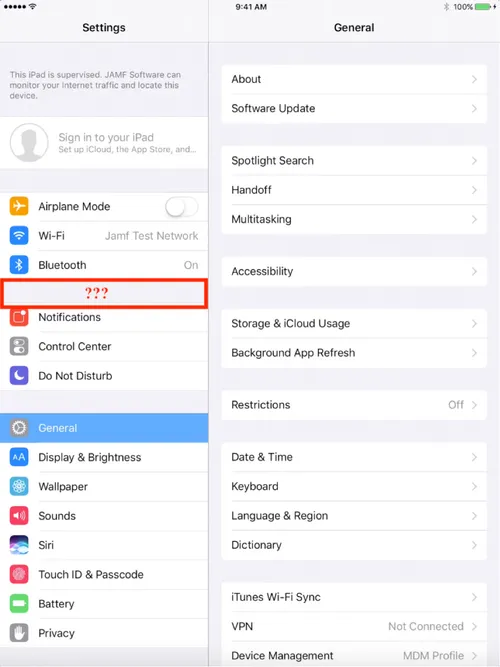
In order for Classroom to show in Settings, the teacher and student iPad must be on the same Wi-Fi network and have Bluetooth turned on. The teacher must also have Apple’s Classroom app open on their device. And, the devices must be within range of each other. Once you’ve done that, you’ll see Classroom appear like this:
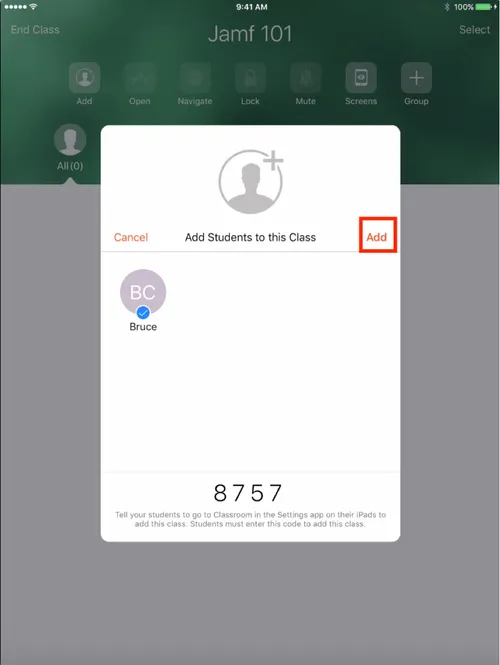
5. Once the student selects their class (and in this example, we’re joining Jamf 101), they will be asked their name and for the code that was displayed on the teacher’s iPad.
6. Once the student enters their information and selects the “Add” button, the teacher can add that student to their class. Once the teacher selects their “Add” button, the student has officially joined the class!
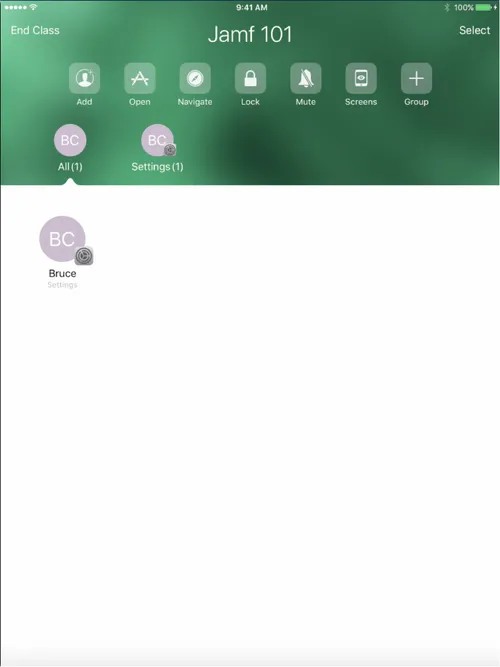
7. On the student iPad, we can now see all of the classes that student is a part of, along with their permissions for the teacher to view and control their iPad. Keep in mind, these settings can be changed by the student at any time.
8. If a teacher attempts to control the student iPad, the student will be prompted for action by default unless he or she has changed their “Allow Teacher To” settings to “Always” or “Never”.
9. Once the student removes the class from their Settings, the teacher will no longer be able to see the student in their classroom.
What if I don’t see my classes once Classroom has loaded?
Make sure the EDU profile has been deployed to the device. You can check this under Mobile Device Record | Inventory | Profiles in Jamf Pro. Or, you can check the Management tab in that location and see if the profile is pending to be installed.
I've done all of the above, but student devices are showing as offline.
If student devices are showing as offline, you’ll want to confirm that the teacher and student devices are on the same Wi-Fi network. This should fix your offline problem.
Bonus tips for troubleshooting: Shared iPad devices
1. In order for Shared iPad to work, you need student users, teacher users AND a mobile device group containing iPads configured as Shared iPads (configured during DEP enrollment). All of the students assigned to a class will be configured to log in on any of the Shared iPads contained in the Mobile Device Group for that class. You must have teachers, students AND a mobile device group in order to use Shared iPad.
Bonus tips for troubleshooting: iPads not in a shared environment
1. Make sure the student device is on at least iOS 9.3, is Supervised, and has the EDU configuration profile.
2. Ensure both Wi-Fi and Bluetooth are turned on for teacher and student devices.
3. Check that the user and location information is filled out, ensure the student has an iPad assigned to his or her user record, and that the user is within the scope of the class.
4. Devices communicate peer to peer, so double-check network ports. Contact Apple for more info.
5. Try using a different, but same network for both student and teacher iPads.
Scenario 3: Troubleshooting Apple School Manager setup
**As a reminder, you do NOT need to enable Apple School Manager in order to use Apple’s Classroom app. Enabling Apple School Manager is only required if you’re looking to use Managed Apple IDs, Apple’s Shared iPad model, or you’re wanting to import classes from a supported Student Information System (SIS) that has been integrated with Apple School Manager. **
To integrate with Apple School Manager, you’ll need to do these steps:
1. Make sure you’ve contacted Apple to tie your Device Enrollment Program (DEP) token to your Apple School Manager instance. Follow the upgrade steps for Apple School Manager, including linking any VPP accounts prior to upgrading.
2. Best practice: Create a new mobile device management (MDM) server in Apple School Manager specifically for importing classes. This is a helpful step so someone doesn’t change or remove an MDM server that is being used for communication with Apple School Manager.
3. Navigate to Mobile Device Management Settings | Apple Education Support and select the Apple School Manager tab. Then, check the box to enable Apple School Manager Integration.
4. Next, select your DEP instance you want to tie Apple School Manager to, keeping in mind that at this time, Jamf supports integration with a single instance of Apple School Manager. (There’s no limit on Apple’s side around how many DEP tokens are created or how many are linked to MDM.) You’ll also want to select the matching criteria for your users. This only matters for matching to users that already exist within Jamf Pro.
5. Best Practice: Try to use “Exact” or “Starts with” as the matching criteria as those are the best in terms of performance for your Jamf server.
6. Once you’ve selected your matching criteria, go ahead and navigate to Mobile Devices | Classes and select the “Import” button. You’ll then select which classes you want to import. A benefit of this is that importing classes will automatically sync new users added to or removed from classes. This will pull in not only your classes from Apple School Manager, but also all of the students and teachers. You’ll see “New Users” that aren’t already in the server. If they are already in the server, you’ll need to go back to Apple Education Support | Apple School Manager and change the matching criteria and try again. Once you’ve matched the existing users correctly and the new records don’t already exist in the server, go ahead and import.
OK, I’ve done that, but I’m getting errors when I try to log in
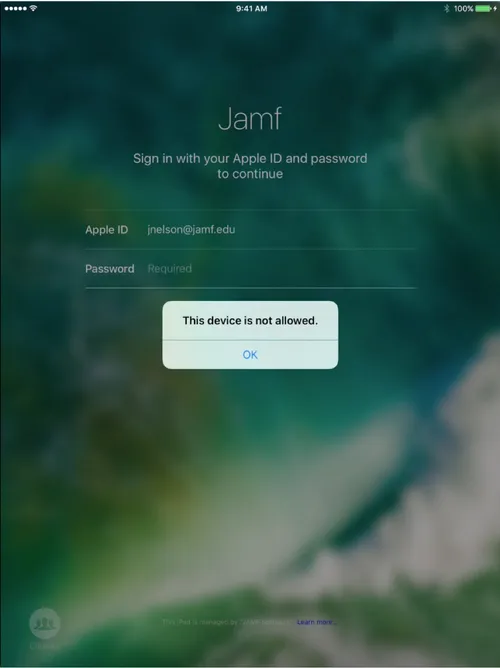
This means the DEP token specified in the Prestage enrollment you’ve selected for this MDM server does not exist within your Apple School Manager instance. You’ll need to make sure the correct DEP instance that was integrated with Apple School Manager is selected in your DEP Prestage enrollment.
Scenario 4: Troubleshooting Shared iPad setup
To use Apple’s Shared iPad model, certain extra requirements do have to be met for the student iPads:
- iPad version: iPad mini 4 or later with at least 32GB of memory, iPad Air 2 or later with at least 32GB of memory or an iPad Pro
- iOS version: iOS 9.3 or later
- Managed Apple IDs: Required
1. In your DEP Prestage enrollment, select “Supervise Devices” in order for the “Enable Shared iPad” option to appear. Make sure that is selected, and then select any other settings you want. Make sure the iPads you want to use this model with are in the scope of this Prestage.
2. Wipe the iPad, or remove the iPad from an unopened box and follow the Setup Assistant prompts.
3. When going through the Shared iPad setup steps, you’ll choose your Language, Location and Wi-Fi. Then you’ll see the iPad activate and your organization will automatically configure the iPad. Once the user selects “Next”, they’ll see the configuration install and the iPad will reboot. The user is then presented with a screen to sign into the iPad using their Managed Apple ID and password. Once they do this, they’ll continue through the Setup Assistant as selected in the DEP Prestage.
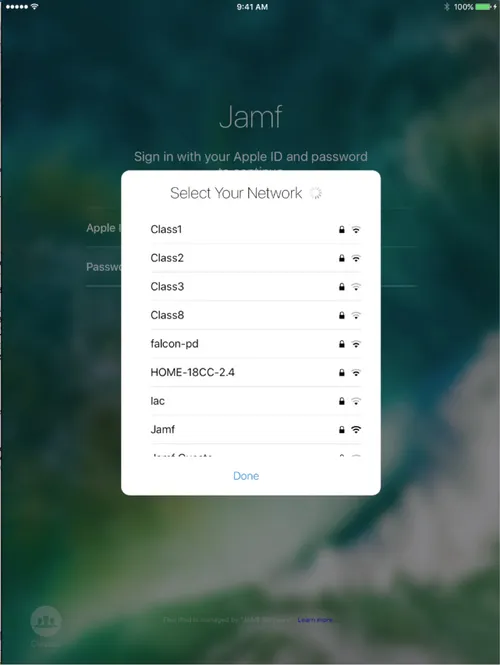
What if I am on a Shared iPad, but cannot connect to the network from the login screen?
To connect to a network, double-click the Home button and it’ll open a window for you to select a wireless network:
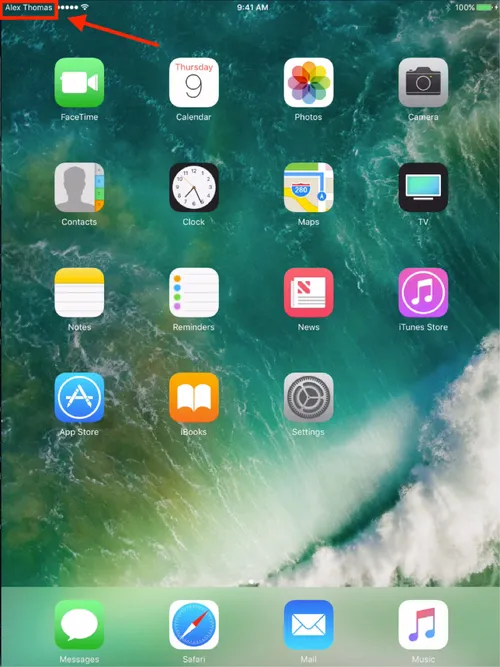
How do I know which user is logged into the Shared iPad?
You can see which user is logged in with the name in the top left corner:
A lot going on there, but hopefully not too much so you can continue to see the education benefits of Apple.
While these tutorials will help you troubleshoot many of the snafus you may run in to, I understand that not everything can be avoided. So when that time arrives, don’t hesitate to reach out to Jamf Support.
Subscribe to the Jamf Blog
Have market trends, Apple updates and Jamf news delivered directly to your inbox.
To learn more about how we collect, use, disclose, transfer, and store your information, please visit our Privacy Policy.