
Apple introduced Swift in 2014 with the goal of creating a new, modern programming language that was suitable for all Apple platforms — from watchOS to macOS — including additional platforms yet to come. In 2018, Apple also introduced SwiftUI, a Swift-native framework to build user interfaces.
As administrators, we need tools that provide access to system information and functionality but are also easy to create, manage and deploy. While some MacAdmins may consider Swift to be one of the more “complex” programming languages, it nevertheless has some definite strengths over languages considered “less complex”, such as shell scripting.
For starters, with SwiftUI, creating user interfaces is comparatively simple. Another strength of Swift and its frameworks is fetching and parsing data from web APIs. This combination makes Swift and SwiftUI a strong choice for tools and applications that interact with APIs, such as the Jamf Pro API.
Aside from SwiftUI, there have also been changes in recent updates to Swift, which make features like these more accessible to programmers and admins just getting started with the language. In this series of posts, I will show how you can build simple Swift tools and apps to interact with the Jamf Pro API.
What we will do
Goal: Build a command line tool that reads data from the Jamf Pro API.
A command line tool does not require much of a user interface, which means we can focus on the process of getting the data out of Jamf. We will also create code to get the API password out of the macOS Keychain. Also, the object-oriented nature of Swift allows us to reuse large swaths of code, which we will utilize for the command line tool when we build the SwiftUI application in a later tutorial.
What you will need
Basic understanding of Swift
You will need a basic understanding of programming concepts and Swift to follow this tutorial. Since it is beyond the scope of this series to explain Swift, I recommend great tutorials from Apple and third parties to help those who have little to no idea of programming or scripting in general
macOS Monterey (or newer)
This tutorial will use some features that were introduced in Swift 5.5, which is included with macOS Monterey. It will also use some SwiftUI features also introduced in macOS Monterey. While dropping support for Big Sur and older versions of macOS may not be possible for some MacAdmins, the features included with the newest version of macOS does simplify the code significantly.
Xcode 13 or newer
This goes together with the macOS Monterey requirement. You need Xcode 13 or higher to build against macOS Monterey. You can download Xcode from the Mac App Store or optionally from the downloads portal if you have an Apple Developer account.
API access to a Jamf Pro server
To use the Jamf Pro API, you need access to a Jamf Pro instance. In line with best practices, it is recommended you use a test environment and not your production server while learning. Jamf Cloud customers may request a free sandbox instance through their Customer Success team for testing and development.
You also need a Jamf Pro account for API access. Any account will do, but for security purposes, an API test account that is restricted to only read and update Computer and Category records is suggested.
Note: This tutorial will also not go into much depth about the Jamf Pro API and how it works. Jamf's Developer pages provide a wealth of documentation with plenty of sample code examples. Lastly, we will be exclusively using the Jamf Pro API, but the principles can also be used with the classic API for those that prefer that version instead.
Command Line Tool
The goal of our command line tool is simple: we want to list all the computers enrolled in the Jamf Pro server, together with their attributes, like the Device ID and the enrollment date. To achieve this, our tool will have to perform a few essential steps:
- use the username and password to get a Jamf Pro API authentication token from the API
- fetch a list of computers using the token
- convert the JSON data from the Jamf Pro API into Swift objects
- print the list of computers with their respective attributes
Note: The API account’s username and password will be stored in clear text within the code. This is not recommended as a best practice and, moving forward, we will add functionality to securely obtain the password from the user's Keychain in a future installment.
For the time being, be very aware of where your code is stored. Again, rather than using your main Jamf Pro account, I strongly recommend creating a restricted API user that both limits access to your Jamf Pro instance and may be easily deleted after you’re done with the tutorial.
Create the Xcode Project
1. Open Xcode and select create a new project. In the project template chooser, make sure you have selected macOS as the platform and choose “Command Line Tool”, then select the “Next” button.

2. In the next window, set the Project Name to "SwiftJamfAPI" and choose an identifier that matches your organization. These usually follow reverse DNS name notation, for example, com.example. The full identifier for the project will be generated and displayed below. Make sure Swift is chosen as the language and select the “Next” button to continue.
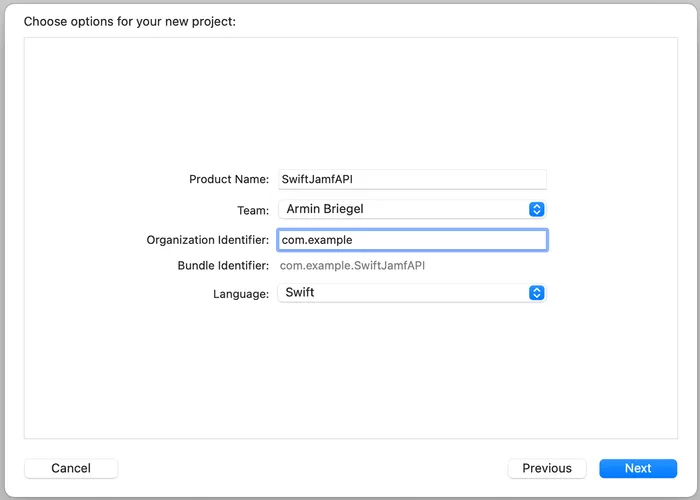
3. In the next dialog, choose the location for the project folder, then select the “Create” button. Then Xcode should display a project window like this:
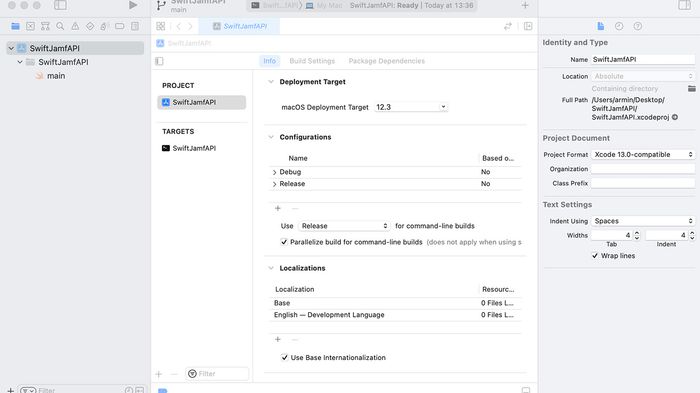
On the left, you see a list of project files. The template only contains one Swift file named “Main”. We will use this project to house all the software we will build in this tutorial. Doing so allows us to easily share code between the command line tool and application. There are a few configuration steps to get there, first.
4. In the center pane, you see an overview of your new Xcode project and its targets. We only have one target right now, but will add more later. Make sure the project with the blue icon is selected in the center pane and that the“macOS Deployment Target” is at least 12.0. Change the deployment target from the popup menu, when necessary.
5. The template sets the name of the command line tool to the project name, but we want it to be different. Select the target named “SwiftJamfAPI” with the black command line tool icon. You can double-click it to change the name to jamf_list. You can also change the name in the inspector area on the right of the window. This will be the name of the command line tool this target generates.
6. In the file list on the left column of the window, under the “SwiftJamfAPI” project (with the blue icon) there is a grey folder (Xcode calls these “groups”) with the same name. Select the group and change the name (either by double-clicking or in the inspector area on the right) to CLI Tool.
7. Next, select the file named “Main” in that grey folder and delete it, by either hitting the delete key or selecting “Delete” from its context menu. You will be prompted whether you want to move the file to the Trash or just remove the reference. Choose "Move to Trash."
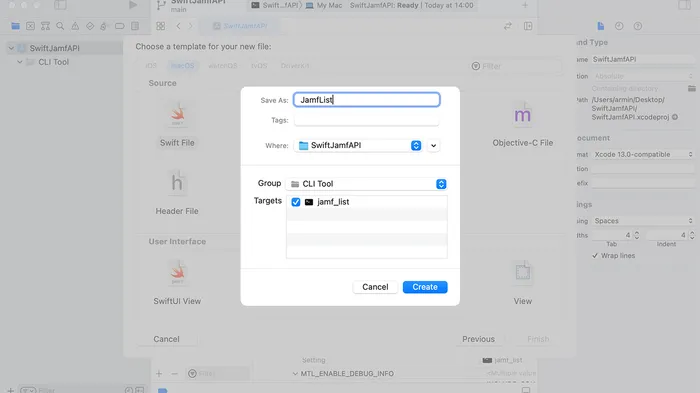
8. From the "File" menu, select "New" | "File…". The keyboard shortcut for this is ⌘-N. This will be useful to remember since we will do this often. In the template chooser, make sure “macOS” is selected at the top and choose “Swift File” in the top-left of the list. Click “Next” and name the new file JamfList. Select “CLI Tool” as the Group and make sure the checkmark next to the “jamf_list” target is enabled.
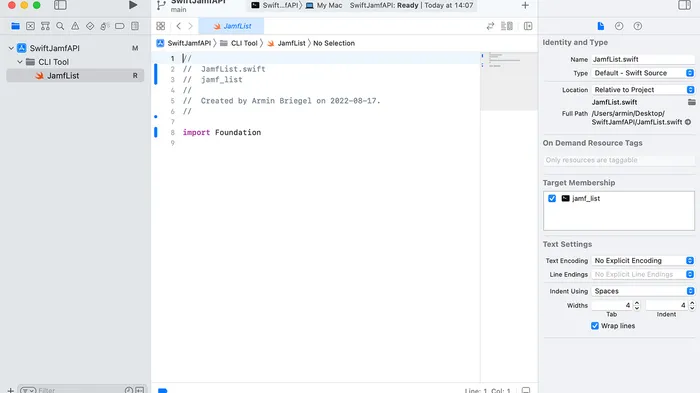
9. Xcode will prompt whether you want to create an Objective-C bridging header. Select “Don't Create”. Your project should now look like this:
Build the Command Line Tool
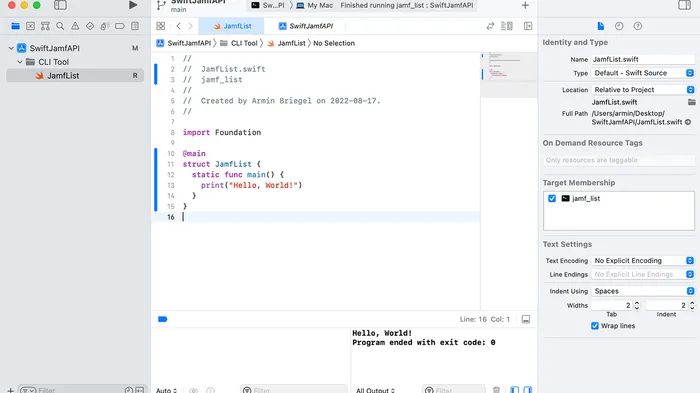
The new Swift file contains some comments and a single line of code: import Foundation. Add this code below the import line:
Then select the “Play” button in the toolbar (or select “Run” from the Product menu). This should build and run the command line tool. The first build will take longer than subsequent ones, so be patient. You can follow the progress in the status area in the top center of the project window.
Note: If the build process fails, an error was made along the way. Most often, something was mistyped in the code above. Read the error messages carefully, as they should give you an indication of where the error exists. If the error cannot be located, simply delete the project and start over.
When the build completes, Xcode will run your command line tool and a new display area will pop up from the bottom of the center pane. The right pane in the “Debug Area” will show the output of our code. It should show:
Pro Tip: There are small square icons at the top and lower left of the debug area that allows you to show and hide the various panes. If you are working on a small screen, it can be useful to adjust the panes to view more code. You can also show and hide the file list on the left and the inspector on the right with the icons in the toolbar at the top of the window to make more room for the code.
This may seem like a lot of effort to get a "Hello, World!", but now we are ready to dive into the fun part!
Jamf API Authentication Token
To reduce the risk of exposing the username and password within web traffic, the Jamf Pro API uses an authentication token. You get the token with a single basic authentication request and then use the token from then on.
The request to get the authentication follows the same pattern as all subsequent API calls:
- prepare the request
- send the request to the server and retrieve the data
- handle errors
- parse JSON data
Getting the API token is our first task. We will be able to reuse a lot of the code for subsequent API calls. In the JamfList code, select the line with the print command and replace it with:
This will declare the variables needed to connect to the Jamf Pro API. Replace the values with your specific account data.
Xcode will show yellow warning messages next to each variable, stating that this value was initialized but never used. Ignore these warnings for now. We will add the code using the values later. If you see other warnings, then you should read the message and address the issue. You can click on the icon next to a message to get more detail, and sometimes there is a “Fix” button in the message where Xcode attempts to correct the problem.
The // TODO: and // MARK: comments will be highlighted in bold by Xcode. These are special comment markers that you can use to better navigate your code.
Prepare the Request
Now we get to the code that does the actual work. We will add and explain it step by step. Add each piece of code to the main function as we explain it.
This takes the username and password variables we declared earlier, combining them into a string that is base64 encoded to be used for the initial authentication.
This uses the URLComponents object to build the URL for the authentication request from the server variable and the endpoint path. You can find endpoint paths for all API requests in the Jamf Pro API documentation.
The guard statements test for steps where the initialization of variables may fail and then we exit the tool with a non-zero exit value, which signifies a failure. This error handling is better than nothing, but still quite crude, we will improve on it later.
Send Request and get Data
These commands create and configure a URLRequest object. It sets the request method to POST and adds an “Authorization” header with the base64 string we created earlier.
When you add this code, Xcode will show a red error warning. This will be fixed later, ignore it for now.
This line is the key functionality for the API request. We use the URLSession object to get the data over an http(s) request that is defined with our URLRequest object, which contains the target URL, the method and the authentication data. If you have experience with doing API calls from shell scripts, this URLSession call is the equivalent of the curl command.
This particular URLSession functionality returns two pieces of information. First, the raw binary data is returned from the server. This would be the HTML content for a normal web page. For API requests, the data will usually be encoded as XML or JSON. The second piece of information is a URLResponse object which contains all the extra data associated with the response from the server.
The URLSession may fail at this point. The most common reason is that there is no network, among other reasons. URLSession will signal this to the calling code by throwing errors. The try? keyword tells the compiler to return nil values in case URLSession fails. The guard statement triggers on those nil values and exits the tool.
Concurrency
This leaves the explanation of the await flag. Requests to servers are exceptionally slow compared to other tasks in code. Because of this, URLSession is asynchronous, meaning that it is designed to run in parallel or concurrent to other tasks the process, app or system might need to do, such as update the user interface. When URLSession has the data and is complete, it will signal that to our code which will continue working with the data.
Earlier versions of Swift already allowed to build of concurrent code, but it required the programmer to split the code into different pieces, called code blocks or “closures”, that would run before and after the task was complete. This broke the code into pieces that do not appear in the execution order, making it harder to read, understand and therefore maintain.
Swift 5.5 was introduced in macOS Monterey and iOS 15 added the async and await notations. By adding the await flag before the command, we are telling the compiler to pause the code here and do other things, then resume here when URLSession is done. This results in more readable code, written in the sequence that it will be executed.
However, we need to tell the compiler which parts of our code might use this. We do this by adding the async keyword to functions and methods that either support this concurrency or use other functions that do. Since our main function calls the async URLSession function to fetch the data, we have to declare that as async, as well.
When you click on the red error next to the URLSession line, you will see that this is exactly what Xcode is complaining about. When you click the “Fix” button, Xcode will add the async keyword in the right place to our main function declaration.
The yellow warnings are, once again, telling us that we declared variables we are not using. You can ignore those as we will use them later in the code.
Handle Errors
The URLResponse object we get from the URLSession contains all the metadata from the server response, including the HTTP status code. We can check its value and exit when it’s not what we expect.
At this point, we can be sure we got data back from the API. If you wish to see it, we can add a line to print the data:
We now need to convert the data returned from the URLSession into a String object to print it. The conversion might fail, so we use the “nil coalescing operator” ?? to show a default string should that happen. Though it doesn’t always occur, the ability to see the errors introduced in the code can certainly save you time while sparing you from any headaches.
Build and run the code. You should see the JSON data in the output pane, it will look something like this, except the token string is much longer.
Parse JSON Data
We want to be able to use the token in our Swift code, so we need to convert or decode the JSON into a Swift object. The JSON data we get for the authentication has two entries: the token itself and the expiration date. We will need an equivalent Swift object.
- In Xcode, create a new Swift file by selecting File | New | File… and set its name to JamfAuthToken.
- Make sure the group is set to “CLI Tool” and the “jamf_list” target is checked. You will get the same empty file template as before. Add the following code below the import statement and save the file.
The code above is declaring this struct to implement the Codable protocol which enables and provides the functionality to create an object from JSON and vice versa.
Pro Tip: For greater insight into this process and encoding decoding of custom types for compatibility, Apple’s developer documentation is a treasure trove of detailed information and examples.
In the file list on the left, select the JamfList file and add the following code to the end of the main function: (You can comment on the print statement which shows the JSON.)
We create a JSONDecoder object to do the work for us. Since we want the date string from Jamf to be decoded as a Swift native Date we need to configure the decoder with the proper date formatted. Then we tell the decoder to decode the data we got from the URLSession into a JamfAuthToken.
Since the decoder may throw errors on decoding, we wrap the command in a try? and guard statement and exit if errors occur. When all goes well, we have a JamfAuthToken in our auth variable. The last two print statements will show the decoded properties of the input object.
Pro Tip: Tokens from Jamf expire after thirty minutes of being received. For the purposes of this tutorial, this is ignored in our tutorial code. However, according to best coding practices, a check of the expiration time should be performed along with a token renewal before the token times out. Additionally, best practices also recommend that tokens be invalidated once your code has completed running to prevent unauthorized reuse in replay attacks.
Getting Objects from Jamf
Now that we have the working code for getting the auth token, we can proceed to build the code to get the actual data. The code follows the same schema, except that you use the token for authentication and use a different endpoint.
Earlier I said that our ultimate goal will be to list the computers in Jamf Pro. However, the computer object is one of the most complicated objects in Jamf Pro. There are hundreds of fields and the JSON is nested into several dictionaries and arrays.
Pro Tip: You don't always have to write all of this Swift code to just see the JSON return for a specific API call. You can go to the URL of your Jamf Server with the path API, (i.e. https://jamf.example.com/api) to enter an interactive interface where you can test API calls and see the JSON result.
While it is possible to model even complex objects like this as Swift objects, this is not a good example for the first API call. Instead, we will focus on starting with a simpler object in the Jamf Pro API: Category.
In Jamf Pro, categories are used to, well, categorize items in long lists. Admins can customize the list of available categories and use them in different places in Jamf Pro and the Self Service app. You can access and manipulate categories with the API.
Comment or delete the last two print statements that show the token data and add this to the end of the main function:
This code will fetch and print the JSON data for categories in your Jamf. The JSON output will look similar to this:
As you can see, categories in Jamf Pro have three attributes: an ID, a name and a priority. This is a much simpler first example than all the data for a computer.
So far, so good
We have reached a point where we are getting the data we want. We are not yet really able to do anything with the data, but we will visit this in future installments.
For reference, here is the entire code of the JamfList.swift and the JamfAuthToken.swift files. You can also find the sample project as it exists thus far.
JamfList.swift
In part two, we will look in more detail at how we can decode the JSON object returned from the server.
Interested in taking your management workflows to a higher level?
Get to know Jamf Pro's API for greater flexibility and manageability than you thought possible.
Subscribe to the Jamf Blog
Have market trends, Apple updates and Jamf news delivered directly to your inbox.
To learn more about how we collect, use, disclose, transfer, and store your information, please visit our Privacy Policy.