
In part one of this technical series, we discussed building a Command Line Tool.
What we achieved so far
In the previous blog post, we discussed building a command line tool that fetches an authorization from Jamf Pro, ending with getting the JSON data for a Category request from the server.
We started with the Category object rather than the Computer object, because Categories are one of the simplest objects in Jamf, as opposed to Computers, which are one of the most complex.
You can get the code for the first part, to review or to use as a starting point.
In this post, we will tackle the task of modeling, decoding and using the Category in Swift, and then the more complex Computer object.
In part one of this series, we already decoded JSON to Swift for the JamfAuthToken object. The principle and workflow is the same for Category and, later, the Computer object, but there are a few differences.
Modeling a Category
To model the data for the Category object data in Swift, we need three properties we see in the JSON code.
1. In Xcode create a new Swift file with the name "Category" and add the following code, below the "import" statement:
However, when you look closely at the JSON returned from the Jamf Pro API, you will see that it actually contains an array or list of Category objects in the "results" key, together with a "totalCount" property.
2. We need another structure to model this. Add the following at the end of the Category file:
In general, it is recommended to create a separate file for each object in Swift. However, I find it convenient to combine objects that are this closely related and have to work together this way in a single file. Later, we will re-engineer much of this code anyway.
This provides the information required for JSONDecoder to decode the data from the API call. It knows it should expect an integer number for the count and an array of objects with the structure of a "Category." The JSONDecoder then will decode each item in the list to a Category object. Let's try this.
3. Return to the JamfList file, comment or delete the last "print" statement and append this to the end of the "main" function:
This will print something like:
This may seem deceptively simple. Let us take a close look at what is happening here.
We tell the "decoder" object (which is a JSONDecoder) to decode the data we got from the URLSession call into a new "CategoryResults" object. During the decoding process, the JSONDecoder will "find" the list of Category data in the data and decode them into a Swift array of "Category" objects in the "results" property of the CategoryResults object.
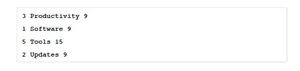
That means that we can get a list of Category objects from the "result" object returned by the "decoder" and loop through them. And each Category object will have an "id," a "name," and a "priority" property.
Printing the list to the screen requires merely a "for" loop with a "print" statement:
This completes our goal of creating a command line that lists Category objects.
Modeling a Computer
Now that we have the simpler Category data working, we can take a look at the Computer data.
1. In the JamfList file, remove all the code below and including the "//MARK:GetCategories" line and replace it with this:
When you compare the code with what we used to get the list of Category objects, you will see that most of it is the same, except for the line that adds the endpoint path to the URLComponents. The part which decodes the JSON is also missing, since we have not yet modeled Computer objects in Swift.
When you run this, it will print the JSON returned for Computer objects.
It starts like this:
Then there follows a lot of data for the first computer and for each computer in the list.
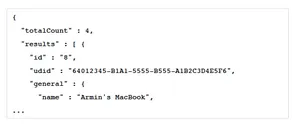
When we look at the JSON, we see that the data for all the computer records is also wrapped in a results list, like the categories were. When we look at the individual computer data, we see attributes for "id" and "udid" and then a sub-dictionary or sub-section called "general" with more data.
First, some good news: The Swift decoding tools can only partially decode the JSON. JSONDecoder does not care about attributes in the JSON that are not in the Swift model. The extra JSON data is simply ignored. That means we can build a Swift model which only represents the data we are interested in.
Let's start with a minimal Swift Computer object that just contains the "id" and the "name":
2. In Xcode, create a new Swift file and name it "Computer." Add the following code below the "import" statement:
3. Then add this code which parses the JSON data to the end of the "main" function in the "JamfList" file:
This will list the computers in the Jamf Pro server.
(Note: the Jamf Pro API has a feature called "paging" that will only return a certain number of records at a time, so as not to overwhelm the server or the client when there are large data sets in play. We are not going to tackle working with these large data sets in this tutorial.)
We modeled the "general" sub-dictionary for the JSONDecoder by creating a "sub" "struct" inside the "Computer" struct. When the decoder sees the "general" dictionary in the JSON, it will know to map it to the "general" property. The contents of the general property are modeled by the properties of the "General" sub-struct.
The JSONDecoder only decodes the information the properties in the "Computer" and "General" structs require. Everything else in the JSON data is ignored. This allows us to build the structs and classes in Swift incrementally and only decode what we need, even when the JSON data is very complex.
More attributes
When we look at the JSON, there are a few more things in the "general" section that we might be interested in, such as "assetTag" (a field where a custom asset tag number can be tracked), "lastEnrolledDate" (when the device was enrolled), and "userApprovedMdm" (a boolean). Depending on your use case, you may be interested in other data, but these will do as an example.
The "assetTag" value may be empty. In this case the JSON value for it may be "null" (note the lack of quotes) or the attribute might be entirely missing from the JSON. In Swift, these "nullable" values are represented by optionals. The decoder will set them to "nil" when the JSON value is "null" or when the attribute does not exist at all in the JSON data. Using optionals in the Swift gives us flexibility to deal with nullable or unreliable JSON data in a "Swift-y" way.
1. Extend the "General" struct in the "Computer" file with these three properties:
To decode the date string to a proper Swift Date object, the JSONDecoder needs to know in which format the date is stored. We use a DateFormatter object which matches the Jamf Pro API date format.
2. In the JamfList file, add these lines after the "MARK: Parse JSON Data" line, and before the "guard"ed decode statement:
3. Then extend the "print" statement in the loop with the new data:
The JSONDecoder maps not just the text values to the Swift String properties, but also maps Integers, optionals, dates (using the provided date formatter) and boolean values. It also works through lists and dictionaries.
Once you have the Swift objects modeled the right way, you can mostly "forget" about the JSON and just use the Swift objects.
Even more data
If you are familiar with Jamf Pro, you may have noticed there is more information in the Jamf Pro web interface, that we do not see in the JSON output. When we look in the Jamf Pro API documentation for the "computers-inventory" API call, we see that we can add query strings to the endpoint URL to get more subsections. For our example, the "Hardware" and "OperatingSystem" sections have interesting data.
Since we are using the URLComponents object to assemble the request URL, it is easy to add queries to it.
1. Modify the "Prepare Request" section after the "MARK: Get Computers," up to but not including the "MARK: Send Request and get Data" line, like this:
When you run this code, the "print" statement will show the URL string assembled from the components.

Note that we did not have to worry about the proper separation characters in the query. The URLComponents object did the right thing. If characters in the query require escaping, URLComponents takes care of that as well.
Using URLComponents to assemble the request URL made our code a little more complex in the beginning, but it is paying off now.
2. You can comment the URL "print" statement, and un-comment the "print" statement that shows the JSON output before decoding to verify that the JSON now contains the "general," "hardware" and "operatingSystem" sections. With the extra data present in the JSON, we can now add more sections and attributes to the "Computer" struct:
3. Now you can change the "print" statement in the loop to show some new data:
We have reached a point where we have the functionality for the command line tool that we set out for. You can find the sample code for what we completed in this part here.
However, there are some things we can and should do to clean up our code to make it more re-usable and readable. We strive for re-usability and readability not for aesthetic reasons, but because it reduces the effort of maintaining the code going forward.
In part three, we will clean up clode and create a Swift protocol, which can be used for other objects in the Jamf Pro API as well.
Want to take your management workflows to the next level?
Subscribe to the Jamf Blog
Have market trends, Apple updates and Jamf news delivered directly to your inbox.
To learn more about how we collect, use, disclose, transfer, and store your information, please visit our Privacy Policy.