

Whether you’re moving to a new server or setting up a development and/or QA server, you’ll need to start populating them with data. This can be accomplished by either individually enrolling devices, manually creating policies, profiles, etc… or by importing the data. If you’ve set up a server before, you’re likely familiar with the tedious process of adding data manually so let’s look at how you can import data.
Two options exist for importing data: directly importing into the database or utilizing an API. Importing directly into the database should only be used if you have a complete and healthy Jamf Pro server database to import. Importing sections or individual items can result in an unstable or unusable server. An API on the other hand provides great flexibility, convenience and safe guards for importing data.
Getting Started
As mentioned earlier, importing directly into MySQL is useful for a full import of all data:
mysql -u root -p jamfsoftware < ../jamfsoftware.sql
The import has little flexibility as to what is imported but provides a quick way to populate the database. Be aware that any existing data will be overwritten by the import. Utilizing the API allows you to retain existing data while importing new data or modifying existing data. This is ideal for environments where you develop and test on one server, then once things are ready, migrate the item(s) to another. You can view endpoints available in the API by browsing to:
https://your.jamf.server:port/api
To begin, let’s add a category to the database using bash:
curl -sku apiUser:password https://your.jamf.server:port/JSSResource/categories/id/0 -d "<?xml version='1.0' encoding='UTF-8'?><category><name>Security</name><priority>9</priority></category>" -X POST -H "Content-Type: application/xml"
Breaking down the command:
curl - the binary that submits data to the endpoint.
-s - run silently, don’t display progress.
-k - ignore certificate validation.
-u - credentials used to connect to the server. If the password is not provided you will be prompted.
-d - the data that will be sent.
-X - the operation to perform. The most common being: POST (create new), PUT (update existing), GET, DELETE.
-H - format of the data and whether we’re sending or receiving.
-v - Not used here, but will provide verbose output. Handy for troubleshooting.
When creating new objects, always specify an id of 0 (zero).
https://your.jamf.server:port/JSSResource/categories/id/0
Upon successful completion of the command, the server will reply with something similar to the following:
<?xml version="1.0" encoding="UTF-8"?><category><id>23</id></category>
Updating an existing item can be performed by referencing either the object name or ID. I prefer to reference the object by ID as it is always unique. Computers and policies for example can have duplicate names. If trying to reference the object by name, there is no guarantee you’ll update the one you’re interested in, if duplicates exist. To update the category you just created from ’Security' to ‘Security - macOS’, leave the priority as it is:
curl -sku apiUser:password https://your.jamf.server:port/JSSResource/categories/id/23 -d "<?xml version='1.0' encoding='UTF-8'?><category><name>macOS - Security</name></category>" -X PUT -H "Content-Type: application/xml"
Stepping it Up
Let’s look at adding something a little more complex, printers for example. Previously, with categories, you only needed to provide a name for the object and had the option to provide a priority. With printers you have a name, category, URI, CUPS name, location, along with several other attributes available. To get an idea for what the structure of the XML needed to add a printer is, let’s visit the Jamf developer portal at http://developer.jamf.com/apis/classic-api/index and navigate to the POST method within the “printers” resource.
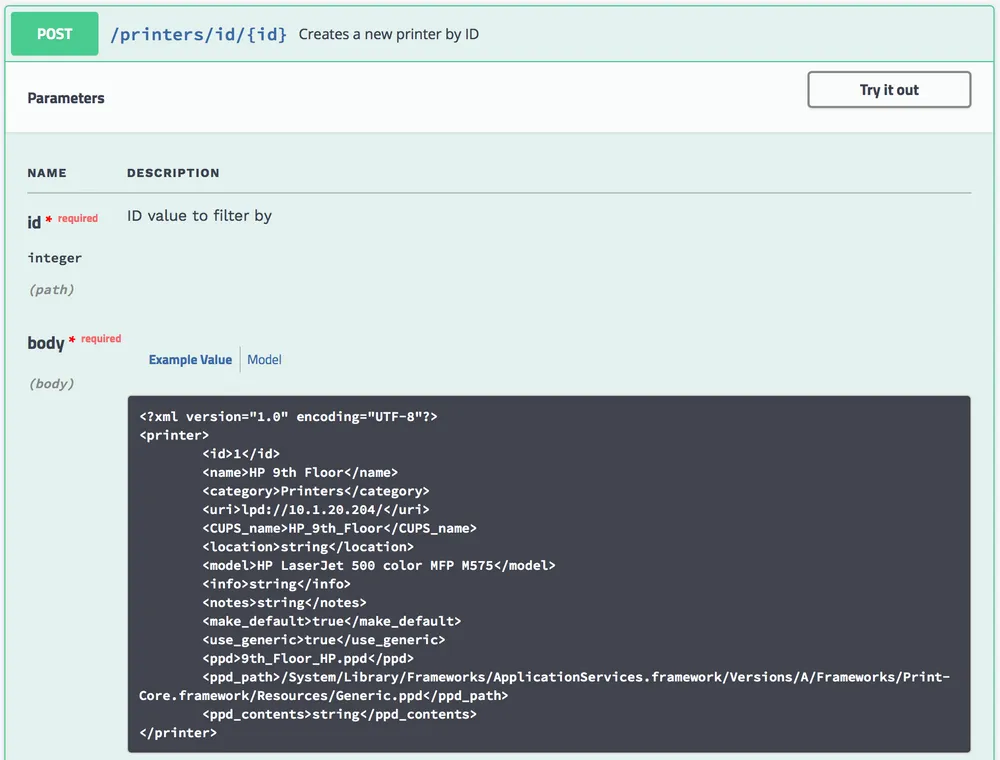
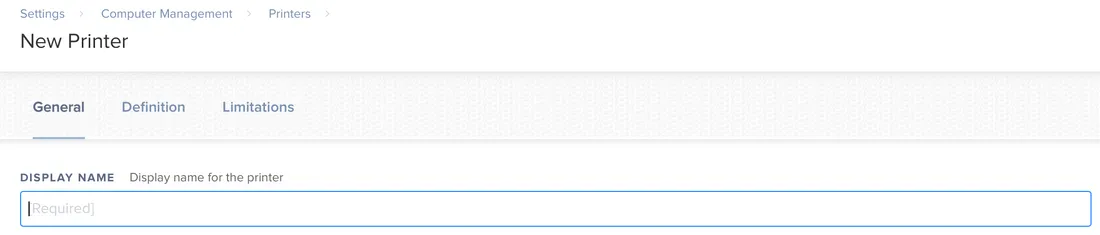
Note all the fields required when creating a new printer object. Looking at the Jamf server GUI when creating a printer will help identify the required fields:

Next, you’ll create a spreadsheet containing the information for your printers. Be sure to save the spreadsheet with line endings appropriate to the OS, and as plain text. At the very least you need the display name for the printer, CUPS (queue) name for the printer, and device URI. See example here: https://github.com/BIG-RAT/addPrinters/releases/download/current/printers.csv
You’ve added a few extra bits of information along with the required fields. One important note, as you’ve included a category called Printers, that category must exist prior to adding the printers to the Jamf Server. Now, let’s build a script to import the information, the path to the file containing your printer information will be passed as an argument to the script.
Let's start with a little help on how to run the script. If the data file is not provided you will provide some usage information:
 if [ "$1" = "" ];then
 echo "Usage:"
 echo " /path/to/createPrinters.sh /path/to/printers.csv"
 exit
fi
Verify the file provided is accessible:
 if [[ ! -f $1 ]];then
 echo "unable to locate data file: $1"
 exit
fi
Next prompt for credentials used to create the printers:
 echo -n "Jamf Server Admin: "
 read uname
echo -n "Password for ${uname}: "
 stty -echo
 read passwrd
 stty echo
echo
Create an endpoint used to test authentication:
endpointUrl="https://your.jamf.server:port/JSSResource/printers"
Test authentication:
 result=$(curl -w " %{http_code}" -m 10 -sku "${uname}":"${passwrd}" ${endpointUrl} -X GET -H "Accept: application/xml")
statusCode=$(echo $result | awk '{print $NF}')
if [[ $statusCode = "401" ]];then
 echo "Incorrect username and/or password."
 exit 0
fi
Set the URL so that you can create new objects:
endpointUrl="${endpointUrl}/id/0" Loop through the file capturing the attributes you'll be setting, create the XML to create the printer, and POST the XML.
 while read printer;do
name=$(echo $printer | awk -F',' '{ print $1 }')
if [[ -z $name ]];then
echo "missing printer name: ${printer}"
echo
continue
fi
category=$(echo $printer | awk -F',' '{ print $2 }')
uri=$(echo $printer | awk -F',' '{ print $3 }')
if [[ -z ${uri} ]];then
echo "missing printer URI: ${printer}"
echo
continue
fi
cups_name=$(echo $printer | awk -F',' '{ print $4 }')
if [[ -z ${cups_name} ]];then
echo "missing CUPS name (queue name): ${printer}"
echo
continue
fi
model=$(echo ${printer} | awk -F',' '{ print $5 }')
default=$(echo ${printer} | awk -F',' '{ print $6 }')
printerXml="<?xml version='1.0' encoding='UTF-8'?>\
<printer>\
<name>${name}</name>\
<category>${category}</category>\
<uri>${uri}</uri>\
<CUPS_name>${cups_name}</CUPS_name>\
<model>${model}</model>\
<make_default>${default}</make_default>\
</printer>"
result=$(curl -sku "${uname}":"${passwrd}" ${endpointUrl} -X POST -H "Content-Type: application/xml" -d "${printerXml}")
if [[ $(echo $result | grep 'technical details') = "" ]];then
echo "created printer: ${name}"
else
echo "***** failed to create printer: ${name}"
echo "$result"
echo
fi
done << EOL
$(cat "${1}")
EOL
Putting all together we have:
 #!/bin/bash
if [[ $1 = "" ]];then
echo "Missing data file."
echo "Usage: /path/to/createPrinters.sh /path/to/printers.csv"
exit
fi
if [[ ! -f $1 ]];then
echo "unable to locate data file: $1"
exit
fi
echo -n "Jamf Server Admin: "
read uname
echo -n "Password for ${uname}: "
stty -echo
read passwrd
stty echo
echo
## url used to test authentication
endpointUrl="https://your.jamf.server:port/JSSResource/printers"
## test authentication
result=$(curl -w " %{http_code}" -m 10 -sku "${uname}":"${passwrd}" ${endpointUrl} -X GET -H "Accept: application/xml")
statusCode=$(echo $result | awk '{print $NF}')
if [[ $statusCode = "401" ]];then
echo "Incorrect username and/or password."
exit 0
fi
## set the url so that we can create new objects
endpointUrl="${endpointUrl}/id/0"
while read printer;do
name=$(echo $printer | awk -F',' '{ print $1 }')
if [[ -z $name ]];then
echo "missing printer name: ${printer}"
echo
continue
fi
category=$(echo $printer | awk -F',' '{ print $2 }')
uri=$(echo $printer | awk -F',' '{ print $3 }')
if [[ -z ${uri} ]];then
echo "missing printer URI: ${printer}"
echo
continue
fi
cups_name=$(echo $printer | awk -F',' '{ print $4 }')
if [[ -z ${cups_name} ]];then
echo "missing CUPS name (queue name): ${printer}"
echo
continue
fi
model=$(echo ${printer} | awk -F',' '{ print $5 }')
default=$(echo ${printer} | awk -F',' '{ print $6 }')
printerXml="<?xml version='1.0' encoding='UTF-8'?>\
<printer>\
<name>${name}</name>\
<category>${category}</category>\
<uri>${uri}</uri>\
<CUPS_name>${cups_name}</CUPS_name>\
<model>${model}</model>\
<make_default>${default}</make_default>\
</printer>"
result=$(curl -sku "${uname}":"${passwrd}" ${endpointUrl} -X POST -H "Content-Type: application/xml" -d "${printerXml}")
if [[ $(echo $result | grep 'technical details') = "" ]];then
echo "created printer: ${name}"
else
echo "***** failed to create printer: ${name}"
echo "$result"
echo
fi
done << EOL
$(cat "${1}")
EOL
Running the script (make sure it's executable: chmod +x /path/to/addPrinters.sh):
 $ /path/to/addPrinters.sh /path/to/printers.csv
Jamf Server Admin: jpsadmin
Password for jpsadmin:
created printer: 3rd Floor Xerox
created printer: 2nd Floor HP MFP
created printer: Brother MFC-L5850DW series
created printer: Lobby
Now, what if you forgot to create the Printers category before running the script? You should see a reference to the cause of the error in the result of the curl command:
 <html>
<head>
<title>Status page</title>
</head>
<body style="font-family: sans-serif;">
<p style="font-size: 1.2em;font-weight: bold;margin: 1em 0px;">Conflict</p>
<p>Error: Problem with category name</p>
<p>You can get technical details <a href="http://www.w3.org/Protocols/rfc2616/rfc2616-sec10.html#sec10.4.10">here</a>.<br>
Please continue your visit at our <a href="/">home page</a>.
</p>
</body>
</html>
You could say the creation of the printer object (may) depend on the existence of the category object. May depend, since you can create a printer object, with no category assigned, regardless as to whether or not categories are created. It is, however, nice to know what object you should create first, to avoid potential issues later on. In general, start with shared objects, those not tied to only macOS or iOS. By ranking objects with the fewest, or no, dependencies to those with the most, you'll have something like the following:
Shared:
 Sites
User Extension Attributes
LDAP Servers
Users
Buildings
Departments
Categories
Jamf Users
Jamf Groups
Network Segments
Advanced User Searches
User Groups
macOS:
File Shares (AFP/SMB)
Directory Bindings
Dock Items
Computers
Software Update Servers
Netboot Servers
Extension Attributes
Scripts
Printers
Groups
Restricted Software
Configuration Profiles
Packages
Advanced Searches
Configurations
Policies
iOS:
Extension Attributes
Devices
Groups
Advanced iOS Searches
Configuration Profiles
Another issue you might run into is where the object (printer) already exists. Again, you will see a reference to the issue in the result of the curl command:
 <html>
<head>
<title>Status page</title>
</head>
<body style="font-family: sans-serif;">
<p style="font-size: 1.2em;font-weight: bold;margin: 1em 0px;">Conflict</p>
<p>Error: Duplicate name</p>
<p>You can get technical details <a href="http://www.w3.org/Protocols/rfc2616/rfc2616-sec10.html#sec10.4.10">here</a>.<br>
Please continue your visit at our <a href="/">home page</a>.
</p>
</body>
</html>
Pick a Language
Prefer to script in a language other than bash? You’re in luck! Python, Java and PowerShell to name a few all support working with the API.
For example, using this PowerShell script you can create the same printers. Say you have both the PowerShell script and data file in D:\api, you run the script similar to what you did with the shell script. Before running you need to modify the file for your environment. Locate line 100 and set $endpointUrl to the server in your environment:
 $endpointUrl = "https://your.jamf.server:port/JSSResource/printers"
Now run the script from the PowerShell command prompt:
D:\api\appPrinters.ps1 D:\api\printers.cvs
The script will bring up a dialog box prompting for credentials:

Provide appropriate Jamf Pro credentials and the results should be similar to what you saw earlier, provided the printers don't already exist.
 cmdlet Get-Credential at command pipeline position 1
Supply values for the following parameters:
added printer: 3rd Floor Xerox
added printer: 2nd Floor HP MFP
added printer: Brother MFC-L5850DW series
added printer: Lobby
As a final example, you might find it useful to have a script that is cross platform, say in Java. Let's take this Java script, compile it and run it. Before compiling, you need to modify the file for your environment. Locate line 93 and set endpointUrl to the server in your environment:
endpointUrl = new URL ("https://your.jamf.server:port/JSSResource/printers/id/0"); First, you'll change your present working directory to the directory you've saved the addPrinters.java script, then compile:
workstation $ javac addPrinters.java
This will create a file called addPrinters.class in the same directory as the .java file. Now you'll execute the addPrinters file (leaving off the extension):
 workstation $ java addPrinters /path/to/printers.csv
Jamf Admin Username: jpsadmin
Password for jpsadmin:
created printer: 3rd Floor Xerox
created printer: 2nd Floor HP MFP
created printer: Brother MFC-L5850DW series
created printer: Lobby
workstation $
Note, this was only tested using java 8.
In Conclusion
The API provides a safe, easy and flexible way to add data to your Jamf Pro server. Although the API doesn't provide access to all the settings available in the GUI, there is a tremendous amount of work you can do with it to save yourself from repetitive tasks.
You can find all the scripts and sample data file here.
Not already a Jamf Pro customer?
Take our best-of-breed Apple management solution for a free test drive and start putting these workflows in place.
Subscribe to the Jamf Blog
Have market trends, Apple updates and Jamf news delivered directly to your inbox.
To learn more about how we collect, use, disclose, transfer, and store your information, please visit our Privacy Policy.