

Jamf Blog has maintained a series of posts for the past few years titled “Reinstall a clean macOS with one button”. The idea for reinstalling a clean operating system was born out of an axiom administrators have followed which is to always erase and reinstall computer drives before repurposing them, preparing to retire them, or when troubleshooting has failed.
Apple is practically eliminating this need to erase and reinstall everything and replacing it with just needing to erase the data — leaving the operating system behind. If that makes administrators or security professionals a little queasy, that’s understandable. They’ve been following this erase/reinstall practice since the computer started taking a permanent place on the desktop in the 1990s.
However, “because that’s the way it’s always been done” isn’t a reason to avoid this new feature that only came to macOS last year with Monterey. Let’s review:
- How Erase All Content and Settings works
- The road to Erase All Content and Settings on macOS
- The security of Erase All Content and Settings
- Running Erase All Content and Settings
- When we may still need to completely erase and install
Our goal should be to move the practice of erasing the entire Mac disk to its own little isolated island in the middle of the Dead Sea.
How Erase All Content and Settings works
For more than a dozen years — at least since the iPhone 3 — iOS has supported Erase All Content and Settings. Apple designed this feature from the ground up to be a secure method for resetting an iPhone without having to reinstall iOS. Remember, the iPhone was a consumer product first, and Apple needed to make this process consumer friendly.
They did two things.
First, the data storage on iPhone has always been encrypted. Adding a PIN code gave the consumer a means to decrypt the device for use and a way to protect their data when not in use. But Apple never gave the consumer direct access to the iOS operating system itself. It couldn’t be altered.
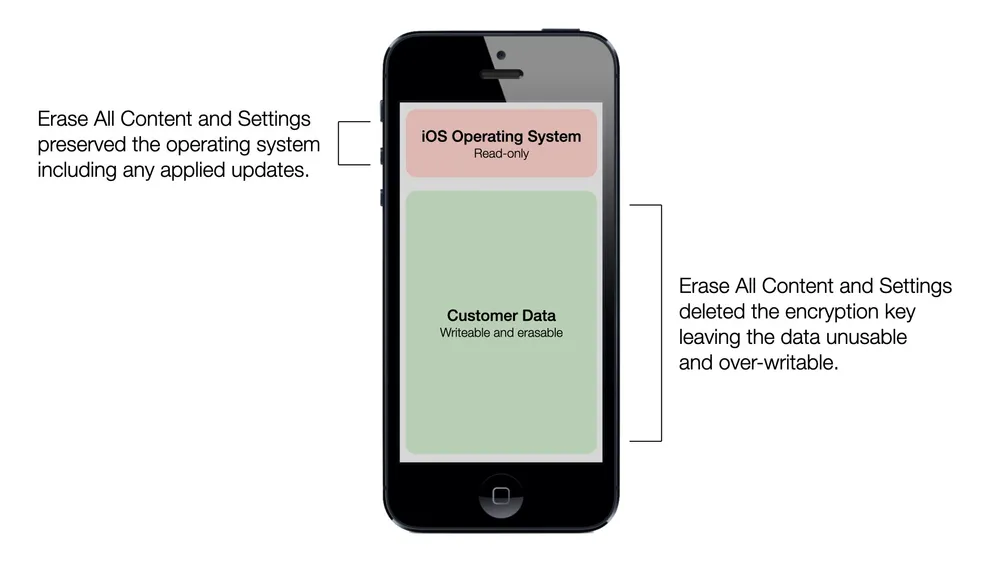
Next, the iPhone storage was partitioned into a read-only operating system partition and a writeable data partition. The operating system partition only changed when applying an update. It remained read-only and unchangeable during normal use.
When the consumer was ready to sell their iPhone or maybe hand it over to a family member to use, the Erase All Content and Settings feature simply deleted the encryption key to the data partition and left the operating system partition alone. The benefit was speed and convenience. The operating system was always there and didn’t need reinstalling, and it was as up-to-date as the last update applied.
The road to Erase All Content and Settings on macOS
The Mac, though, didn’t have this speedy and convenient option until very recently. That’s because it had to go through a series of major changes over time to match the level of security built into iOS from the start.
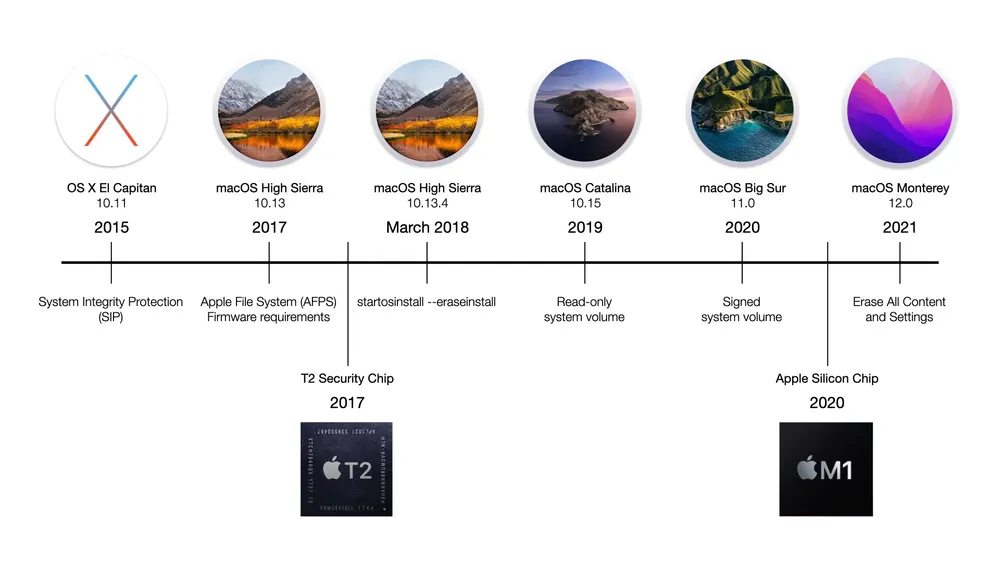
The line where the transition began is blurry, but a good place to start is with OS X El Capitan 10.11, which is when Apple introduced System Integrity Protection (SIP). SIP was the beginning of protecting the Mac operating system from external threats like malware, or even administrators, by removing their ability to modify it directly. Doing so required them to now boot to the Recovery HD to disable SIP first. And this could only be done by a human sitting in front of the computer.
Over the next several major releases, more and more of the operating system fell under SIP. To further increase security, Apple introduced its Apple File System (APFS) with macOS High Sierra 10.13, setting the stage for some major under-the-hood changes with how it could handle data on the drive. And it tied the operating system to specific hardware models by requiring firmware. That installation process required an Internet connection to download the machine-specific firmware version.
Apple introduced another new security feature starting in 2017 that was specific to the hardware not the operating system — the T2 security chip. This chip along with the Apple Silicon chip introduced in late 2020 became important for securing macOS installs. Just like iOS devices were encrypted out-of-the-box, these chips enabled Mac disks to be encrypted out-of-the-box.
In March 2018, Apple introduced the startosinstall command in its macOS High Sierra 10.13.4 installer. It included an --eraseinstall option for completely erasing the operating system on a disk (plus its user data ) and then installing a clean macOS. Because startosinstall was a command line tool, it was easy to remotely invoke on Macs. No longer did a technician need to sit in front of the computer and boot it to an external drive to prepare it for something else.
MacOS Catalina 10.15 started the process of dividing the computer’s disk into the read-only operating system and writeable user data partition. This was the first obvious sign that Erase All Content and Settings was coming. It also laid the groundwork for macOS Big Sur 11.0 to introduce signing for the system volume, which goes through a rigorous checksum validation process at both installation and each boot to ensure its integrity.
Finally, when all the pieces were in place, macOS Monterey introduced Erase All Content and Settings to the Mac. The new process was a speedy 4-5 minutes compared to using the startosinstall command with the --eraseinstall option, which could take 20 minutes on a fast Mac or longer depending on the model.
The security of Erase All Content and Settings
A local computer admin can invoke Erase All Content and Settings. It does several things:
- Signs the end user out of all Apple services, such as iCloud
- Removes fingerprints from Touch ID
- Unpairs Bluetooth accessories
- Turns off Find My Mac and Activation Lock
- Erases apps, data, and user settings
- Erases all other volumes including system volumes using BOOTCAMP
Similarly, sending the EraseDevice command from a Mobile Device Management (MDM) server like Jamf Now, Jamf Pro or Jamf School, will invoke Erase All Content and Settings on macOS Monterey and Ventura computers instead of wiping the entire drive.
The first thing Erase All Content and Settings will do is verify the operating system hasn’t been modified or corrupted. How does it know?
This is where the T2 or Apple Silicon chip becomes important. Each chip contains an area called the Secure Enclave. The Secure Enclave stores a cryptographic key that’s specific to each Mac. That cryptographic key is what allows the computer to unlock the signed system volume. (Remember, the system volume is encrypted out-of-the-box.)
If the cryptographic key doesn’t match the signed system volume, Erase All Content and Settings will display an alert indicating the macOS needs reinstalling. It won’t allow a modified or “corrupt” macOS system to remain on the computer. And the only way to get a new operating system is from Apple.
But what stops an admin from installing their own modified operating system? It’s still possible, but only when the security of the Mac has been lowered from Full Security to Permissive Security (Apple Silicon) or No Security (Intel). This type of security is intended for developers who need to test low-level software.
Erase All Content and Settings then does one more very important task. If the security level of a Mac was lowered from Full Security to a lower security setting, it’ll reset the level to Full Security, restoring all the security mechanisms from the Secure Enclave and the cryptographically signed system volume.
To verify the security level of any Intel or Apple Silicon Mac using Jamf Pro, navigate to the computer record and select Inventory > Security. Alternatively, create an advanced computer search or smart computer group with the Secure Boot Level criterion to create a list.
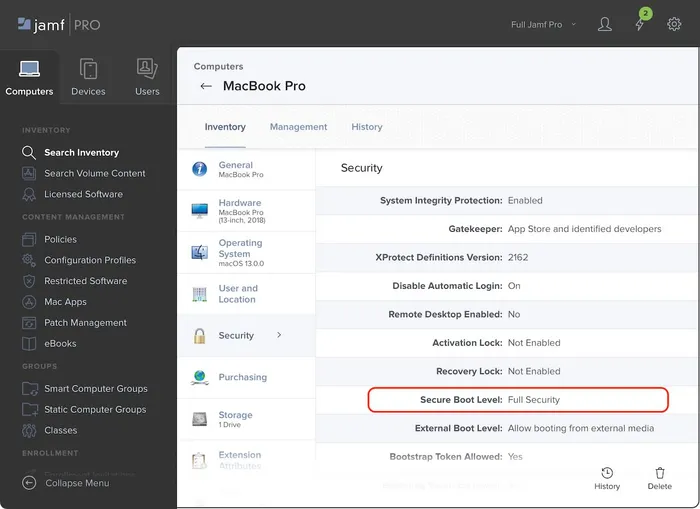
Just know that even if Jamf Pro reports reduced security, simply running Erase All Content and Settings or the EraseDevice command successfully will restore the Mac to its most secure settings prior to preparing it for another purpose.
Running Erase All Content and Settings
An end user can run Erase All Content and Settings directly from the computer itself or an MDM administrator can send the EraseDevice command to one or more computers. Both have the same requirements:
- Intel computers must have a T2 security chip
- All Apple Silicon computers support Erase All Content and Settings
- The computer must be running macOS Monterey 12.0 or newer
- If running the command from the computer itself, the current login account must be an admin and have the necessary credentials to sign out of iCloud
To run the command on macOS Ventura, open System Settings (formerly System Preferences) > General > Transfer or Reset and click Erase All Content and Settings. The Erase Assistant first prompts for administrator credentials to continue.
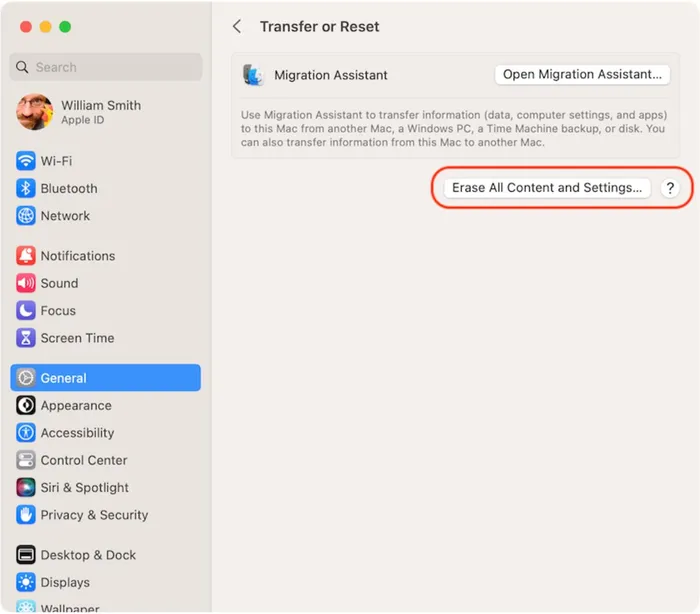
The Erase Assistant will then provide a summary of what’s about to happen.

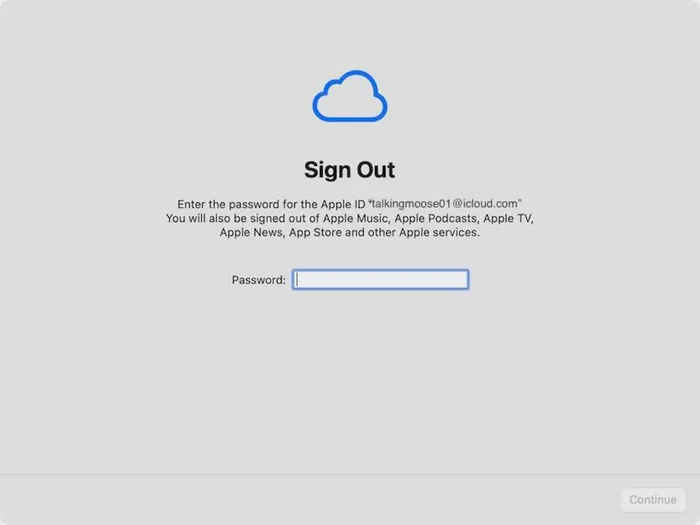
If the computer is connected to iCloud, the administrator is prompted for the password of the account’s Apple ID.
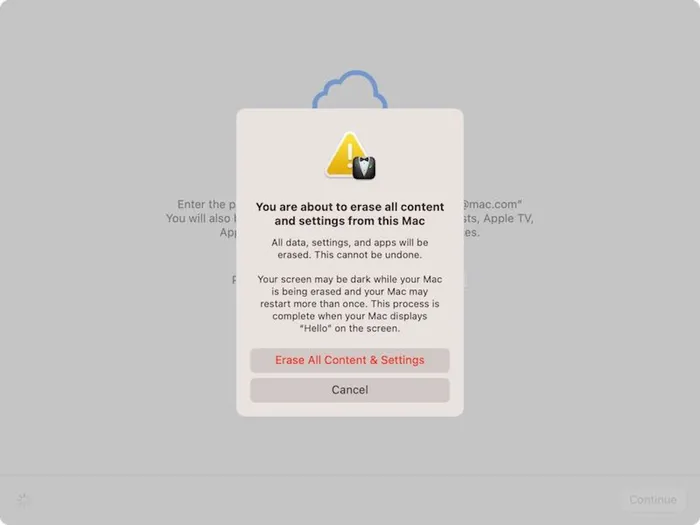
After authenticating, the end user is given one last warning that all data, settings, and apps will be erased and that it cannot be undone.
The computer will restart temporarily into the Recovery Assistant to Activate the Mac. It’ll restart again in about 60 seconds if the end user takes no action. Again, during this process, the Mac is using the cryptographic key stored in the Secure Enclave to verify the integrity of the installed macOS and, if necessary, returning its security level to Full Security.
If the end user sees “Hello” appear in multiple languages after about 4-5 minutes, the computer has effectively been restored to out-of-the-box settings with Full Security enabled. If instead they see a message that macOS must be reinstalled, the current system was found corrupt. They can proceed through the Recovery Assistant to download and install a pristine macOS system.
But what happens if an MDM administrator sends an EraseDevice command while the computer is signed in with an iCloud account?
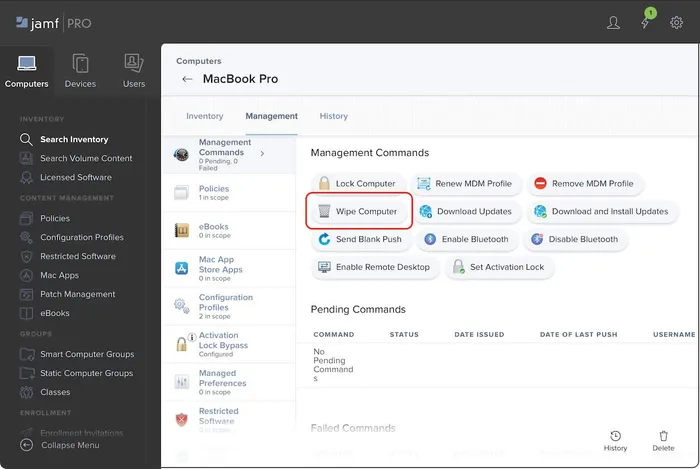
First, to send the EraseDevice command to just one computer from Jamf Pro, navigate to the computer record and click Management > Management Commands > Wipe Computer. If the computer supports Erase All Content and Settings (see the criteria listed earlier), it’ll proceed with erasing just user data and settings. But be careful. The same button will erase everything (operating system, user data and settings) on computers that don’t support Erase All Content and Settings.
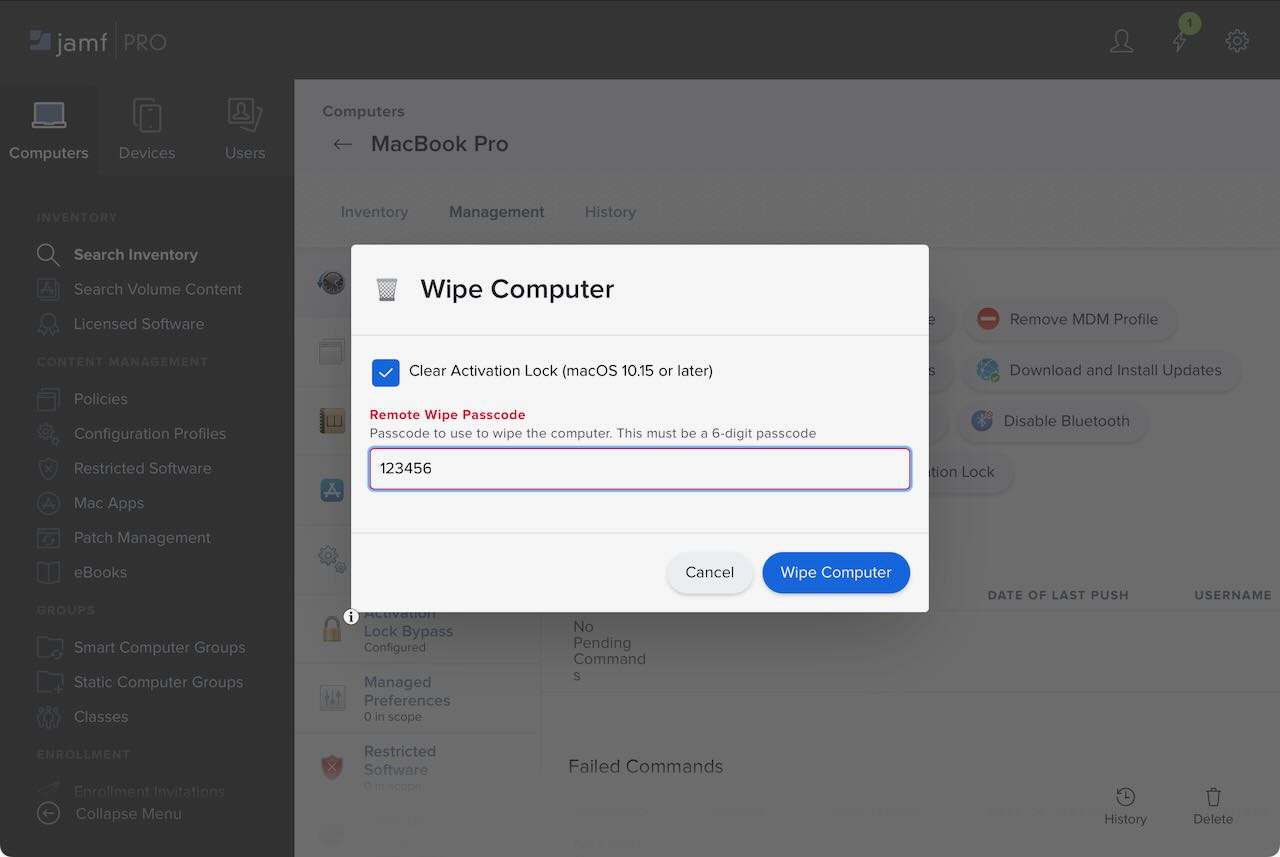
Sending the command may require two things: enabling the Clear Activation Lock instruction and providing a Remote Wipe Passcode.
Clearing Activation Lock effectively disconnects the computer from an iCloud account and providing a Remote Wipe Passcode is only effective if the computer has Remote Lock enabled. If Remote Lock isn’t enabled, any arbitrary six-digit number will work. After clicking Wipe Computer, the administrator must confirm one more time they wish to proceed.
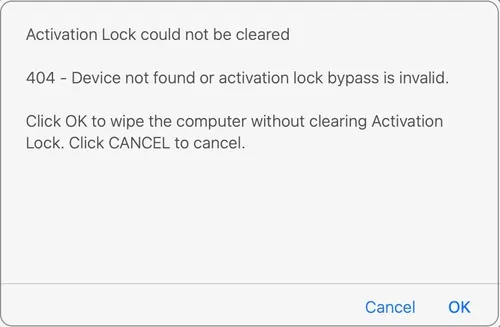
Note that if a computer isn’t connected to iCloud, or it was enrolled using a Jamf Pro PreStage Enrollment that prevented Activation Lock, then the option to disable Activation Lock doesn’t apply. The administrator may receive a message that Activation Lock couldn’t be cleared. They can just proceed anyway by clicking OK.
Sending the EraseDevice command to multiple computers is only possible today using the Jamf Pro Classic API. It’s not supported using the Action button at the bottom of an advanced computer search or smart computer group. It’s also not supported yet using the newer Jamf Pro API.
The basic script syntax for sending the EraseDevice command to a computer using the Classic API looks something like:
The “123456” string in the last line represents the six-digit passcode required to remove the computer from Device Lock and the “1,5,18,24” string represents a list of computers by their Jamf IDs. The Classic API only supports identifying computers by their IDs.
For a more complete script, see this GitHub gist.
Using the Classic API to send the EraseDevice command to multiple Macs is especially beneficial to administrators of school lab Macs that need refreshing between quarters or semesters. This along with the PreStage Enrollment option to automatically advance through the Setup Assistant has the potential to make the entire refresh hands-free.
When we may still need to completely erase and install
Is the startosinstall command with the --eraseinstall option dead?
Not quite yet. The two macOS systems that support Erase All Content and Settings, Monterey and Ventura, still run on a handful of older computer models that don’t have T2 security chips. Until Apple ships an operating system that only runs on computers with T2 or Apple Silicon chips, the startosinstall command still has its place in the administrator’s toolbox.
We can foresee a time a few years from now when Apple releases a macOS version that requires a Secure Enclave. Like iOS and iPadOS today, the need to reinstall a clean macOS will likely be limited to certain developers who work at low levels of the operating system between the kernel and the hardware. The average and not-so-average device administrator will likely never work at that level.
Then what? Erase All Content and Settings is just one feature in a long journey of Apple development that will likely drive both macOS and iOS closer and closer until one day there’s just one OS for all devices. It’s a slow process, but it’s also easy to see Apple has been aggressive in making it happen.
For now, take away that Erase All Content and Settings is the replacement for startosinstall. And it’s a secure method for deleting user data as well as restoring a computer to out-of-the-box settings.
Let Jamf Pro streamline your redeployment process.
Subscribe to the Jamf Blog
Have market trends, Apple updates and Jamf news delivered directly to your inbox.
To learn more about how we collect, use, disclose, transfer, and store your information, please visit our Privacy Policy.