
Reinstall macOS Monterey with one button
It’s important to learn from history.
- Apple has been on a 1-year major release cycle for its Mac operating system for the past 10 years. It released Mac OS X Lion (10.7) in 2011 and every year since has released a new major version.
- The size of its Mac operating system installers has grown considerably over those 10 years too. The OS X Lion 10.7 installer was about 4.72 GB. Its most recent macOS Monterey 12.0.1 installer weighs in at about 12 GB — nearly triple in size.
- Today’s macOS is under increased threat from malware and bad actors. Traditional malware such as viruses and worms are still minimal to non-existent. However, threats from for-profit malware hidden in apps or tainted downloads quadrupled in 2019 according to a USA Today report.
What does this teach us as administrators?
- Apple is aggressively updating its Mac operating system. This isn’t new or changed behavior. It’s an established pattern that’s been in place for a decade. No administrator should be surprised or unprepared for a new version of macOS each year.
- As the size of the macOS installer grows, the complexity of deploying it grows exponentially. Today, it takes 3x longer to download an installer and 3x more space to store on Mac endpoints plus 3x more working disk space to run. And while installation time has remained relatively consistent at anywhere from 20 to 50 minutes, the upgrade process is still lengthy.
- And much of the aggressiveness for its annual updates comes from Apple’s increased focus on both privacy and security as its footprint in the world grows more substantial. Mac's at double the footprint compared to 10 years ago are a bigger target today for spyware and ransomware.
Major macOS upgrades are important because every new upgrade brings not only new features but improved security and end user privacy. But they need careful planning and testing before deploying organization wide.
We’ve updated this blog post the past few years for each new upgrade. Let’s continue with Apple’s latest upgrade Monterey.
Starting over
Erasing and reinstalling a clean macOS is now a common workflow for reprovisioning Macs for different users, different purposes or simply starting over. Apple started introducing these tools in its macOS High Sierra 10.13.4 installer, and the process has continued to evolve and improve well into Monterey.
A lot has changed the past year. Let’s spend some time discussing newer ways to manage Monterey installations including:
- Restricting installations
- Deploying the macOS installer
- Identifying Macs eligible to erase and install or upgrade
- Remotely running the macOS installer
- New - Erase All Content and Settings
Restricting installations
Not every administrator is ready to support Monterey, but sometimes our end users get ahead of us and install it themselves. What steps can we take to prevent our end users from installing a new major macOS version? Keep in mind, end users can acquire the installer and run it in multiple ways. That usually means we need to be taking more than just one step.
“Don’t do that”
The easiest method for preventing unwanted installations is to disclose your organization’s policy to end users that states “Do not install major macOS upgrades unless authorized by Information Technology”. Be sure to specify IT’s stance for non-compliance.
This does absolutely nothing to prevent someone from doing it anyway, but it asserts authority without removing any privileges. Depending on your organization, this may be enough.
Ignore is no longer an option
First, let’s talk about the --ignore option as part of the softwareupdate command, which we’ve used in the past for hiding macOS updates. In macOS Catalina 10.15, it looked something like this:
As of macOS Big Sur 11.0, this option is no longer available.
An administrator’s only options today for hiding Monterey from Macs are to disable automatically checking for software updates and prevent end users from manually checking for updates. Be aware, this by itself doesn’t prevent an end user from downloading the Monterey installer some other way and installing it. Administrators can still run commands from Jamf Pro to get available updates and install them.
To disable automatically checking for software updates:
- In Jamf Pro, choose Computers > Configuration Profiles and click New to create a new profile.
- Provide a name such as “Disable Automatic Software Updates” in the General payload.
- Scroll down the list of payloads to Software Update and click Configure.
- Disable “Automatically check for updates” but consider disabling all other related options too.
- Scope and save the profile to deploy it.

This profile by itself is not enough to prevent end users from manually opening the Software Update pane in System Preferences and checking for updates. We’ll have to explicitly deny access to the Software Update pane.
If you’re already deploying a configuration profile with a Restrictions payload, you can edit that profile and choose Preferences > Disable Selected Items > Software Update. When saving, choose the option to deploy to all computers.
The computer Restrictions configuration profile hasn’t been modernized yet, which means it may deploy more settings than you want. To deploy this setting by itself, use Jamf Pro’s custom manifest feature.
- Copy the macOS Disabled System Preference Panes.json manifest from GitHub.
- In Jamf Pro, choose Computers > Configuration Profiles and click New to create a new profile.
- Provide a name such as “Disable Software Update pane”.
- Scroll down the list of payloads to Application & Custom Settings and click External Applications.
- Click Add.
- Set the Source to Custom Schema.
- Set the Preference Domain to “com.apple.systempreferences”.
- Click the Add Schema button and paste the copied text of the manifest from GitHub in the Custom Schema field. Click Save.
- In the System Preferences Pane Identifier 1 field, enter “com.apple.preferences.softwareupdate”.
- Scope and save the profile to deploy it.
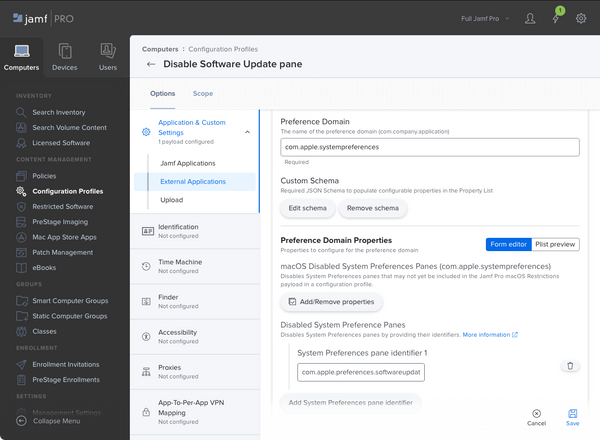
After the profile is installed, the Software Update pane is dimmed and inaccessible to all users on a Mac. Note that if it detected an update prior to installing the profile, an alert badge will still appear on the icon.

Use Jamf Pro’s Restricted Software feature
Administrators can configure the Restricted Software feature found under Computers in Jamf Pro to warn or prevent users from running the Monterey installer. We can use this feature in a few different ways, and it will apply whether the end user is a Standard user or an Admin user.
1. Restrict by application name and warn the end user.
This also won’t completely prevent end users from installing Monterey, but we can both alert them and us via email at the moment of trying to install the software. This won’t alert about attempts to install supported versions of macOS like Big Sur.

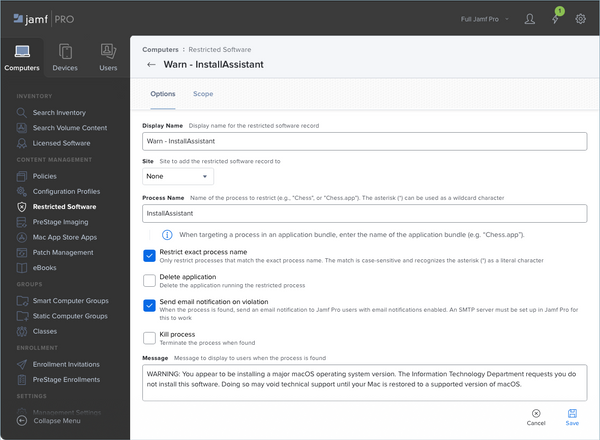
2. Restrict using the InstallAssistant process and warn the end user.
An alternative to restricting the app name, which the end user can change, is to restrict the InstallAssistant process name. This is the name of the process that runs when double-clicking any macOS installer and displaying windows guiding the process. This won’t do anything if the installer is run using the startosinstall command line tool.
3. Restrict using the application name and kill the process.
This is similar to the first method, but it includes the Kill Process option. Instead of allowing the end user to continue, Jamf Pro will quit the installer within a few seconds. Adding the Delete Application option will delete it immediately, bypassing the Trash.
When restricting by application name, be aware the end user can simply rename the installer and bypass the restriction.
4. Restrict using the InstallAssistant process name and kill the process.
This is similar to the second method, but it includes the Kill Process option and could include the Delete Application option. It will prevent any macOS installer from running when double-clicked including Monterey, Big Sur, etc.
Defer major or minor updates up to 90 days
Like ignoring updates, Apple allows deferring updates up to 90 days from when they’re initially released (not when the Mac first sees the updates). Updates during this time won’t appear in the Software Update pane in System Preferences nor will they appear when running the softwareupdate command line tool. However, commands from Jamf Pro can still install them.
Macs running macOS High Sierra 10.13 and later support deferring updates. Macs running macOS Big Sur 11.3 and later support deferring both major and minor updates — just in time for macOS Monterey’s release.
What does this mean?
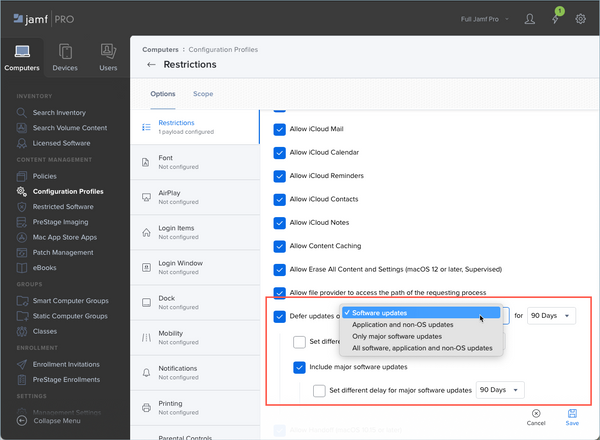
macOS Big Sur 11.3 and later will offer two kinds of updates for installation - major upgrades and minor updates. If both macOS Monterey 12.0.1 and macOS Big Sur 11.6.1 are available, Apple lets the administrator or end user decide which to install.


Furthermore, administrators running Jamf Pro 10.32 and later can choose which appears to end users with the updated Restrictions payload in computer configuration profiles. For example, they can allow their Macs to show the minor Big Sur 11.6.1 update but hide the major Monterey upgrade.
To set deferrals for major upgrades, minor updates or both:
- In Jamf Pro choose Computers > Configuration Profiles.
- Create a new configuration profile and add the Restrictions payload or edit an existing profile that already contains a Restrictions payload.
- Under the Functionality tab, scroll to the end of the page and enable Defer Updates.
- From the menu, choose to defer all updates, major updates, minor updates, or non-OS updates like Safari.
- Scope and save the profile to deploy it.
Deferring updates is Apple’s preferred approach for administrators to manage available upgrades and updates. Along with beta testing, organizations have a lot of time to verify their environments will support a new macOS version or work with software vendors to provide updates.
Any organization with an Apple Business Manager or Apple School Manager account has access to AppleSeed, Apple’s beta software program for IT where administrators may test beta releases of new software updates prior to release. Betas generally run at least two months before general release. The beta period plus the 90-day deferral period combined provides administrators about five months to test software before deploying to their environment.
Remove admin privileges
Anyone with admin privileges on a Mac can do practically anything, including installing an operating system. The most basic step we can take is to remove admin privileges from end users and require they use Self Service for running policies we allow.
Removing admin privileges, though, makes your end users heavily rely on IT administration.
Set a firmware or Recovery Lock password
Setting a firmware password on Intel Macs or a Recovery Lock password on Apple Silicon Macs prevents anyone without the password from booting to the Recovery HD, erasing the existing operating system and installing a new macOS. Since this is at the hardware level, no one without the password can install or upgrade.
The caveat with setting a hardware level password is that someone in Technical Support helping a remote user may have to provide this password to the end user. Be sure each Mac has a unique password that won’t unlock any other computer.
Administrators can automatically set a Recovery Lock password during Automated Device Enrollment for Apple Silicon Macs using Jamf Pro 10.32 and automatically rotate the password when viewed in Jamf Pro 10.33 and later.

They’ll need to balance limiting access to the Monterey installer with needing to install it for themselves. For example, they can use scoping Exclusions to avoid restricting their own test devices.
Deploying the macOS installer
Before we can deploy the macOS installer, we need to acquire it. According to Mr. Macintosh, a great blog with a heavy focus on Mac installers, upgrades and updates, there are eight ways to download full installers. We’ll cover just few here.
Deploy using softwareupate
In the past, we’ve discussed Apple’s --fetch-full-installer option in the softwareupdate command.
It has the advantage of being a small and light command that we can send to our Macs to retrieve the installer themselves, which works great with on-premises content caching servers. And its reliability has greatly improved over the past year.
Note: We don’t need a dedicated content caching server to upgrade a large group of Macs in one room or one building. Configure one or a few of the beefiest Mac workstations as a caching server by turning on Content Caching in the Sharing pane of System Preferences. Manually run the softwareupdate command on another Mac to “warm” the cache of the server (to download the installer ahead of time). Later, the rest of the Macs will pull automatically from this server instead of the internet.

New in macOS Big Sur 11.3 is the ability to retrieve available installers going back to macOS Mojave 10.14.6. Open Terminal and run:
It’ll return something like this:
Software Update found the following full installers: * Title: macOS Monterey, Version: 12.0.1, Size: 12128428704K * Title: macOS Big Sur, Version: 11.6.1, Size: 12428472512K * Title: macOS Big Sur, Version: 11.6, Size: 12428553042K * Title: macOS Big Sur, Version: 11.5.2, Size: 12440916552K * Title: macOS Big Sur, Version: 11.5.1, Size: 12440158909K * Title: macOS Catalina, Version: 10.15.7, Size: 8248985973K * Title: macOS Catalina, Version: 10.15.7, Size: 8248854894K * Title: macOS Catalina, Version: 10.15.6, Size: 8248781171K * Title: macOS Mojave, Version: 10.14.6, Size: 6038419486K
To download one of the older full installers, add the --full-installer-version option with the specific macOS version you want. For example, to get the macOS Big Sur 11.5.1 installer, run:
Remember, this list command runs only on Big Sur 11.3 and later, but you can at least retrieve older installers for Macs you’re not ready to upgrade or can’t upgrade and then add them to Jamf Pro.
Deploy using Volume Purchasing
The Install macOS Monterey application is available in Apps and Books when viewing either Apple Business Manager or Apple School Manager and is deployable like other Mac App Store apps. That means we don’t need to upload an unwieldy package to our distribution points or manage new versions as they’re released. Search for “macOS Monterey” and assign licenses to your Jamf Pro server.

While this works well, it does have one big caveat. This will download what some folks describe as a “stub” installer. It’s not a full installer but rather the same app without the 12 GB SharedSupport.dmg in the app bundle. When double-clicked or run using the startosinstall command line tool (discussed a little later), the Mac must be connected to the internet and it will download the rest of the files it needs to complete. Depending on the speed on the current internet connection, that may mean a delay of 10, 20, 30 minutes or longer before installation even begins.
This type of deployment is best suited for unattended Macs like those in school labs that can be left overnight and works well with content caching servers to speed delivery. When using it with home users or those who’ll be invoking the installer themselves using something like Self Service, be sure to alert them not to put their Macs to sleep, to leave them plugged in to power and to allow time for the installation to complete.

Avoid download and package
In the past, we’ve discussed using the Mac App Store to download the macOS installer and then packaging it using special tools that can handle the larger size of the file. (For example, Jamf Composer can create a DMG but not a PKG of a macOS installer.)
However, because the installer is being copied from the original system to new systems, Apple’s Gatekeeper feature requires scanning the app at first launch. This takes several minutes and delays the installer.
New open-source community tools introduced over the past year make this process much easier and much faster. Avoid packaging your own macOS installers and use the community tools instead.
Download an installer package from Apple
Last year, Armin Briegel who maintains Scripting OS X, provided a script for not only reliably acquiring the latest Big Sur installer but also downloading it in PKG format ready to deploy into the Applications folder.
His tool called fetch-installer-pkg.py is a python script that accesses Apple’s software update servers and downloads the same package the Mac’s built-in software update service would use. You’ll find it on Armin’s GitHub respository.
Since then, he’s created Download Full Installer, an application that’s much easier to use. Follow the link in his blog post to get the “Download.Full.Installer-v1.1.1.zip” file from his GitHub repository and simply run the app. Click the arrow next to the Big Sur or Monterey installer you need. It doesn’t get much easier than that.

When it finishes, upload the InstallAssistant pacakge directly to Jamf Pro and deploy to your Macs using a policy. It’s OK to rename the package file before uploading.
When we’re ready to deploy the installer using any of these methods, we need to make sure it’ll do so successfully. So, let’s next examine Monterey’s installation requirements.
Identifying Macs eligible to erase and install
Before running the installer to erase and install our Macs or even upgrade them, we need to first identify which ones meet Apple’s system requirements. This year, Apple hasn’t published much on technical requirements for Monterey other than minimum supported hardware. General requirements below are based on those minimum hardware specifications.
General requirements
- OS X Yosemite 10.10 or later (based across minimum supported hardware)
- 8 GB of memory (based across minimum supported hardware)
- 26 GB of available storage for macOS Sierra 10.12 or later or 44 GB for Yosemite and macOS El Capitan 10.11 (include an additional 13 GB to store the installer too)
Hardware requirements
- MacBook (Early 2016 and later)
- MacBook Air (Early 2015 and later)
- MacBook Pro (Early 2015 and later)
- Mac mini (Late 2014 and later)
- iMac (Late 2015 and later)
- iMac Pro (2017 and later)
- Mac Pro (2013 and later)
Monterey compatible Mac (Smart Computer Group)
Let’s create a new Smart Computer Group to identify eligible Mac and name it “macOS Monterey Compatible Macs”. Because Apple hasn’t specified minimum requirements for memory or macOS version, let’s assume the basic specifications for each model meet those needs and leave that criteria out. And let’s assume we need 13 GB space to store the installer plus an additional 26 GB to run it (rounding up to 40 GB).
We’ll add the following criteria:
Boot Drive Available MB more than 40000 and Model Identifier matches regex
We need to use the model identifier of Macs to pinpoint the exact models Apple says are eligible for Monterey. That’s almost 50 models. Rather than bloat our Smart Computer Group with nearly 50 lines of criteria, we can use a regular expression (or regex) to identify them. Regex lets us create a pattern that can match certain strings of characters such as model identifiers. This one line of text will match all the eligible models including those introduced so far in 2021. Copy and paste it in the value field for the Model Identifier criterion in the above Smart Computer Group.
(MacBook(10|9)|MacBookAir(10|[7-9])|Macmini[7-9]|MacPro[6-7]|iMacPro1|iMac(1[6-9]|2[0-2])),\d|MacBookPro1(1,[45]|[2-8],\d)
After saving, be sure to click the View button to verify the group is working as expected.
Install macOS Monterey.app Cached (Smart Computer Group)
While we’re at it, let’s create a second Smart Computer Group named “Install macOS Monterey.app Cached” and add the following criteria:
Application Title is Install macOS Monterey.app and Application Version like 17.0
This will help us identify Macs that have the Monterey installer app already in the Applications folder to prevent Jamf Pro from downloading it again. Be sure to get the current version of the installer app by selecting it and choosing File > Get Info.
Intel and Apple Silicon Macs (Smart Computer Group)
Two more smart groups that’ll come in handy for a few years will help us distinguish between the older Intel and newer Apple Silicon architectures.
Let’s create a new Smart Computer Group named “Intel Macs” to identify Intel Macs.
We’ll add the following criteria:
Apple Silicon is No
Let’s create a second Smart Computer Group named “Apple Silicon Macs” to identify M1 chip Macs.
We’ll add the following criteria:
Apple Silicon is Yes
Now that we’ve identified Macs ready for Monterey and have groups to help distinguish between the two Mac architectures, let’s look at methods for running the installer.
Using the Monterey installer to erase and install (or not)
Today, we have three considerations for running the Monterey installer:
- Intel Macs
- Apple Silicon Macs with Big Sur or earlier
- Intel T2 chip Macs and Apple Silicon Macs with Monterey
Intel Macs
For the most part, little changes with the erase and install workflow for Intel Macs with and without T2 security chips. We can still use startosinstall.
The startosinstall command line tool is found inside the Install macOS Monterey.app bundle. It does the same thing as double-clicking the installer application without showing any of the dialogs and windows. It also has the advantage of working even if we’ve used Software Restrictions to block the InstallAssistant process and we can invoke it as part of a script or a Jamf Pro policy (optionally, using Self Service).
To find the command line tool, right-click or Control-click the Install macOS Monterey application and choose Show Package Contents > Contents > Resources. Locate and drag the startosinstall file into a Terminal window and add --usage to the end.
This lists several arguments (each beginning with double-dashes) and explains what each does. We want to use some or all of the following:
- --eraseinstall — the option that does the erase and install magic
- --agreetolicense — required to fully automate the process
- --forcequitapps — prevents running apps from hampering installation
- --newvolumename — optional, names or renames the Macintosh HD
Putting the command into a script has worked more reliably lately than simply adding it as a command in a Files and Processes payload of a policy. Create a new script in Jamf Pro called “Erase disk and install macOS Monterey” and paste the following into the under the Script tab:
Add the script to a policy and make it available in Self Service. We’ll need two policies altogether.
Cache Install macOS Monterey.app (Policy)
The first policy will place Install macOS Monterey.app on our target Macs.
General
- Display name: Cache Install macOS Monterey.app
- Trigger: Recurring Check-In
- Execution Frequency: Ongoing
Packages
- Package: InstallAssistant.pkg (downloaded earlier)
Maintenance
- Update Inventory: Enabled
Scope
- Targets: macOS Monterey Compatible Macs (Smart Computer Group)
- Exclusions: Install macOS Monterey App Cached (Smart Computer Group)
When that’s successful, our “Install macOS Monterey.app Cached” Smart Computer Group should now list Macs ready to erase and install.
Erase and Install macOS Monterey (Policy)
Create a second Policy in Jamf Pro named “Erase and Install macOS Monterey”. Complete the following payloads and scope.
General
- Display name: Erase and Install macOS Monterey
- Trigger: None (enable Self Service instead)
- Execution Frequency: Ongoing
Scripts
- Script: Erase disk and install macOS Monterey
Scope
- Targets: Install macOS Monterey.app Cached (Smart Computer Group)
- Exclusions: Apple Silicon Macs (Smart Computer Group)
Self Service
- Button names: Erase & Install
- Description: Warning — Your Mac is about to be fully erased and macOS reinstalled. Before proceeding, copy all important files and user data to another computer or backup system. After your Mac is erased, you cannot recover deleted data. (Consider using markdown to add emphasis to your message.)
- Ensure that users view the description: Enabled
Add a button icon, assign categories, and save the policy. As Macs check in, they’ll download and install the Monterey installer and update inventory. Then the Self Service policy to erase and install Monterey will become available for all end users or specific users you scope. Note that this policy excludes Apple Silicon Macs. Those need a slightly different version of the script (see below).
Important: The Monterey installer behaves differently from previous installers. Instead of restarting the Mac right away and then taking 20-50 minutes to install and configure software, Monterey does most of its installation and configuration before restarting the Mac. This gives the appearance that nothing is happening for about 20, 30 or more minutes and then displays a very brief (usually less than five minutes) Apple logo at the end.
Consider adding an explanation of what’s happening like a jamfHelper screen at the beginning of the “Erase disk and install macOS Monterey” script. Add the following lines just before the echo command:
Apple Silicon Macs with Big Sur or earlier
Last year, Apple released updated product lines that include their new Apple Silicon M1 chip. Apple Silicon Macs introduced the concept of “volume ownership” that specifically affects the erase and install feature of the startosinstall command.
To run startosinstall requires the “owner” of the Mac, loosely defined as the user who first claimed a Mac by configuring it for their own use, to approve running the command by providing a username and password. That’s something Jamf Pro won’t have. And it’s possible the volume owner may not be an administrator.
So, what can we as administrators do? We have a couple of options, neither of which is great. Both require somehow retrieving the “owner’s” username and password and providing that to the startosinstall command.
When we know the password
While the macOS behaves the same on Apple Silicon as it does on Intel Macs, the startosinstall command has two additional required parameters specific to Apple Silicon. They are:
- --user — an admin user to authorize installation
- --stdinpass — collect a password from stdin without interaction
As part of our command, we need to supply the username and password of an account with a Secure token. We know of Secure token today mostly as a requirement for using FileVault.
The command looks something like this:
This example is providing the name of an admin account “adminuser” toward the end of the command and the password of the admin account “P@55w0rd” in clear text at the beginning. Ideally, the password would be obfuscated in some way to keep it concealed.
The benefit of the above command is it can still be used in a Self Service policy to let the end user erase their Mac and reinstall macOS. The drawbacks are it requires the Jamf Pro administrator to know an admin username and password for every computer and it exposes the password to anyone with Scripts and/or Policies privileges in Jamf Pro.
Be sure to set the policy’s Exclusions in scoping to “Intel Macs”. Otherwise, the policies for Intel and Apple Silicon Macs are the same.
When we don’t know the password
But what if our end users have been drop-shipped their new Macs and they’ve become the volume owners during setup? Then, we have to ask them to provide their usernames and passwords using a dialog.
For something that provides administrators a lot of options, consider using Graham Pugh’s erase-install project. He provides a detailed wiki with eight steps that can include fetching a new installer, prompting the end user for credentials, and providing status information using jamfHelper (as discussed above) or DEPNotify.
Intel T2 chip Macs and Apple Silicon Macs with Monterey
Monterey introduces a new feature to macOS that borrows from iOS — Erase All Content and Settings.
iOS has long practiced the concept of partitioning its storage into a read-only volume for the iOS operating system and a writable volume for apps and user data. This partitioning meant devices have never been completely erased when they’re reset. The user partition is effectively deleted and recreated, which takes just a few minutes.
Choosing Settings > General > Transfer or Reset (iOS 15) > Erase All Content and Settings clears apps and data, logs out any existing Apple ID, deactivates Find My and removes credit card information stored in Apple Wallet.
Starting around macOS High Sierra 10.13, Apple moved away from the HFS+ file system to APFS, which set the stage for a lot of interesting capabilities and greatly improved security. Later, in Catalina, it adopted the partitioning scheme from iOS to separate the read-only Macintosh HD (for the operating system) and the writeable Macintosh HD - Data (for apps and user data).
With APFS and similar partitioning schemes, Monterey now provides the ability to reset a Mac back to a factory-like condition with all user data removed. This doesn’t reset the operating system back to factory defaults, though. If a Mac shipped with Monterey 12.0.1 and was later updated to Monterey 12.1.0, it will remain at 12.1.0 after erasing all content and settings.
And the process takes less than five minutes!
While the process may not be a one-button click, it’s still simple. End users can open System Preferences and choose Erase All Content and Settings from the System Preferences menu.

Alternatively, to add this to Self Service, Jamf Pro administrators can create a policy that includes a Files and Process payload to execute the command:
The Erase Assistant still requires interaction. The person sitting in front of the Mac must provide an administrator username and password to continue.
If the end user is signed in with an Apple ID, he or she will need to provide the password to sign out of the Apple ID.

Finally, Intel T2 chip Macs and Apple Silicon Macs with Monterey installed not only support the local end user running Erase All Content and Settings, but they’ll also support remotely running Erase All Content and Settings from an MDM.
When a Jamf Pro administrator sends the Wipe Computer command from the computer record and Jamf Pro detects an Intel T2 chip Mac or Apple Silicon Mac running Monterey, it’ll send an EraseDevice command instead of a Wipe command. Again, this preserves the installed macOS operating system while securely removing app and user data.
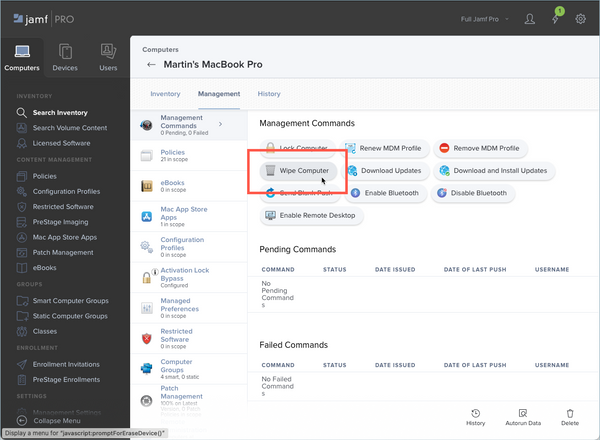
Note: There is no longer a reason to completely wipe an Intel T2 chip Mac or Apple Silicon Mac running Monterey whether for repurposing the device or preparing for disposal. User data has been encrypted on the drive the entire time even without enabling FileVault. Erasing content and settings destroys the encryption keys for accessing information.
Upgrading instead of erasing
With one simple change, the startosinstall workflow can instead upgrade a Mac to macOS Monterey from an OS X Yosemite 10.10 or later operating system preserving applications, data and user settings. Or it can reinstall Monterey. Installing the same version of macOS can sometimes repair corrupted installations.
Edit the “Erase disk and install macOS Monterey” script or clone it to make a new one and rename it to “Upgrade to macOS Monterey”. Then adjust the command to omit the --eraseinstall and --newvolumename options. Create a new policy and add the script. Scope it to the Macs that need it.
Again, this will only work for Intel Macs. For Apple Silicon Macs running Big Sur or earlier, the script will need to include the username and password for the volume owner, or it will have to ask the end user for the credentials. Graham Pugh’s erase-install script mentioned earlier offers upgrading Macs instead of erasing them as an option.
Alternatively, Jamf Pro supports sending an MDM command to Intel Macs with the T2 chip and Apple Silicon Macs using a mass action command.
By default, the command to update macOS excludes major versions (e.g. Jamf Pro will not update a Mac from Big Sur to Monterey) unless the administrator explicitly enables the option to include major updates. This feature is only available as a mass action command and doesn’t appear as an option when viewing one computer.
In Jamf Pro, use an Advanced Computer Search or Smart Computer Group to view a list of Macs for an upgrade. Choose Send Remote Commands and click Next. Choose the second option to update OS version and at the bottom of the page choose the option to download and install the update. Last, enable Include Major Updates.

Be very careful with this command. An upgrade requires restarting the Mac. End users won’t be notified. This upgrade feature would be ideal for upgrading school labs or other shared machines.
Conclusion
Much has changed the past couple of years that affects our current state of remotely reinstalling the operating system.
- Preventing unwanted macOS upgrades is more difficult but still manageable, especially so with Jamf Pro.
- Big Sur 11.3 and later will detect multiple update or upgrade options not just the newest option.
- Monterey introduces some long-awaited management capabilities.
- We have multiple ways to get macOS installers that are easier to use.
- We have two computer architectures (Intel and Apple Silicon) that each have their own nuanced management features.
- APFS formatted disks are providing us interesting options for erasing and reinstalling the macOS (or not).
- The softwareupdate command for downloading macOS versions is not only more reliable, it’s more robust.
- The end of erasing drives and reinstalling operating systems is here! Administrators can reset newer Intel and Apple Silicon Macs running Monterey to a factory-like state in less than five minutes, ready to re-enroll into Jamf Pro.
We’re still in new territory with Monterey but we’re not in unfamiliar waters. Many of our commands still work. And we have a new workflow for resetting Macs that many administrators are already using for iPhones and iPads in their environments. Imaging is dead. Simply starting over is alive.
Subscribe to the Jamf Blog
Have market trends, Apple updates and Jamf news delivered directly to your inbox.
To learn more about how we collect, use, disclose, transfer, and store your information, please visit our Privacy Policy.