

All the previous parts have been leading up to this. We have built a command line tool to explore how we can get data out of the Jamf Pro API and use it in Swift. Then we also generalized the code and learned how to get the password out of the Keychain. In the last part, we put together the UI for our app with sample computer objects. Check out the other parts here:
- Part 1: Command line tool
- Part 2: Decoding data objects
- Part 3: Optimizing the code
- Part 4: Implementing a new object
- Part 5: Build the app!
In this part, we will connect the Swift UI interface with the actual live data from the Jamf Pro API.
Controlling the data
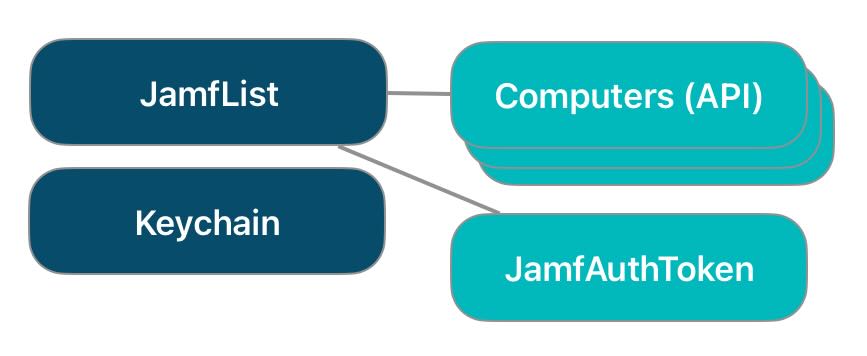
When we look at the code for our command line tool, we can separate the types into two categories. The JamfAuthToken and the types that implement the JamfType protocol interact with the Jamf Pro API and represent the data or ‘model’ that we are working with. The JamfList interacts with the data and controls the workflow. The Keychain object also to a lesser degree controls some data flow.
For the simple needs of our command line tool, a single class was sufficient for controlling the data and printing it out to the terminal.
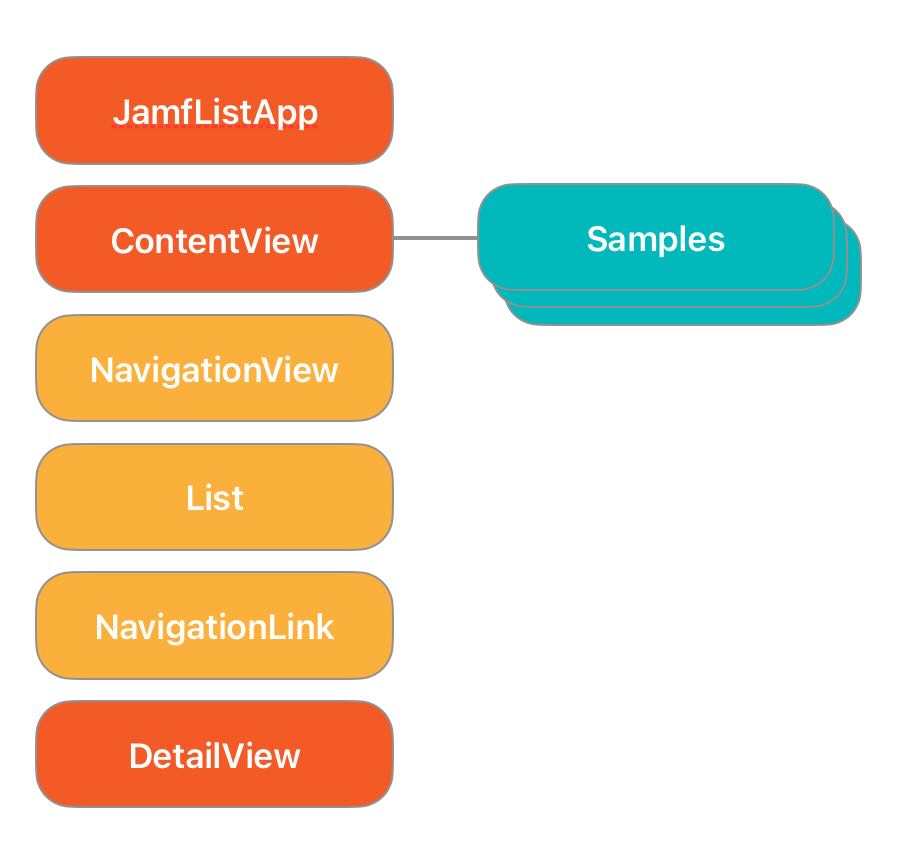
In our Mock SwiftUI app with just the sample data, we are using six UI types that interact with the sample data. The sample data is just an array of computer objects. However, when you look at the structure, only the ContentView object has a direct connection to the sample data. The ContentView object passes the necessary data over to its sub-views.
It is tempting to put the logic to control the data objects into the ContentView object. For an example as simple as this, we might be able to get away with it, but it will get very messy with anything more complex. The standard approach here is to separate an app into three layers. The model (data), the view (user interface) and an intermediate controller layer.
To connect our view types with the data from the Jamf Pro API, we will create a controller object, which does the work of getting the data and presenting it to the view objects in a form they can work with: an array of computer objects.
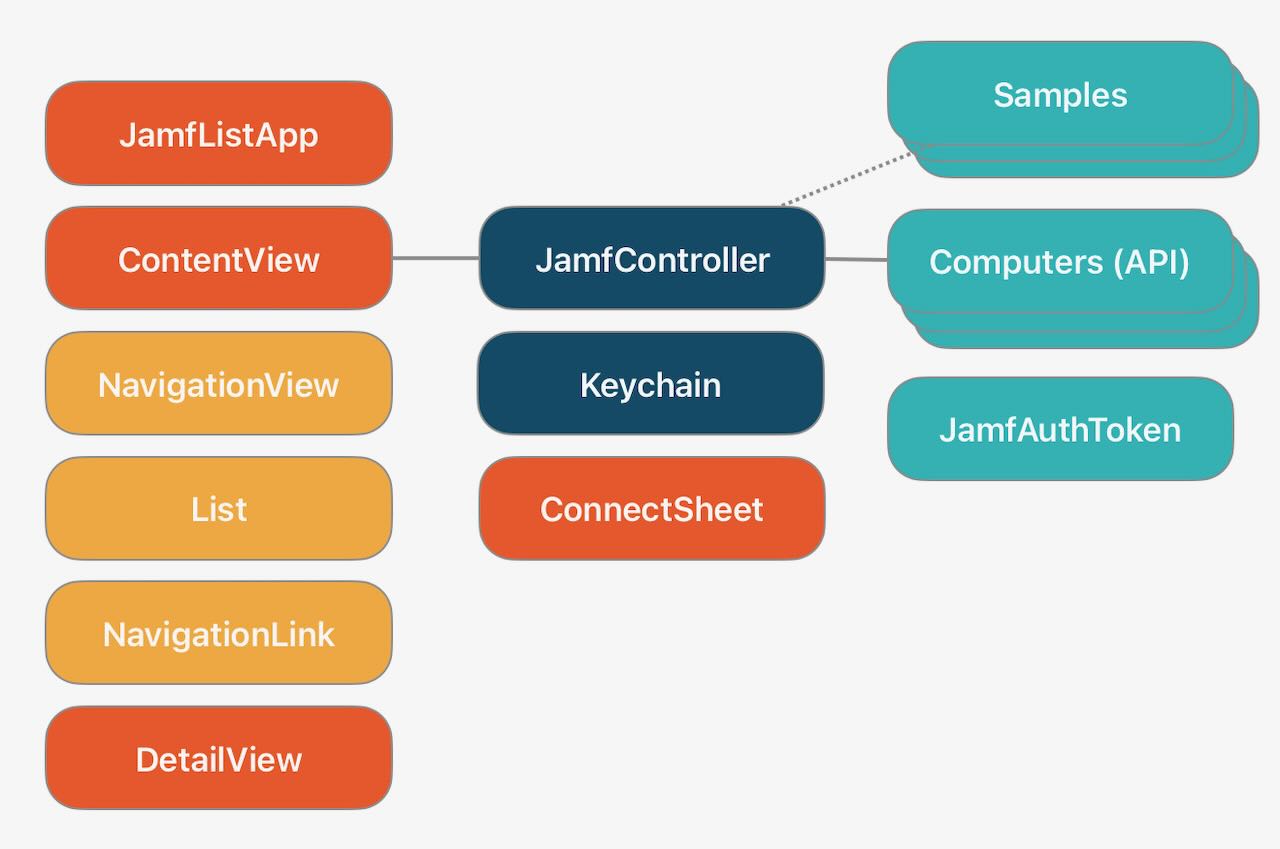
The controller will also have to handle getting the information required to connect and authenticate to the Jamf Pro API, the server, username and the password. In the command line tool, we got those from arguments. In a user-facing app, we will need some user interface (ConnectSheet) and a means of storing the access data between app launches.
We also want the controller to know when it is being used for Xcode internal previews and keep using our sample data then.
You can tell the controller is very crucial. The controller is the central object in our application. It will take a similar position to the JamfList object in the command line tool and we will be able re-use some of the code we built for the CLI tool. First, we need to build the ability to get a JamfAuthToken, and then we can fetch data from the Jamf Pro API.
We are now adding functionality to our app that requires reaching out to a remote server for information. Sandboxed apps require a special permission or ‘entitlement’ to reach out to remote servers. To tell Xcode to add that entitlement, select the blue project icon in the file list, then select the grey ‘JamfList’ app in the list of targets. In the tab on the top, select ‘Signing & Capabilities’, then scroll down until you get to the ‘App Sandbox’ section. In there, check the ‘Outgoing Connections (Client)’
In our Xcode project, create a new Swift file and name it ‘JamfController.’ Add the following after the import statement:
This object inherits behavior from ‘ObservableObject.’ This is a type in the Combine framework, which allows for other objects to observe and react to changes in this object. The JamfController type has a number of properties that are ‘Published’ which means changes to them might trigger behavior elsewhere, in our case the user interface views.
We also have properties for the server, username and password. The server and username are read directly from UserDefaults, which means they will be read from the app’s property list file.
There is one function ‘load,’ which is marked as an asynchronous function which has to run on the main thread. Apps can have multiple threads, but interaction with the user interface has to happen in the main thread. The ‘@MainActor’ tag ensures this.
The function sets the ‘isLoading’ property to true. Since this property is ‘@Published’ the user interface class will get notified of this change. This allows us to dynamically change the UI and show a progress wheel. Code in the ‘defer’ block will be executed whenever the current code block is left, no matter whether it happens through an early return, a throw statement or at the end of the function.
Then we test if the code is running in Xcode preview. If so, we set the ‘computers’ property to the sample data and leave. When not in preview mode, we wait for 3 seconds to simulate loading time, then set the ‘computers’ property to the sample data and also set the ‘hasError’ property. This is all test code to see if all the pieces of the user interface are working. We will add proper functionality later.
We have not connected JamfController to the view objects yet. Replace the ContentView struct with this:
We have replaced the ‘computers’ array with a property that contains a JamfController object. This is also marked as a ‘@StateObject’ which means that SwiftUI will observe and react to changes in this object.
In the body of the ContentView, we check the ‘isLoading’ property of the controller and show a progress spinner when it is set, or the List when it is done. We are using the Swift control statements in the declarative ‘body’ section of the SwiftUI view class. This is a really powerful feature of SwiftUI. Not only can we easily ‘list’ UI elements, but we can dynamically change the state or the entire composition of a view depending on data in observed objects in the model.
At the end of the NavigationView, we added an ‘task’ modifier, which runs the controller’s load() function. The task modifier will be run before the view is displayed for the first time. We have to wrap the function in a ‘Task’ because it is asynchronous.
We also added two toolbar items. One is merely a status that displays when the controller’s ‘hasError’ property is true. The other is a button that will show an empty or filled bolt icon, depending on the controller’s ‘connected’ property. When you click this button it sets the ‘needsCredentials’ property in the controller. This will not do anything else yet, but later we are going to use that as a trigger to prompt the user for the connection data.
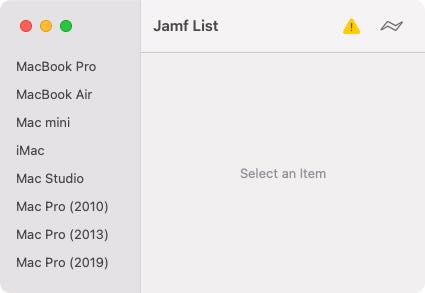
Since the controller object recognizes when it is running in Xcode preview, you should see the sample data there. When you run the app, you should see the spinning wheel for a few seconds and then also see the warning icon for an error. You can also click the connect button, but it doesn’t really do anything yet.
We have set up the JamfController and hooked it up to the ContentView, but so far it isn’t doing anything more than providing the sample data. The challenge is that we need to get the server, username and password before we can get any data from the Jamf Pro API. In the command line tool, we could get the access credentials from the code or later the arguments, but in an app we have to put up a user interface and find a place to store the data between app launches.
When the app launches the controller will have to check if it has all the required credentials. When it doesn’t, it needs to ‘tell’ the view objects to present an interface for the user to enter the credentials. When the controller has all the credentials, it can request an authentication token from the Jamf Pro server. When that succeeds it can fetch the computer records and display them.
Most of this logic will happen in the JamfController class. Add this function to the JamfController class:
You may get an error that it doesn’t know the ‘Keychain’ type here. When you get that, select Keychain file in the project and make sure is both the CLI tool and the JamfList app enabled under ‘Target Membership’ in the File Inspector.
This function checks if it has the server url and username, attempts to retrieve a password from the Keychain, and then tries to fetch an authentication token with those credentials. The function is written in a way that if it already has a password or an authentication token, it will do nothing, so we can call the function repeatedly without creating excessive calls to the Keychain or Jamf Pro API.
If any of those steps fails, it will change the needsCredentials flag to true. When it succeeds at retrieving an auth token, it will set the connected flag to true and the other flags to false. Since these properties are marked as ‘@Published’, the view classes will be re-evaluated when these flags change. That means the user interface we build reacts immediately to changes in our controller class.
In the ‘load’ function in JamfController, replace all the code below the // not in preview mode comment with:
When you run this, nothing will happen. We still need to add the code in the ContentView that reacts to change of the flags. In the ContentView file, insert this code after the closing brace of the ‘NavigationView’ block and before the ‘.task’ modifier:
This will create an error, because the ConnectSheet view does not exist. Create a new SwiftUI View file named ‘ConnectSheet’, make sure it is assigned to the ‘JamfList’ target and replace everything below the import statement with:
There is a lot going on here. First, ConnectSheet’s ‘show’ property is a ‘Binding.’ This means its value is directly connected with the variable passed in its initializer, in this case JamfController’s ‘needsCredentials.’ The binding goes both ways, so when we change the ‘show’ value in ConnectSheet it will change ‘needsCredentials’ in JamfController and vice versa.
We also connect to the JamfController object directly, since we need to retrieve and store the password value from there. This is an ‘@ObservedObject’ connection, since the ConnectSheet does not own the controller object. You can learn more about the different kinds of connections between view and data objects in SwiftUI in this WWDC 2020 session: Data Essentials in SwiftUI.
The server and username variables are connected through ‘@AppStorage’ to the app’s defaults property list. AppStorage is the SwiftUI counterpart to Foundation’s UserDefaults.
When you run the app now, you should get the connect sheet immediately. This is what is happening on the app’s first launch:
- The ContentView is created, which also creates the JamfController object
- The ContentView runs its attached ‘task’ which runs JamfController’s ‘load’
- JamfController’s ‘load’ sets the ‘isLoading’ property to true, which makes ContentView display the ProgressView (a spinning wheel) in place of the List
- No matter how the load function exits, the deferred action will change ‘isLoading’ back to false, which replaces the spinning wheel with the list of computers
- Then it calls the ‘connect’ function, which determines that it requires credentials, and sets ‘needsCredentials’ to true
- Changing ‘needsCredentials’ to true is the trigger for the ‘sheet’ part in ContentView, which displays the ConnectSheet
- The user enters the credentials in the ConnectSheet
- When they hit the ‘Connect’ button, the server and username are stored in the app’s defaults (through @AppStorage) and the password is stored directly in the controller object
- The ConnectSheet’s ‘show’ variable, which is connected to the controller’s ‘needsCredentials’ is set to false, which also hides the sheet again (as this is the criteria to show the sheet in ContentView)
- The password is stored in the keychain if the user checked that option
- controller.load() is called again, which calls controller.connect(). Should it fail again, the process will start over and the ConnectSheet will reappear
When the credentials are correct, the app will get a token. You will see nothing right now other than the connect button in the toolbar changes from an empty lightning bolt to a solid one. We have yet to implement the code to actually load and show the computer objects.
Once you have entered the correct credentials and selected “Save in Keychain,” the next time you launch the app, it will get the server and username from the app’s preferences, the password from the Keychain, and log in automatically. You will see that the app switches from not connected (empty lightning bolt) to connected (solid lightning bolt).
If you need to make the app “forget” the stored credentials, you can delete the defaults file with this command in the Terminal (you will have to use the Bundle identifier you chose for the app):
defaults delete com.scriptingosx.JamfList
You can also use the defaults command to inspect or manipulate the data that is stored for the app. This can be useful for debugging.
This was a lot of ground work just to get connected. The next step is to actually load the computers from the Jamf Pro API. Add the following code at the end of the load function in JamfController, after the await connect():
We verify once more (cannot be careful enough) that we have received an auth token. Then we call the getAll function on Computer. If that successfully returns a list of computers, we replace JamfController’s computer property. Since the ‘computers array’ is a published property, the ContentView will update immediately on this change.
When an error occurs when fetching the computer list, we set the hasError variable to true. This variable is connected to the ‘error’ toolbar item which will display for warning icon. This is very rudimentary error handling. For a useful app, you should use a ‘do... catch statement’ and display some message to user explaining what went wrong.
Build and run the app; you should see a list of computer from the Jamf Server and be able to look at the detail information. Congratulations!
You can find the sample code of the app at this point here in the repo.
Extra bonus: In the toolbar of Xcode, where it says ‘JamfList > My Mac’ click on the ‘My Mac’ and select one of the iPads in the list. Then re-build and run the project again. This will launch the app in the iOS simulator. Because SwiftUI is designed to work across Apple platforms, the code we built for Mac will “just work.” There are a few cosmetic issues and the Keychain code needs adapting, but the fact that is mostly works is quite impressive. You can also test the app running on an iPhone by choosing an iPhone from the device list.
This sample app is far from finished. Even aside from the cosmetic issues on iOS (and to be honest the current incarnation of the Mac app), there is much left to do. You could quite easily display more property fields from the Computer record. You can also add more types of objects though you’d have to choose a way in the UI to switch between the different types. You may also want to add functionality to edit data in the records and update the data in Jamf Pro through the proper API calls.
This tutorial has kept us busy for six installments. I consider it complete for now. I may or may not address some of these issues in the future, but I believe you now have the fundamentals and insights necessary to tackle these challenges yourself. Good luck and enjoy!
Subscribe to the Jamf Blog
Have market trends, Apple updates and Jamf news delivered directly to your inbox.
To learn more about how we collect, use, disclose, transfer, and store your information, please visit our Privacy Policy.