
macOS 10.12.4以降から、このワークフローが若干変更されています。このワークフローの最新版を入手するためには、GitHub repoへアクセスしてください。
ここ数ヶ月間、あなたはすべてのアプリケーションが macOS Sierra で動作するかどうかのテストと検証に費やしてきました。さあ、いよいよ最新の Mac オペレーティングシステムをエンドユーザに展開する時が来ました。しかし、アップグレードのプロセスが以前のバージョンと同じようにはいかないことに、すぐに気がつかれたのではないでしょうか。Jamf をお使いの方は、インストーラアプリケーションを Casper Admin にドラッグ&ドロップしたり、InstallESD.dmg を使用する方法に慣れていると思いますが、なぜかアップグレードしようとすると、なぜか FileVault 認証による再起動が機能しなくなり、インストールプロセスを進むようにユーザに表示画面で促されるようになりました。これはあなたが期待していた理想的な体験ではありません。
macOS Sierra では、Apple は自動アップグレードのトリガーの際に、インストーラアプリケーションに含まれる startosinstall バイナリを使用することを強制するようになりました。これに伴い、所定のアップグレードには新たな考え方が必要になりました。では、IT 管理者はどのようにしてこれを達成し、使い慣れている状況に戻ることができるのでしょうか?
弊社がサポートいたしますので、ご心配は無用です。まず、startosinstall バイナリに関するドキュメントを確認してみましょう。
 startosinstall --usage

Usage: startosinstall --applicationpath --volume

Arguments

--volume, a path to the target volume.

--applicationpath, a path to copy of the OS installer application to start the install with.

--license, prints the user license agreement only.

--agreetolicense, agree to license the license you printed with --license.

--rebootdelay, how long to delay the reboot at the end of preparing. This delay is in seconds and has a maximum of 300 (5 minutes).

--pidtosignal, Specify a PID to which to send SIGUSR1 upon completion of the prepare phase. To bypass "rebootdelay" send SIGUSR1 back to startosinstall.

--usage, prints this message.

Example: startosinstall --volume /Volumes/Untitled --applicationpath “/Users/Shared/Install macOS.app"
これで、たくさんの情報を得ることが出きたので、早速コマンドの構築を始めましょう!
startosinstall --volume /--applicationpath "/Users/Shared/Install macOS Sierra.app” --nointeraction
「--nointeraction」スイッチが startosinstall のドキュメントに一覧表示されていませんが、問題ありません。これは実際には非表示のスイッチで、「--agreetolicense」スイッチを含むすべてのユーザのやりとりを打ち切ります。
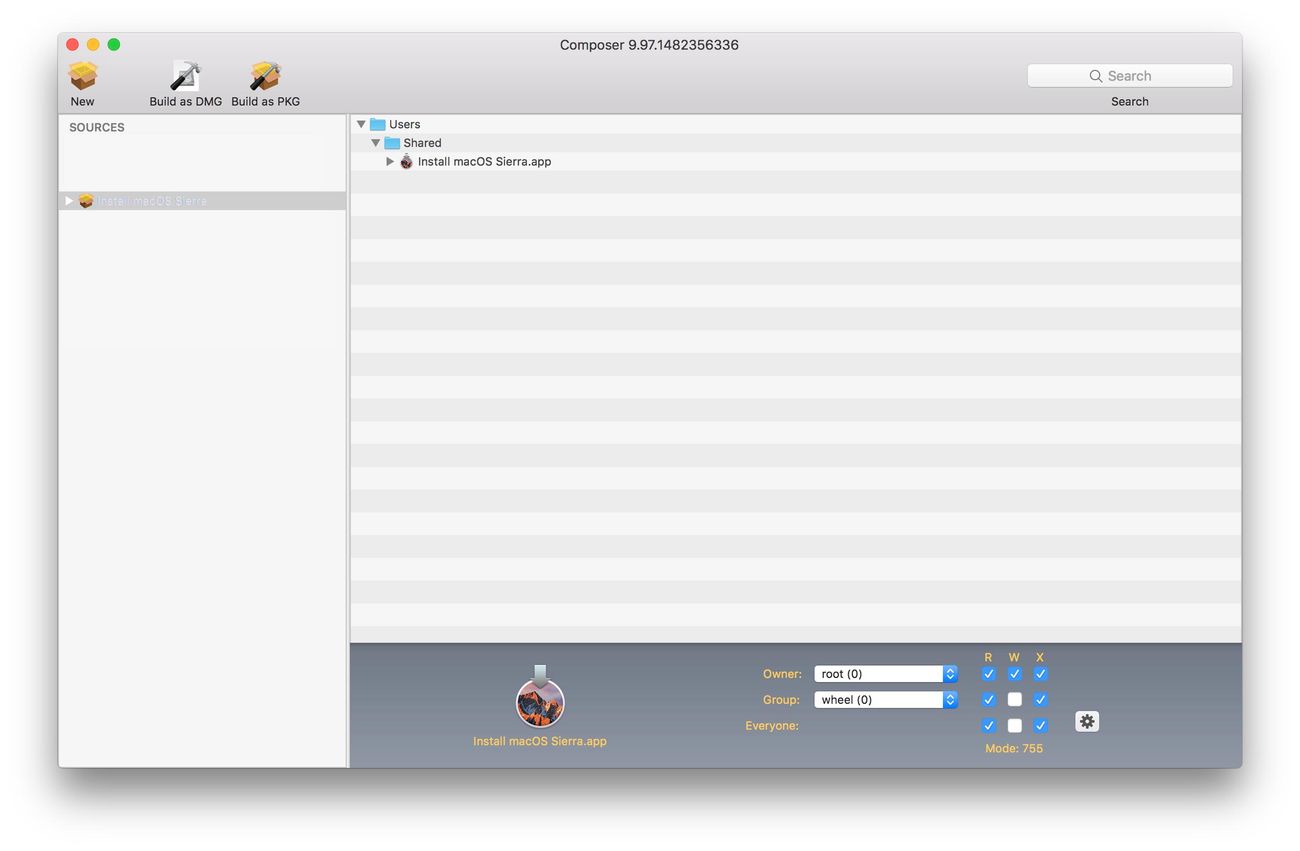
コマンドを入手しましたね、素晴らしいです!では、これをテストしましょう。念のためにお伝えしますが、このコマンドでは実行しているコンピュータがクライアントに "Install macOS Sierra.app "がインストールされている必要があります。そのために、Composer.app を開いて、インストーラーをパッケージ化してみましょう。この例では、先に進み、 /Users/Shared/ に配置します。
これで、Jamf Pro にパッケージをアップロードできるようになりました。これを行うためには、簡単なポリシーを作成し、テストマシンにステージングしてください。

この時点で、マシン上でコマンドをテストする準備ができました。Self Service を経由してコマンドを導入するスクリプトを作成することから始めます。
 #!/bin/bash

/Users/Shared/Install\ macOS\ Sierra.app/Contents/Resources/startosinstall --volume / --applicationpath /Users/Shared/Install\ macOS\ Sierra.app --nointeraction
これでスクリプトが完成したので、実行してみましょう!
ちょっと待ってください、もう気づいているかもしれませんが、これはあまりうまくいかないのです。
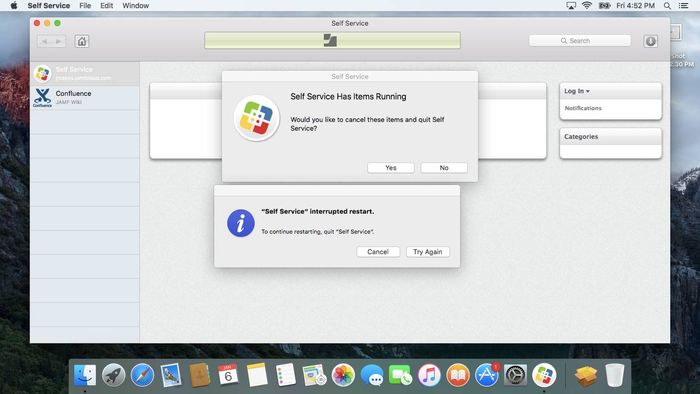
何が起こっているのでしょうか?さて、startosinstall バイナリはすべてが完了したときに、ユーザが開いているかもしれないドキュメントを保存したり、使用していたアプリを閉じたりする時間を与えるために、正常リブート、あるいはソフトリブートを開始します。素晴らしいアイデアのように聞こえますが、この場合スクリプトが完了しておらず、プロセスで立ち往生することになるので、Self Service とはあまりうまく機能しません。このままでは不便なので、対策をしましょう。このシンプルなスクリプトを修正して、 startosinstall バイナリを起動してからバックグラウンドプロセスに移動させることで、スクリプトが正常に完了して再起動が問題なく行われるようにします。
 #!/bin/bash

/Users/Shared/Install\ macOS\ Sierra.app/Contents/Resources/startosinstall --volume / --applicationpath /Users/Shared/Install\ macOS\ Sierra.app --nointeraction &
これでスクリプトは正常に完了しました。しかし、なぜ何も起こらないのか不思議に思うでしょう。まあ、5~10分待っていれば、インストーラーがシステムの準備を完了した時点でコンピュータは再起動します。機能はしているのですが、これではすばらしいエンドユーザエクスペリエンスを提供しているとは言えません。Jamf Helper を使用してこれを修正し、ユーザにとってもっと魅力的なものにしましょう。
Jamf Helper をご存知でない方のためにご説明します。これは、Bash スクリプトからエンドユーザに基本的なGUI を表示させることができる便利なツールです。ここでは、Jamf Helper で利用できるオプションを簡単に見てみましょう。
 jamfHelper -help

Usage: jamfHelper -windowType [-windowPostion] [-title] [-heading] [-description] [-icon] [-button1] [-button2] [-defaultButton] [-cancelButton] [-showDelayOptions] [-alignDescription] [-alignHeading] [-alignCountdown] [-timeout] [-countdown] [-iconSize] [-lockHUD] [-startLaunchd] [-fullScreenIcon] [-kill]

-windowType [hud | utility | fs]

 hud: creates an Apple "Heads Up Display" style window

 utility: creates an Apple "Utility" style window

 fs: creates a full screen window the restricts all user input

 WARNING: Remote access must be used to unlock machines in this mode

-windowPosition [ul | ll | ur | lr]

 Positions window in the upper right, upper left, lower right or lower left of the user's screen

 If no input is given, the window defaults to the center of the screen

-title "string"

 Sets the window's title to the specified string

-heading "string"

 Sets the heading of the window to the specified string

-description "string"

 Sets the main contents of the window to the specified string

-icon path

 Sets the windows image filed to the image located at the specified path

-button1 "string"

 Creates a button with the specified label

-button2 "string"

 Creates a second button with the specified label

-defaultButton [1 | 2]

 Sets the default button of the window to the specified button. The Default Button will respond to "return"

-cancelButton [1 | 2]

 Sets the cancel button of the window to the specified button. The Cancel Button will respond to "escape"

-showDelayOptions "int, int, int,..."

 Enables the "Delay Options Mode". The window will display a dropdown with the values passed through the string

-alignDescription [right | left | center | justified | natural]

 Aligns the description to the specified alignment

-alignHeading [right | left | center | justified | natural]

 Aligns the heading to the specified alignment

-alignCountdown [right | left | center | justified | natural]

 Aligns the countdown to the specified alignment

-timeout int

 Causes the window to timeout after the specified amount of seconds

 Note: The timeout will cause the default button, button 1 or button 2 to be selected (in that order)

-countdown

 Displays a string notifying the user when the window will time out

-iconSize pixels

 Changes the image frame to the specified pixel size

-lockHUD

 Removes the ability to exit the HUD by selecting the close button

-startlaunchd

 Starts the JAMF Helper as a launchd process

-kill

 Kills the JAMF Helper when it has been started with launchd

-fullScreenIcon

 Scales the "icon" to the full size of the window

 Note: Only available in full screen mode

Return Values: The JAMF Helper will print the following return values to stdout...

 0 - Button 1 was clicked

 1 - The Jamf Helper was unable to launch

 2 - Button 2 was clicked

 3 - Process was started as a launchd task

 XX1 - Button 1 was clicked with a value of XX seconds selected in the drop-down

 XX2 - Button 2 was clicked with a value of XX seconds selected in the drop-down

 239 - The exit button was clicked

 240 - The "ProductVersion" in sw_vers did not return 10.5.X, 10.6.X or 10.7.X

 243 - The window timed-out with no buttons on the screen

 250 - Bad "-windowType"

 254 - Cancel button was select with delay option present

 255 - No "-windowType"
たくさんの情報がありますが、すでにシステム内にあるものなので、これらを使用し、エンドユーザに今起こっていることを知らせることができます。Jamf Helper ウィンドウを追加するだけでなく、--pidtosignal スイッチを使ってJamf Helper をクリーンに終了することができるので、再起動時のコンフリクトを防ぐことができます。
 #!/bin/bash

##Heading to be used for jamfHelper

heading="Please wait as we prepare your computer for macOS Sierra..."

##Title to be used for jamfHelper

description="

This process will take approximately 5-10 minutes.

Once completed your computer will reboot and begin the upgrade."

##Icon to be used for jamfHelper

icon=/Users/Shared/Install\ macOS\ Sierra.app/Contents/Resources/InstallAssistant.icns

##Launch jamfHelper

/Library/Application\ Support/JAMF/bin/jamfHelper.app/Contents/MacOS/jamfHelper -windowType fs -title "" -icon "$icon" -heading "$heading" -description "$description" &

jamfHelperPID=$(echo $!)

##Start macOS Upgrade

/Users/Shared/Install\ macOS\ Sierra.app/Contents/Resources/startosinstall --volume / --applicationpath /Users/Shared/Install\ macOS\ Sierra.app --nointeraction --pidtosignal $jamfHelperPID &

exit 0
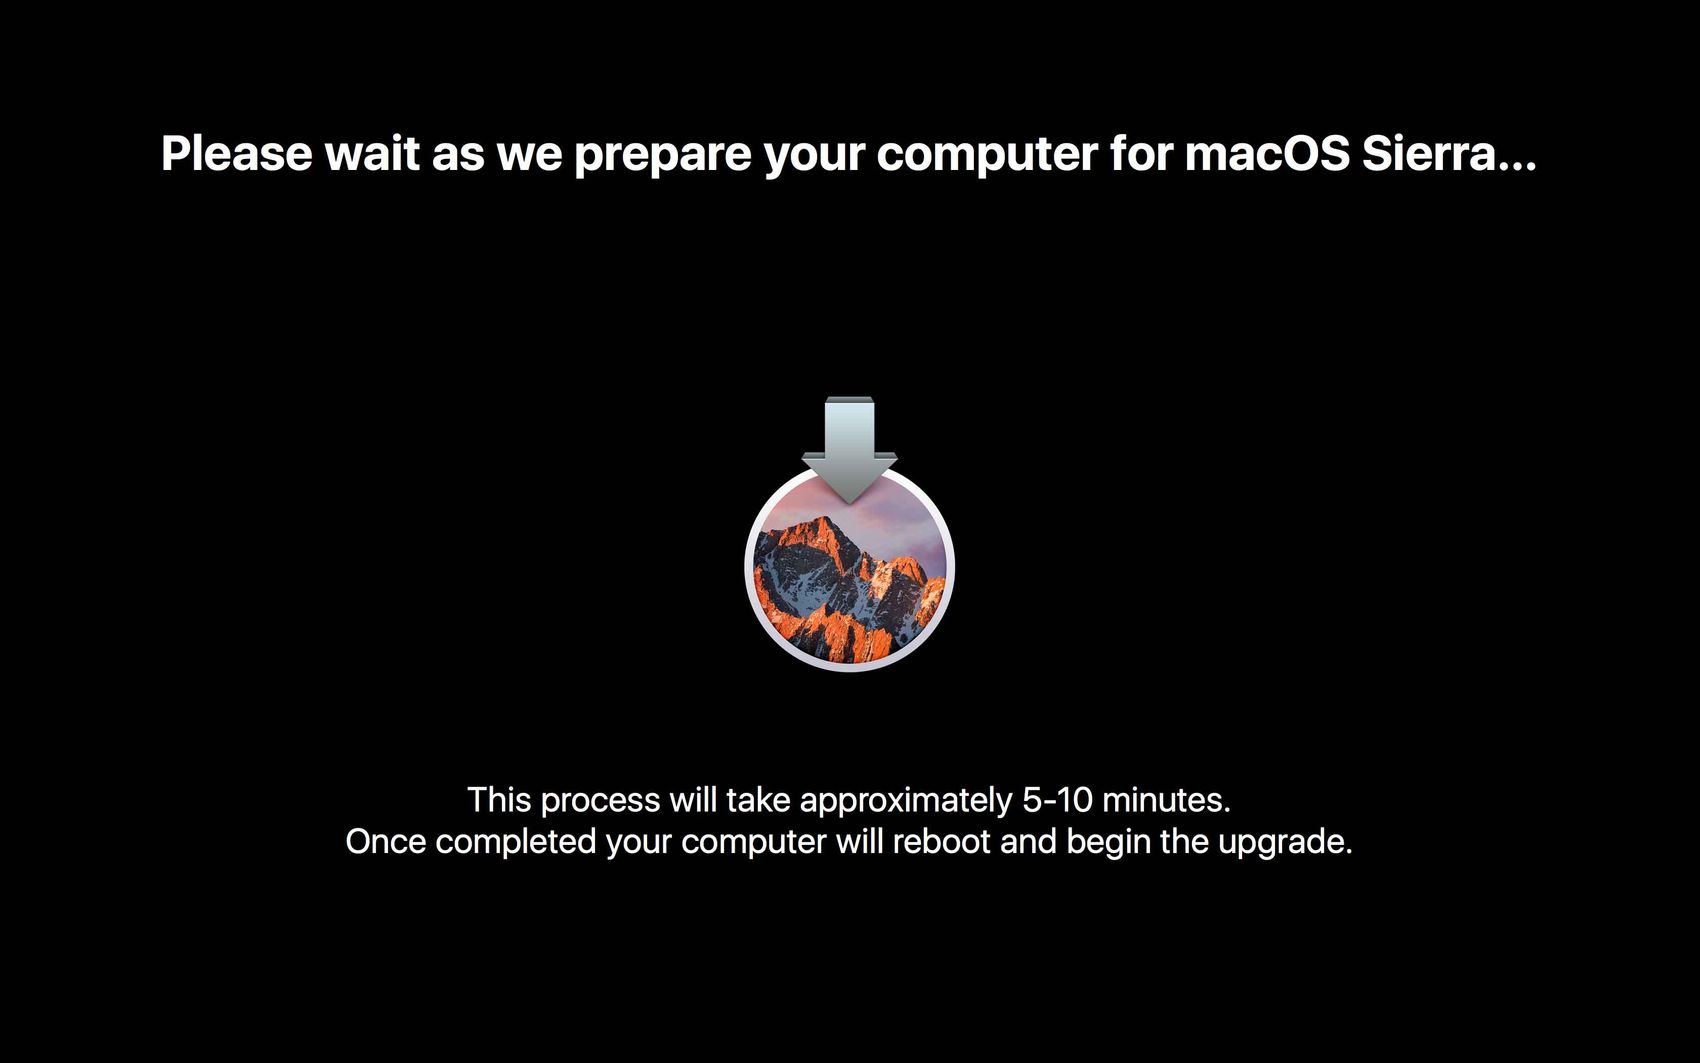
これで、Jamf Helper が全画面ウィンドウを起動して、macOS Sierra へのアップグレード準備中であることをユーザに知らせてくれます。Startosinstall バイナリの実行が終わると、Jamf Helper を終了し、コンピュータを再起動します。アップグレードを行うための Apple のガイドラインを遵守しているので、FileVault Authenticated reboot は見事に動作し、macOS のインストーラボリュームに直接読み込まれ、ユーザに何も要求することなくアップグレードプロセスが開始されました。
最後に大事なリマインダーを1つ、Self Service 説明のクリーンナップを忘れずに行い、エンドユーザに情報を提供することを忘れないでください。

これで、基本的なmacOS アップグレードスクリプトが完成しました。Mac が電源に接続されているかどうかのチェックや、アップグレードのための十分な空きスペースがあるかどうかを確認したい方など、もう少し詳しく知りたい方は、私のGitHub ぺージにアクセスしてください。テスト済みで、使用可能なワークフローを紹介いたします。
Jamfブログの購読
市場トレンドやAppleの最新情報、Jamfのニュースなどをお届けします。
当社がお客様の情報をどのように収集、利用、移転、および保存するかに関しては、プライバシーポリシーをご参照ください。