
A guide to privacy modes in Jamf Safe Internet
Privacy Modes recently came to Jamf Safe Internet. Take a deep dive into these settings and learn how to configure your Jamf School Instance with the right privacy settings for your school.

Jamf Safe Internet’s privacy modes will enable IT admins to identify specific users/devices within device groups and within security reporting. Up until now, Jamf Safe Internet has provided pseudo-device and user details mainly based on a random string. For example, a device name might be 13570-qeicvm-03ajc54 and the user assigned to the the device 687suef@13570-qeicvm-03ajc54.
It’s important to understand that nothing has changed with Jamf’s outlook on privacy; Jamf Safe Internet was designed for and continues to focus on prevention over inspection. The default setting for any new or existing Jamf Safe Internet customer is “Full Privacy,” which uses the pseudo-data. However, if an IT admin decides to switch to “Balanced Privacy,” then Jamf Safe Internet will work with Jamf School or Jamf Pro in order to populate a device name, user and user email details.
Table of contents:
How does this help IT admins?
Data Residency
Migrating Jamf Safe Internet instances to the US
Switching to Balanced Privacy
Balanced Privacy in the Jamf Safe Internet console
Switching to Full Privacy
How does this help IT admins?
By switching to “Balanced Privacy”, IT admins can identity specific devices within the device groups page, improving their ability to troubleshoot individual devices.
For example:
- An IT admin has an iOS fleet of 100 devices and one student’s device (let call them Jak), needs to wipe and re-enroll their iPad into MDM.
- The admin needs to remove the device from the Jamf Safe Internet console before the device re-enrolls into the MDM. With “Full Privacy,” the admin would see 100 devices with names similar to 13570-qeicvm-03ajc54. This makes it difficult to find Jak’s device, especially since the user assignment was also random.
- Although with some clever grouping in MDM and syncing to Jamf Safe Internet, an admin might be able to pinpoint that device, it requires a lot of work, time and is not scalable.
- With “Balanced Privacy,” the admin would be able to navigate directly to the Device Groups in the Jamf Safe Internet console, search for the student or device name to pinpoint the device and remove it from the console before moving on to re-enrollment.
This is done in a matter of seconds rather than creating elaborate workflows between the MDM and Jamf Safe Internet.
Having user and device details available in the Security Report (this is where JSI reports where it has blocked such things as phishing attempts, malware network traffic or spam) is also a huge win for IT admins. With the balancing of security and privacy, IT admins are still able to preserve user privacy while protecting devices from network threats. Again, IT admins who wish to switch to “Balanced Privacy” can see who network threats are aimed at and use this information to inform ongoing security policies.
Let’s continue with our previous example:
- Of our 100 iOS device estate, ten of these devices belong to teachers.
- In Security Reports, the admin can see that eight of the ten teachers have triggered a phishing alert by attempting to visit the same website.
- With “Full Privacy,” the IT admin would have just been able to see 8 out of 100 devices had triggered that alert from the same website. With the information gained through “Balanced Privacy,” the IT Admin can now see that this attempt appears to target teachers and act accordingly.
The admin’s next step could range from amending content filtering policies in Jamf Safe Internet or other security software/hardware, to using the opportunity to provide user education on best practices or the school’s policies.
Data Residency
Privacy Mode is made possible partly because US customers can now have Jamf Safe Internet instances within their region. Although Data Residency is not part of the Privacy Mode feature, they are implicitly linked together.
“Data residency” or “data localization” is important for regions where laws, regulations or best practices dictate that student identifiable data, such as device names, usernames or email addresses are stored in their region. Before this release, all Jamf Safe Internet instances were hosted in the European Union (EU).
If a US customer is new to Jamf Safe Internet after March 4, 2024, their instance will be created in the US by default. If a customer has been a Jamf Safe Internet customer before this date, they will have an instance in the EU. Customers can verify where there instance is in the new Privacy menu found by navigating to Settings → Privacy
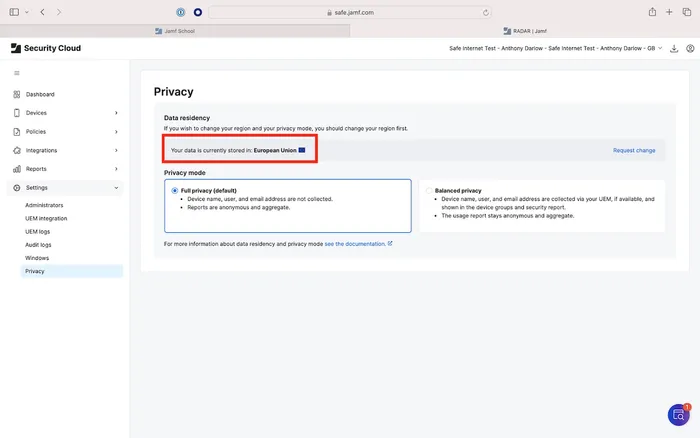
Setting showing where your Jamf Safe Internet data is stored
Customers that are based in the US but have Jamf Safe Internet instances in the EU can request to move their instance to the US. This should be done by the customer raising a ticket at support.jamf.com. More information can be found by clicking the “Request change” button on the Settings → Privacy page in the console
Migrating Jamf Safe Internet instances to the US
Once a customer has requested a migration, they will be guided through the process by Jamf Support. Here is a high level overview of the process:
- Jamf provisions a new JSI instance in the US.
- Jamf recreates any leaf structure and admin accounts in the new console.
- Customer will need to recreate:
- Jamf School one-click connection (not needed for Jamf Pro)
- Device groups
- Additional activation profiles (if applicable, default activation profile created by Jamf)
- Policy settings including:
- Web protection policy settings (all default rules, custom rules, search rules config)
- App blocking
- Custom DNS
- UEM connection
- Customer will then remove the current Jamf Safe Internet configurations from devices.
- Choose suitable Privacy Mode.
- Customer deploys new Jamf Safe Internet configurations from US instance to devices.
- Once everything has been confirmed and verified as working, Jamf will purge original data from the instance in the EU.
Switching to Balanced Privacy
Before switching to “Balanced Privacy,” it's important that a customer has their data hosted in the correct region based on their laws or regulations. This is the responsibility of the customer.
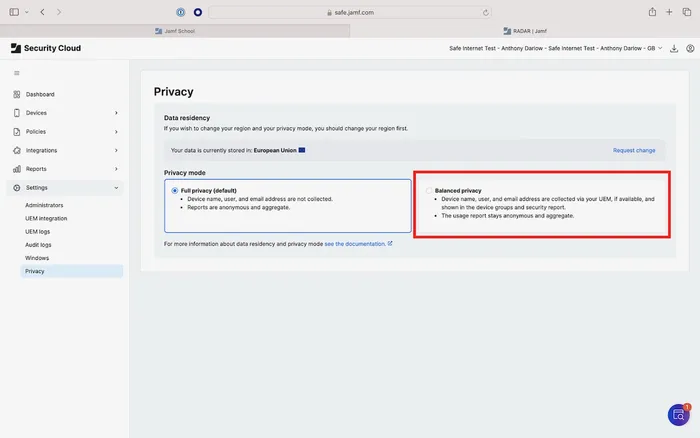
The default Privacy Mode for any new or existing Jamf Safe Internet console is “Full Privacy.” This can be verified in the Jamf Safe Internet Console by navigating to Settings → Privacy

Setting showing Full Privacy
However, an IT admin can switch to “Balanced Privacy” at any point. In environments with multiple administrative users in Jamf Safe Internet, only admins with “super admin” permissions will be able to switch Privacy Modes, though the Settings → Privacy page is viewable to all admins. Whenever a switch is made, it is recorded in the audit logs. These can be found by navigating to Settings → Audit Logs, then looking through the logs or using the filter to search for a Privacy Setting event

Audit logs for changed privacy setting
Subscribe to the Jamf Blog
Have market trends, Apple updates and Jamf news delivered directly to your inbox.
To learn more about how we collect, use, disclose, transfer, and store your information, please visit our Privacy Policy.
Once the Privacy Mode has been switched by an admin, it cannot be switched back for 24 hours. Due to this and the required steps needed after a switch, we recommend not changing this setting regularly. Therefore a customer should spend some time understanding the different Privacy Modes and choose the best option for their deployment, rather than regularly switching to “try it out.”
1. Verifying current setup
As stated above, there is more to switching to Balanced Privacy than just throwing a switch in the console from a device deployment and management point of view. Switching between Privacy Modes fundamentally changes the deployment of Safe Internet on the devices at a configuration profile level.
When Full Privacy mode is selected, the Jamf Safe Internet configuration profile (aka activation profile) reflects the fact that device names, users and usernames are not collected, as there are no keys for such items in the profile, or where it does, it creates a random string.
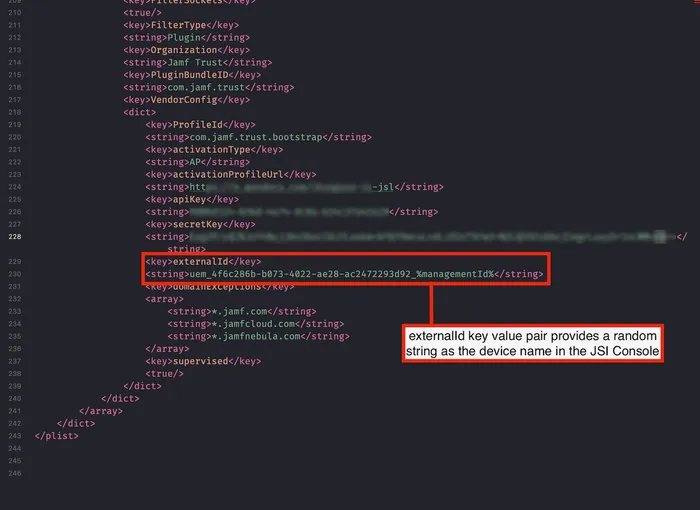
Example of activation profile when Full Privacy is enabled
When Balanced Privacy is enabled, the activation profile is changed and extra key pair values are created. Variables from Jamf School or Jamf Pro populate the true device name, the user assigned in the MDM and the email address attached to the user record.
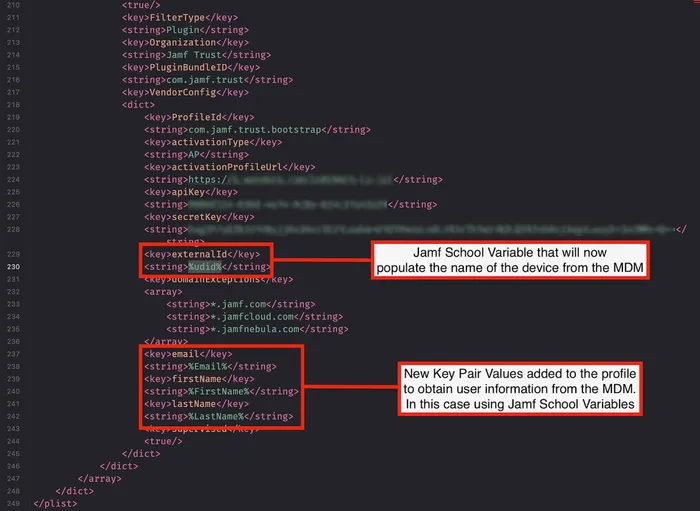
Example of activation profile when Balanced Privacy is enabled
Due to this change, when Privacy Modes are switched, devices need redeploying to Jamf Safe Internet with the relevant activation profile. There are a number of steps required to do this that we will cover in more detail below but the high-level view of the process is:
- Remove all current Jamf Safe Internet configuration from devices.
- Delete any activation profiles in Jamf School/Jamf Pro.
- Change Privacy Modes in Jamf Safe Internet.
- Obtain the new activation profile.
- Deploy to devices.
Before making any steps to switch to Balanced Privacy, it is best to verify your current setup so you can ensure you are starting from the right place and can see the differences once the Privacy Mode has been switched.
Identify devices that have Jamf Safe Internet deployed
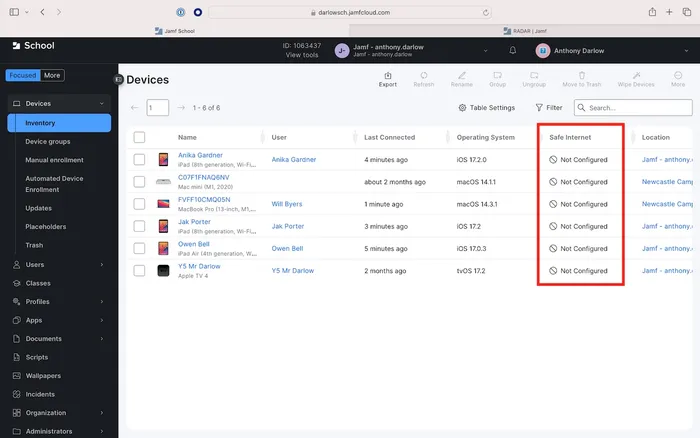
In Jamf School, you can identify devices that have a Jamf Safe Internet configuration installed by:
- Navigating to Devices → Inventory.
- Clicking “Table Settings”.
- Checking the “Safe Internet” box.
This then shows a visual indicator in the inventory view for devices with the Jamf Safe Internet configuration installed.
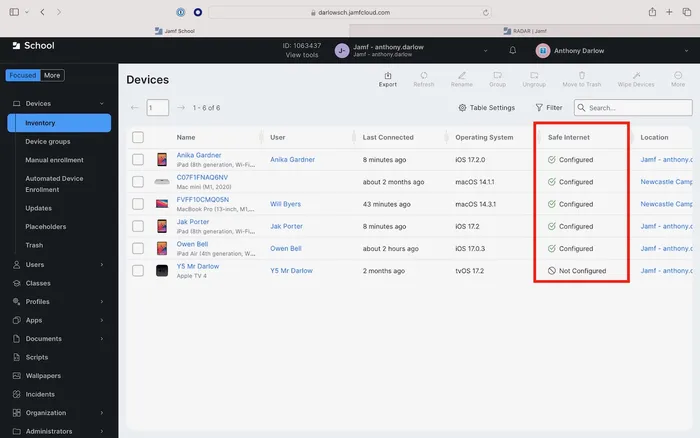
Devices with Jamf Safe Internet configuration installed
This could also be achieved by creating a Smart Group in both Jamf School or Jamf Pro.
Confirm your Jamf School one-click connection is valid
With a valid one-click connection, the activation profile that you have in the Jamf Safe Internet console is also shown in the “Safe Internet” payload in your Jamf School profile.
- In Jamf Safe Internet navigate to Devices → Activation Profiles and note the number of activation profiles and names. Depending on your configuration you may only have one activation profile.
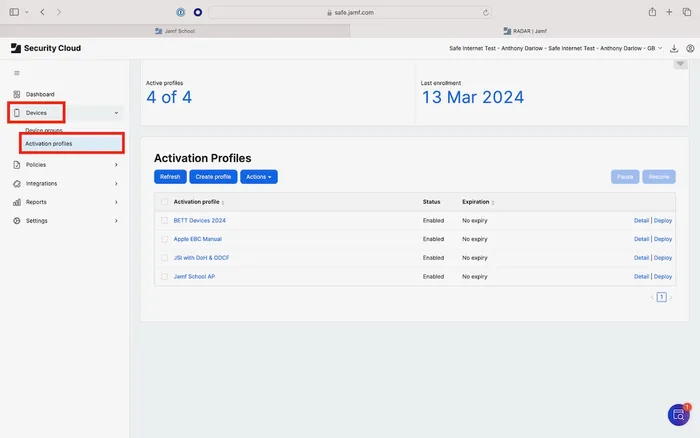
List of activation profiles
2. In the Jamf School console navigate to Profiles → Configuration Profiles.
3. Click the pencil icon on any profile that has a Jamf Safe Internet configuration payload.
4. Click on the “Safe Internet” payload in the left menu.
5. In the “Activation Profile” dropdown menu, compare the number of activation profiles and names to the ones shown in the Jamf Safe Internet console
This verification is for information only as this list will change once Balanced Privacy is enabled (depending on your deployment) but can be used to verify that the switch was successful in a later step.
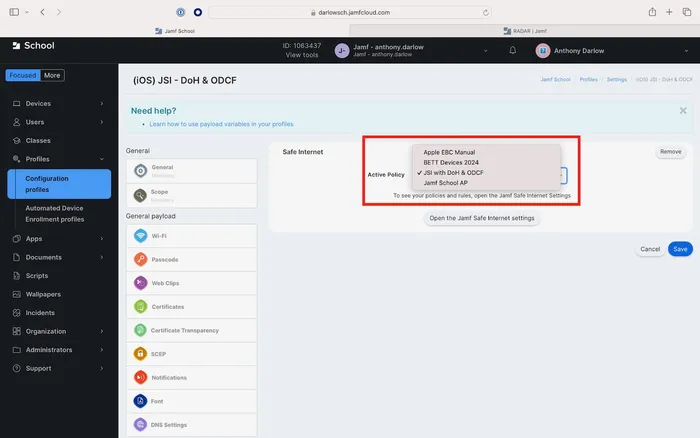
Jamf Safe Internet profile seen in Jamf School
This step is not required for Jamf Pro as there is no “one-click connection” workflow.
Confirm device details in Jamf Safe Internet are randomized
The most obvious place you will notice device details, once switched to “Balanced Privacy,” is in the Devices → Device Groups menu in Jamf Safe Internet. Therefore it is a good idea to familiarize yourself with how devices appear while “Full Privacy” is enabled. After navigating to Devices → Device Groups, confirm that device and usernames are randomized with long strings:
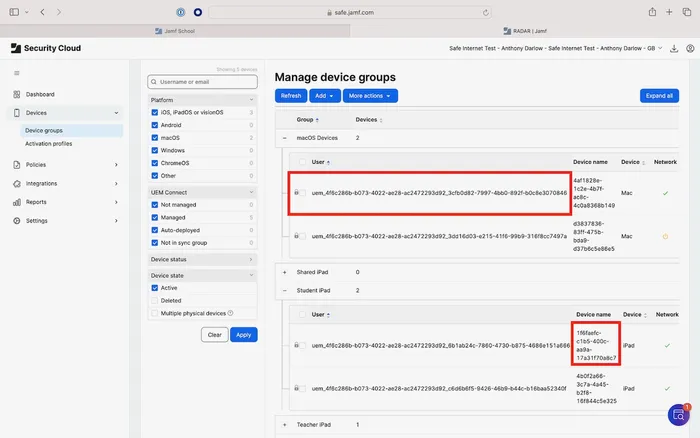
Devices in Full Privacy mode
Now that you have a view of what your current deployment looks like we can start the pre-flight process.
2. Pre-flight process
Before making the switch to “Balanced Privacy,” an admin must remove all configuration items from devices. For iOS, this is the configuration profile and the Jamf Trust app, for macOS this is the configuration profile.
This is due to the fact that when the switch is made to “Balanced Privacy,” all activation profiles are purged (due to the change in the config as described above). In some cases, if a device still has a Jamf Safe Internet configuration installed and the activation profile is deleted (which essentially provides a managed DNS setting to the device), devices are unable to communicate with the internet.
If an admin found themselves in this situation, the only fix would be to wipe the devices and re-enroll them into MDM. Depending on your environment, the wipe of the device might need to be a physical wipe with a Apple Configurator 2 (AC2) workflow for example. In other words, you cannot rely on a wipe via MDM.
Remove Jamf Safe Internet configuration artifacts
- In Jamf School/Jamf Pro, unscope the current Jamf Safe Internet profile from the devices. This will be unique for each environment depending on how you configure groups, settings, etc. but be sure to only unscope the Jamf Safe Internet profile.
- Next, unscope the Jamf Trust app from the devices. This will be unique for each environment depending on how you configure groups, settings, etc. but be sure to only unscope Jamf Trust.
At this point please be aware that the devices are no longer filtered by Jamf Safe Internet.
Delete Jamf Safe Internet profile(s) in MDM
Navigate to the configuration profiles in Jamf School/Jamf Pro, identify any Jamf Safe Internet profiles and delete them from the server. The number and names of the configuration profiles will be unique for each environment but be sure any configurations are removed.
Confirm that no devices have a Jamf Safe Internet configuration installed
In Jamf School, you can use the same method that we used above to view the deployment status of Jamf Safe Internet by navigating to Devices → Inventory and looking at the Safe Internet status (providing you have turned on this menu item in the previous step by clicking Clicking “Table Settings” → Checking the “Safe Internet” box).
Devices do not have Jamf Safe Internet configured
This could also be achieved by creating a Smart Group in Jamf School or Jamf Pro.
3. Making the switch
Once you have removed any “current” Jamf Safe Internet configurations from devices and removed “current” profiles from the MDM, you are ready to switch Privacy Modes in the Safe Internet console.
To do this in the Jamf Safe Internet console, navigate to Settings → Privacy and select “Balanced privacy”:
Balanced Privacy mode setting
Read and acknowledge the statement provided about the consequences that switching to “Balanced Privacy” will have. Click Accept if you wish to proceed.
Remember, it is the responsibility of the customer to ensure that they are able to switch to Balanced Privacy and that their instance is hosted in the appropriate region based on their laws, regulations and best practices.
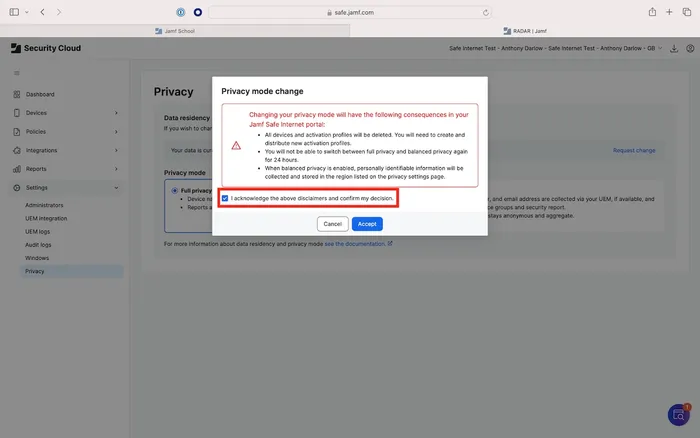
Warning when changing Privacy Modes
Once you have confirmed the change, there will be a dialogue informing you of a successful change and reminding you that you cannot change Privacy Modes again for 24 hours.
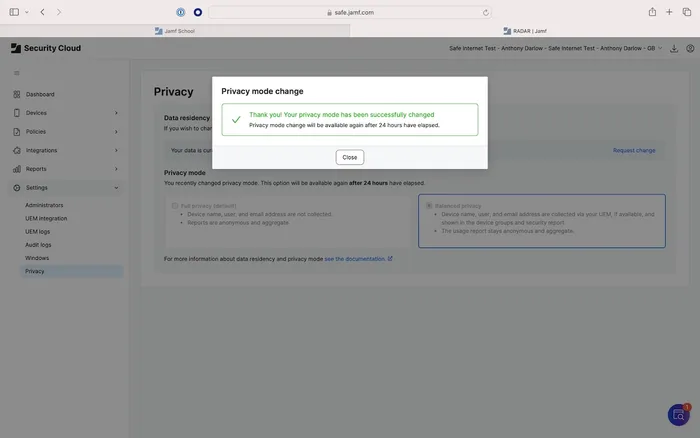
Privacy Mode change confirmation
What changed after the switch?
When the switch between Privacy Modes is made, there is a purge of any activation profiles that you had prior to the change and all devices are purged from the console.
Therefore after the switch you will have a new default activation profile in Devices → Activation Profiles which has the new key value pairs (as described above).
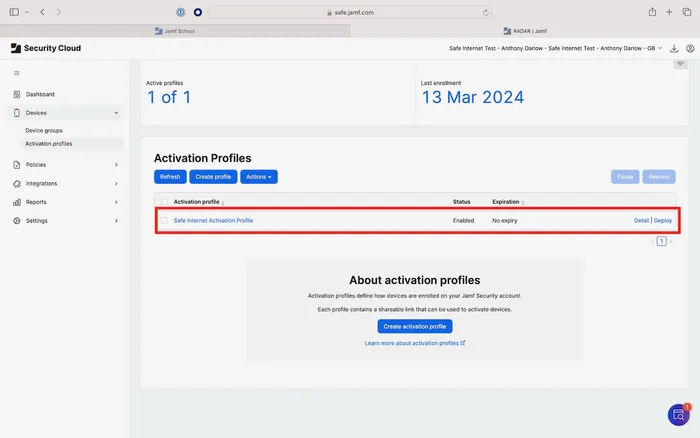
Safe Internet activation profile
You will also notice that there are no longer devices in the console if you navigate to Devices → Device Groups.
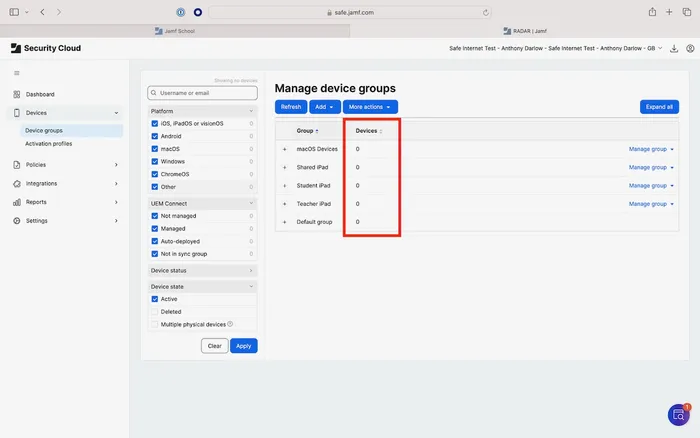
Empty device groups
At this point you have successfully switched Privacy Modes, but your devices are not yet protected by Jamf Safe Internet.
4. Post-flight deployment
The next step after making the switch in the Jamf Safe Internet console is to deploy the new Jamf Safe Internet configuration to your devices. This includes creating a new Jamf Safe Internet profile in Jamf School or downloading an activation profile from Jamf Safe Internet and uploading to Jamf Pro.
New configuration profile in Jamf School
- Log into your Jamf School console and navigate to Profiles. Select “+ Create Profile.”
- Create the profile by selecting “iOS” → “Device Enrollment.”
- Name the profile according to your environment’s needs, noting that something mentioning that the profile has a Jamf Safe Internet configuration is advised.
- Select “Finish.”
- Scroll down to the “Safe Internet” payload and select “Configure.”
- From the dropdown menu, select an activation profile.
- Select “Save.”
If you checked the number of items in the dropdown “activation profile” list before the switch, at this point you can confirm that this now reflects the the number and names of activation profiles that are in your Jamf Safe Internet console now.
As an example, say prior to the switch, I had four activation profiles in the list. After the switch, the activation profiles were purged and replaced with a single default profile. This is now reflected in the Jamf School Jamf Safe Internet payload, where I again only have a single profile. This shows the the one-click connection is still active.
New configuration profile in Jamf Pro
- Log into your Jamf Safe Internet console and navigate to Devices → Activation Profiles.
- Click the activation profile desired (as standard there is one default profile but some customers may have created more).
- Go to “Select your UEM solution”→ “Jamf Pro”.
- Under “Select your OS” click the OS for your deployment.
- Click “Configuration profiles” → Download configuration profile (store this somewhere you can find it later).
- Repeat for the OS platforms required. For example if you have iOS and macOS devices in your estate you will need the configuration profile for both platforms.
- Log into your Jamf Pro instance.
- Navigate to Devices → Configuration Profiles (for iOS) or Computers → Configuration Profiles (for macOS).
- Click upload and upload the configuration profile that was downloaded from the Jamf Safe Internet console.
- Click “Save.”
Deploy configuration to devices
Once you have the new Jamf Safe Internet profile in your MDM, scope the Jamf Safe Internet profile (iOS and macOS) and the Jamf Trust app (iOS only) to your target devices. How you scope the profile and the app to the devices will be unique for each environment depending on how you configure groups, settings, etc. and depending on if you are using Jamf School or Jamf Pro.
Warning for Jamf School deployments
If you have followed the steps in the pre-flight section, you will have deleted any Safe Internet profiles that you have in your environment. However, if you did not for some reason, please be aware that after switching to “Balanced Privacy,” the Jamf Safe Internet payload in any remaining profiles will show the new default activation profile but will fail to deploy. This is due to the payload being empty (not having the activation profile details) even though it appears to have selected the new default activation profile. You must recreate any profiles in order to populate the payload with the new details.
In the screenshot below, you will see the Jamf Safe Internet profile that we had in Jamf School before making the switch and we didn’t delete called “(iOS) JSI - DoH & ODCF” which failed. When looking into the error details, it stated the configuration for Jamf Safe Internet was empty.
Failed profile with no Jamf Safe Internet configuration
Balanced Privacy in the Jamf Safe Internet console
Once you have deployed the new Jamf Safe Internet configurations to your devices, you will see them start to get populated in the Jamf Safe Internet console in the Devices → Device Groups pane. If you are also using UEM Connect with your MDM and have mapped MDM groups with Security Groups, you will see devices populate the relevant groups too.
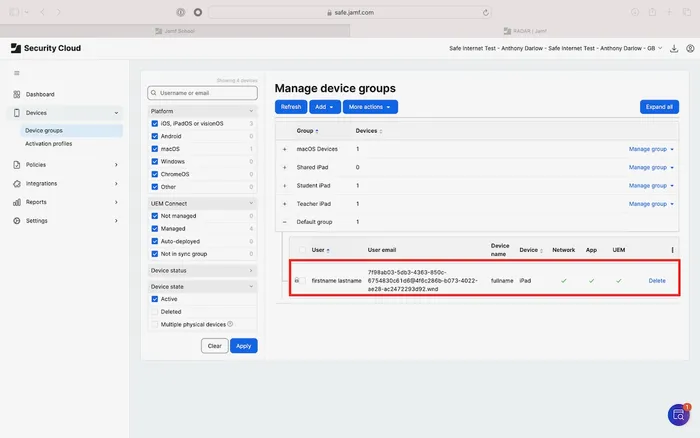
With “Balanced Privacy” enabled, admins can now see device names, which users are assigned to devices and if enabled in the view settings, email addresses attached to the user record (to enable this view select the 3 dots in any group and check the “user email” box).
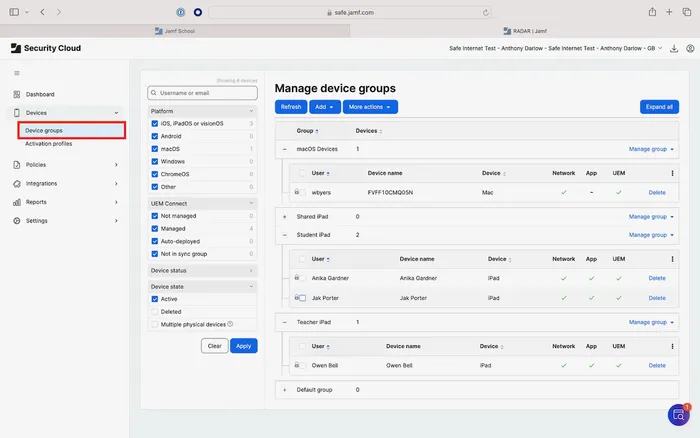
Devices with Balanced Privacy enabled
IT admins will now also have a view of who, what and when in Security Report. To see the security reports navigate to Reports → Security report. Admins can group this data together via:
- Categories: view all devices that trigger specific event types, e.g. spam.
- Sites: view all websites that have triggered an event and which devices have been to each site.
- Devices: view all devices that have triggered an event and see which sites that device triggered a block.
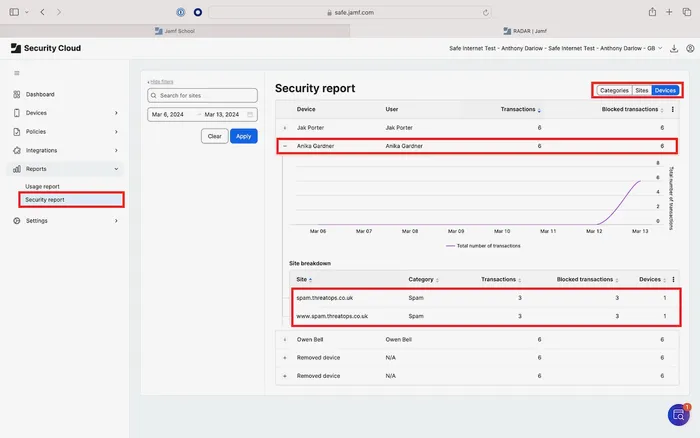
Devices in Security Report
Should the device not have a user assigned or a defined name in the MDM, once it is activated in Jamf Safe Internet it will use generic details based on the variables in the configuration profile. Therefore, it is highly recommended that you name and assign users to devices prior to adding the Jamf Safe Internet configurations to your devices.
Generic device information
Switching to Full Privacy
Should you find that after switching to “Balanced Privacy” you need to switch back to “Full Privacy” then the process is the same:
- Remove all current Jamf Safe Internet configuration from devices.
- Delete any activation profiles in Jamf School/Jamf Pro.
- Change Privacy Mode in Jamf Safe Internet.
- Obtain the new activation profile.
- Deploy to devices.
The only difference is selecting “Full Privacy” on the “Change Privacy Modes in Jamf Safe Internet” step.
Remember that Privacy Modes can only be changed once every 24 hours, can only be changed by super admins and the change is recorded in the audit logs.
Subscribe to the Jamf Blog
Have market trends, Apple updates and Jamf news delivered directly to your inbox.
To learn more about how we collect, use, disclose, transfer, and store your information, please visit our Privacy Policy.


