
Did you attend the Jamf Protect Incident Response webinar? This post will help you to implement the workflows you learned. These workflows are set using a threat level classification to determine the method of remediation or response; this can allow for easier management of various remediation workflows.
DISCLAIMER: If you have not viewed the webinar, you will want to do so. This post contains primarily supplemental materials that you’ll want to reference when implementing the ideas presented in the webinar. These are example workflows and should be properly tested before being implemented in your production environment.
Jamf Protect setup
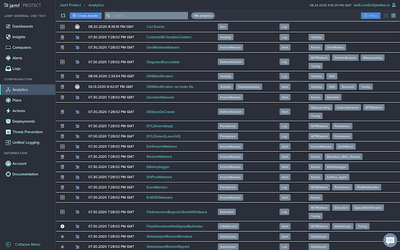
Identify the analytics in Jamf Protect that you would like to set up a response to.
- Open the Jamf Protect console
- Select “Analytics”
- Identify the chosen analytic
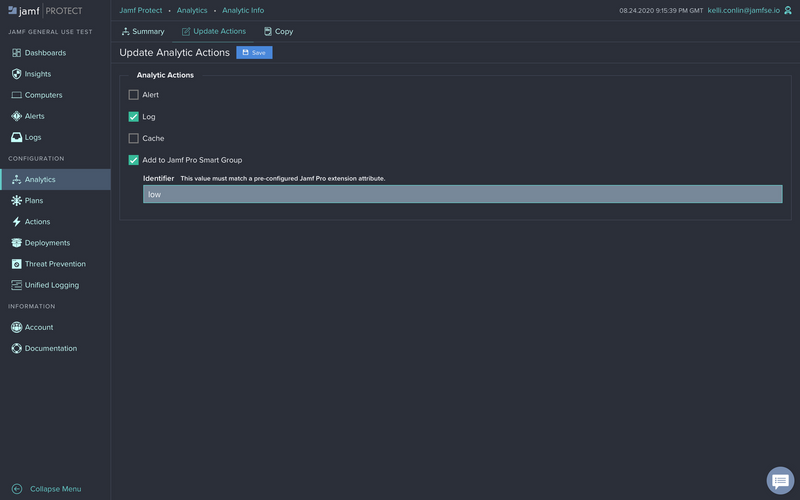
- Select the “Update Actions” tab
- Check “Add to Jamf Pro Smart Group”
- Choose a text value from the text pop-up. This will be the extension attribute written to the device by the Jamf Protect agent when it discovers a security incident. (For example: low, medium, high; malware.)
Jamf Pro initial setup steps
Extension attribute script
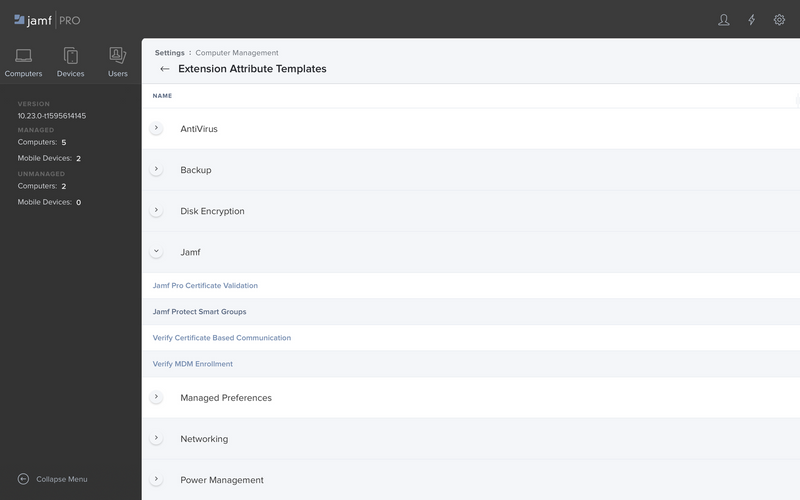
- Open the Jamf Pro Settings > “Computer Management” > “Extension Attributes”
- Select “New from Template”
- Open the “Jamf” section
- Select “Jamf Protect Smart Groups”
- Select “Save” at the bottom of the page

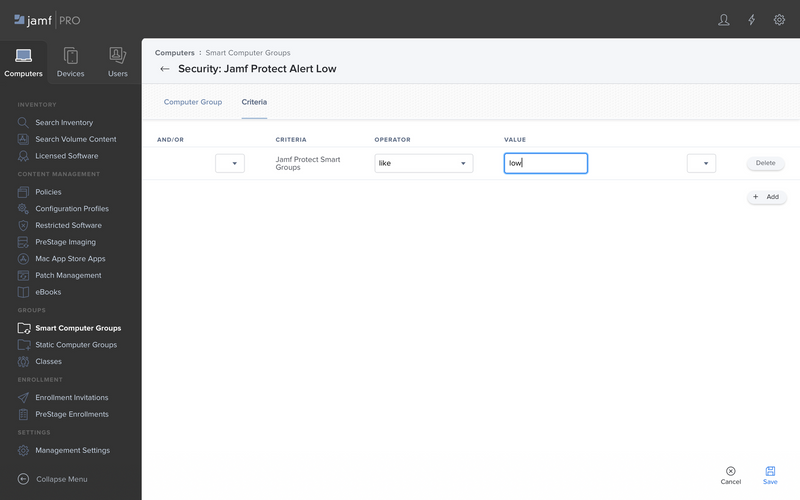
Smart Group creation
- Select “Computers”
- Then select “Smart Computer Groups”
- Select on “+ New” button at the top right
- Enter a name for this Smart Computer group such as “Security: Jamf Protect Low Threat”
- Select “Criteria” tab
- Select “Add” button, then select “Show Advanced Criteria”
- Find the “Jamf Protect Smart Groups” attribute, select choose
- Enter the text of the extension attribute value (See the above Jamf Protect setup)
- Select “Save”
*NOTE: Once the extension attribute is written to the device by the Jamf Protect agent, the extension attribute must be removed for the device to fall out of the Smart Group. This can be done by script of command.
- This will clear all extension attributes created by Jamf Protect:
rm /Library/Application\ Support/JamfProtect/groups/*
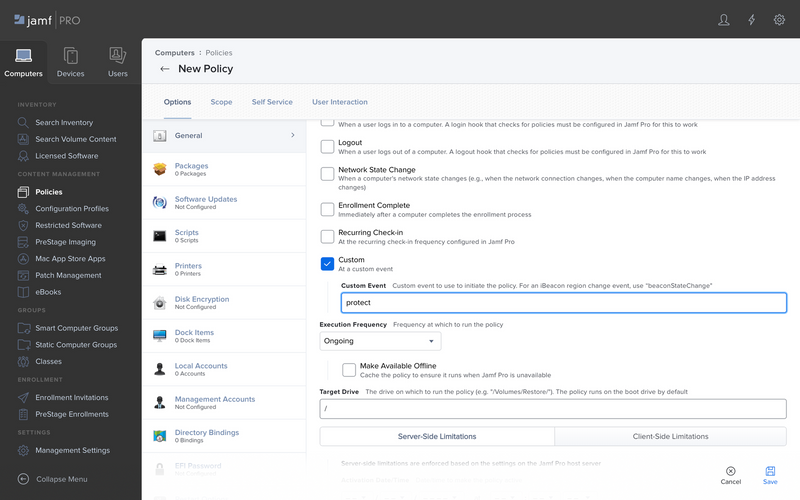
Policy event trigger
- Select “Computers”
- Select “Policy”
- Select “New” button
- In the General area, enter a name for this policy, and insert a custom trigger of “protect.” This will allow the policy to run when the Jamf Protect agent has a detection.
- Set the execution frequency to “Ongoing”
Low-level threat
In this workflow you will prompt your end user with a pop-up message from Jamf Helper of what has taken place on their device. This response if very light and not invasive (ie. no file deletion or isolation).
*NOTE: This workflow will automatically clear the extension attribute after prompt to end user.
Jamf Helper policy:
- Create a new policy (follow the policy steps from the Jamf Pro setup section)
- Add a “Script” configuration, add the script below
*NOTE: The script must first be added to Jamf Pro Settings > “Computer Management”> “Scripts”
Select the “Scope” tab
- Select “Computer Group” > “Add”
- Select the new Smart Computer Group that was created for a low alert
- Select “Save”
Low-level Jamf Helper script
 #!/bin/bash

# Jamf Helper Script for Jamf Protect

jamfHelper="/Library/Application Support/JAMF/bin/jamfHelper.app/Contents/MacOS/jamfHelper"

#Header for Pop Up

heading="IT Security Notification"

#Description for Pop Up

description="Your machine has possibly been compromised. Please report to IT."

#Button Text

button1="Ok"

#Path for Icon Displayed

icon="/System/Library/CoreServices/CoreTypes.bundle/Contents/Resources/AlertStopIcon.icns"

userChoice=$("$jamfHelper" -windowType utility -heading "$heading" -description "$description" -button1 "$button1" -icon "$icon")

#Remove Jamf Protect Extension Attribute

rm /Library/Application\ Support/JamfProtect/groups/*

#Update Jamf Inventroy

jamf recon
Medium-level threat
A medium-level threat is an unwanted security event with minimal impact. For this workflow, once there is a detection, a Jamf Helper pop-up message displays to the end user telling them what has happened to their device and instructing them to select “Ok” to open Self Service. Once Self Service launches, it will immediately open a policy that will run a command to move items from the downloads folder that have been added in the last 24 hours to the trash.
*NOTE: This workflow will automatically clear the Extension Attribute in the clearing script.
Jamf Helper policy
- Create a new policy (follow the policy steps from the Jamf Pro setup section)
- Add a “Script” configuration, add the script below
*NOTE: The script must first be added to Jamf Pro Settings > “Computer Management”> “Scripts”
- Select the “Scope” tab
- Select “Computer Group” > “Add”
- Select the new Smart Computer Group that was created for a medium alert
- Select “Save”
Medium-level Jamf Helper script
 jamfHelper="/Library/Application Support/JAMF/bin/jamfHelper.app/Contents/MacOS/jamfHelper"

#Header for Pop Up

heading="IT Security Notification"

#Description for Pop Up

description="You have tried to open an application that is unauthorized on Corporate Computers. Please click Ok to open Self Service and move all files downloaded in the last 24 hours to the trash. Contact Corporate IT for further assistance"

#Button Text

button1="Ok"

#Policy ID for policy in Self Service

policyID="59"

#Path for Icon Displayed

icon="/System/Library/CoreServices/CoreTypes.bundle/Contents/Resources/AlertStopIcon.icns"

userChoice=$("$jamfHelper" -windowType utility -heading "$heading" -description "$description" -button1 "$button1" -icon "$icon")


if [[ $userChoice == 0 ]]; then

echo "user clicked $button1"

open "jamfselfservice://content?entity=policy&id=$policyID&action=view"

fi
Self Service command
- Create a new policy
- Set the execution frequency to “Ongoing”
- Add a “Script” configuration, add the script below
*NOTE: The script must first be added to Jamf Pro Settings > “Computer Management”> “Scripts”
- Select the “Self Service” tab
- Check “Make the policy available in Self Service”
- Select the “Scope” tab
- Select “Computer Group” > “Add”
- Select the new Smart Computer Group that was created for a medium alert
- Select “Save”
Clearing downloads folder script
 #!/bin/bash

# Move all files downloaded in the last 24 hours to the trash

#Move the files from Downloads to the Trash

find ~/Downloads/ -type fd -mtime 0 -exec mv {} ~/.Trash \;

#Remove Jamf Protect Extension Attribute

rm /Library/Application\ Support/JamfProtect/groups/*

#Update Jamf Inventroy

jamf recon
High-level threat
A high-level threat is when something malicious has occurred but the impact is still unknown. For this workflow, once there is a detection a Jamf Helper pop-up message displays to the end user telling them what has happened to their device and that they have lost network access. Then the device will be excluded from the network configuration profile.
*NOTE: This workflow will NOT automatically clear the Extension Attribute. And there is a risk of the configuration profile exclusion happening before the Jamf Helper script can run.
Jamf Helper policy
- Create a new policy (follow the policy steps from the Jamf Pro setup section)
- Add a “Script” configuration, add the script below
*NOTE: The script must first be added to Jamf Pro settings > “Computer Management”> “Scripts”
- Select “Before” under Priority
- Select the “Scope” tab
- Select “Computer Group” > “Add”
- Select the new Smart Computer Group that was created for a high alert
- Select “Save”
High-level Jamf Helper script
 jamfHelper="/Library/Application Support/JAMF/bin/jamfHelper.app/Contents/MacOS/jamfHelper"

#Header for Pop Up

heading="IT Security Notification"

#Description for Pop Up

description="Your computer may be infected with malware. Your network connection has been disabled. Please power down your Mac and call your IT administrator immediately at 888-867-5309"

#Button Text

button1="Ok"

#Path for Icon Displayed

icon="/System/Library/CoreServices/CoreTypes.bundle/Contents/Resources/AlertStopIcon.icns"

userChoice=$("$jamfHelper" -windowType utility -heading "$heading" -description "$description" -button1 "$button1" -icon "$icon")


if [[ $userChoice == 0 ]]; then

echo "user clicked $button1"

exit 0

fi
Smart Group exclusion
- Find your network configuration profile
- Select the “Scope” tab
- Select “Exclusions”
- Select “Computer Group” > “Add”
- Select the new Smart Computer Group that was created for a high alert
- Select “Save”
DEPNotify Workflow
DEPNotify allows for customization compared to Jamf Helper, but does require a separate package to be installed. In this workflow, when there is a detection of a known threat (or malware) from Jamf Protect’s Threat Prevention feature, the end user will be locked in full screen by DEPNotify while an additional script runs to clean up the detected threat.
*NOTE: This workflow requires a custom analytic in Jamf Protect to go beyond the native Block and Quarantine functionality. Also, this workflow will automatically clear the extension attribute after DEPNotify runs and delete the DEPNotify application.
Jamf Protect custom analytic
*NOTE: This is considered advanced level administration. Please see this section of the Jamf Protect admin guide for more information on Creating Analytics.
- Open the Jamf Protect console
- Select “Analytics”
- Select “Create Analytic”
- Add the name “Threat Prevention File Quarantined”
- Add the category “Known Malware”
- Paste “Monitoring for when a process is moved to quarantine from Threat Prevention” into the description field
- Set Sensor Type to “GPFSEvent”
- Switch to “Filter Text View”
- Paste the NSPredicate below
- Under Analytic Actions
- Check “Log”
- Check “Add to Jamf Pro Smart Group”
- In the text pop displayed choose a text value, this will be the Extension Attribute written to the device by the Jamf Protect Agent when a detection occurs. (ex. malware)
- Scroll to the top and Select “Save”
- Select “Plans”
- Select your desired plan
- Select the “Analytics” tab (this is the tab next to “Summary”)
- Check the new Analytic for “Threat Prevention File Quarantined”
- Scroll to the top and Select “Save Plan Analytics”
*Note: At next check-in the device will receive the updated plan with the newly added analytic.
NSPredicate for Jamf Protect analytic
$event.isNewFile == 1 AND $event.path MATCHES [c] "/Library/Application Support/JamfProtect/Quarantine/.*/.*"
Add DEPNotify to Jamf Pro
Upload the latest DEPNotify package into Jamf Pro from the link below. (Jamf Pro Settings > “Computer Management” > “Packages”).
DEPNotify Policy:
- Create a new Policy (follow the Policy steps from the Jamf Pro Setup Section)
- Add a “Script” configuration, add the script below
*NOTE: The script must first be added to Jamf Pro Settings > “Computer Management”> “Scripts”
- Select “After” under Priority
- Add a “Packages” configuration, add the DEP Notify package
- Select the “Scope” tab
- Select “Computer Group” > “Add”
- Select the new Smart Computer Group that was created for a malware alert
- Select “Save”
DEPNotify Script
 #!/bin/bash

# Version 1.0.0

##########################################################################################################

# Script by Sean Rabbitt, Jamf Senior Sales Engineer and Kelli Conlin, Jamf Security Solutions Specialist

##########################################################################################################

# DEP Notify for Jamf Protect

if [ -f "/Applications/Utilities/DEPNotify.app/Contents/MacOS/DEPNotify" ]; then

/Applications/Utilities/DEPNotify.app/Contents/MacOS/DEPNotify -fullScreen &

else

echo "DEP Notify Not Present.. Exiting"

exit 1;

fi

#Icon

echo "Command: Image: /System/Library/CoreServices/CoreTypes.bundle/Contents/Resources/AlertStopIcon.icns" >> /var/tmp/depnotify.log

#Title

echo "Command: MainTitle: Jamf Protect Remediation" >> /var/tmp/depnotify.log

#Main Text Body

echo "Command: MainText: Malicious activity on this computer has been detected by Jamf Protect.\nIf this screen appears for longer than 5 minutes, call the IT Department on the back of your badge to create a help desk ticket.\n \nControl will return when the malicious software has been isolated." >> /var/tmp/depnotify.log

#Status Message

echo "Status: Isolating malicious software..." >> /var/tmp/depnotify.log

echo "Command: Determinate: 2" >> /var/tmp/depnotify.log

# Here's where you would put your Jamf policy command

jamf policy -event clearing

sleep 2

# Here's where you would put your Jamf policy command

#jamf policy -event protectrocks

#sleep 2

#Completed Status Message

echo "Status: The malicious software has been isolated." >> /var/tmp/depnotify.log

echo "Command: DeterminateManualStep" >> /var/tmp/depnotify.log

sleep 2 # Optional sleeps...

#Completed Title

echo "Command: MainTitle: Remediation Complete" >> /var/tmp/depnotify.log

#Completed Icon

echo "Command: Image: /Library/Application Support/JamfProtect/JamfProtect.app/Contents/Resources/AppIcon.icns" >> /var/tmp/depnotify.log

#Completed Text Body

echo "Command: MainText: The malicious software has been isolated. Reboot is recommended.\n \nSave your work and reboot your computer.\n\nPhishing attempts are the biggest risk to organization data. If you receive any unusual emails or phone calls asking for access to your user name, password, requests to install software, or start screen sharing to your computer, contact the IT Security Department by calling the number on the back of your badge. \nHave your Employee ID ready when you call." >> /var/tmp/depnotify.log

echo "Command: DeterminateManualStep" >> /var/tmp/depnotify.log

echo "Status: " >> /var/tmp/depnotify.log

echo "Command: ContinueButton: Continue" >> /var/tmp/depnotify.log

# Alternative Command to force a restart:

#echo "Command: ContinueButtonRestart: Restart" >> /var/tmp/depnotify.log

rm /var/tmp/depnotify.log

#rm /var/tmp/com.depnotify.provisioning.done

# If forcing a restart

#rm /var/tmp/com.depnotify.provisioning.restart

#Remove Jamf Protect Extension Attribute

rm /Library/Application\ Support/JamfProtect/groups/*

#Update Jamf Inventroy

jamf recon

#Remove DEPNotify

rm -R /Applications/Utilities/DEPNotify.app
Policy command
- Create a new policy
- In the General area, enter a name for this policy, and insert a Custom Trigger of “clearing.” This will allow the policy to run from the DEPNotify script.
- Set the execution frequency to “Ongoing”
- Add a “Script” configuration, add the script below
*NOTE: The script must first be added to Jamf Pro Settings > “Computer Management”> “Scripts” - Scope to "All Computers and Users"
- Select “Save”
Malware extraction script
 #!/bin/bash

# Malware Cleanup for Jamf Protect

#Zip Malware

cd /Library/Application\ Support/JamfProtect/Quarantine/*; zip -r -X "../Malware-$(date +%Y_%m_%d-%H_%M_%S).zip" *

#Move Malware to a new location, Default is /Users/Shared

cd /Library/Application\ Support/JamfProtect/Quarantine/; mv Malware*.zip /Users/Shared

#Remove the Malware

rm -R /Library/Application\ Support/JamfProtect/Quarantine/*
Learn more about remediating a macOS security incident
Subscribe to the Jamf Blog
Have market trends, Apple updates and Jamf news delivered directly to your inbox.
To learn more about how we collect, use, disclose, transfer, and store your information, please visit our Privacy Policy.