
You remember those days of using the famous GitHUB – rtrouton/CasperCheck written by Rich Trouton?
You can use this updated workflow to remediate clients that are not checking in with Jamf Pro anymore due to the following reasons:
- The /usr/local/jamf/bin/jamf binary got broken
- An admin user that did not like being managed removed the /usr/local/jamf/bin/jamf from the device
With the latest macOS Operating Systems, and especially since macOS Big Sur or above and Jamf Pro Version 10.25, the traditional QuickAdd.pkg which enrolled devices in Jamf Pro by installing the MDM Profile became limited.
Many Mac admins struggling nowadays with re-deploying the Jamf Framework to macOS clients are often dealing with cases where the binary stopped working or a "doesn't-like-to-be-managed" end-user removed it.
With the release of Jamf Pro 10.26, we are able to install a software package by sending the MDM command InstallEnterpriseApplication. Before the release of Jamf Pro 10.36, this was a hidden feature that could be enabled by flipping a feature knob.
Additionally, with the release of Jamf Pro 10.36, a new API endpoint has been born: allow me to introduce api/v1/jamf-management-framework/redeploy/. With this endpoint, we are able to distribute a QuickAdd.pkg to the macOS client to re-deploy the Jamf Framework. Under the hood, we are using the same InstallEnterpriseApplication MDM command as used in the /api/v1/deploy-package API endpoint.
This blog shows how to automatically re-deploy the Jamf Framework to macOS clients who did not check in for the last X amount of days. We'll use Jamf Pro webhooks to send device IDs to Microsoft PowerAutomate. PowerAutomate will process the information, and we will use the API endpoints to re-deploy the Jamf Framework to those clients.
As we are using the MDM Framework, which in many cases can't be removed from supervised devices, this should be the way forward to keeping those clients healthy.
This workflow can be used with many other code automation tools or scripts like Torq, Zapier, Okta Workflows, JAWA and many others. The reason I’m writing this based on Microsoft PowerAutomate is that many enterprise customers have Office 365 E3/Business Premium licenses that include PowerAutomate. Some features require Premium.
Adding a device in a smart group triggers a webhook, which sends event data to PowerAutomate. The workflow triggers PowerAutomate to redeploy the JMF Framework and automatically notify the end-user.
Implementation concerns/impact on the environment:
-
An escalated volume of requests to this endpoint can have an impact on Jamf Pro stability in some environments running Jamf Pro. Always test workflows in a test environment prior to use in a production environment.
-
I highly recommend that on-premises customers who use this endpoint enable Tomcat access logging by modifying Apache Tomcat settings. For more information, see the valve component in the Tomcat 8 Configuration Reference. With Tomcat access logging configured, a Jamf Pro administrator has the ability to view information about all requests made to the server that are valuable for understanding historical details of how the feature is being used.
-
I discourage the use of workflows that store Jamf Pro credentials in scripts or parameters.
Requirements
-
Minimum of Jamf Pro running on version 10.36 or higher
-
macOS 10.13.6 or later (due to the
InstallEnterpriseApplicationcommand not being available prior) -
Access to Microsoft PowerAutomate
Instructions
-
Create an automated cloud flow in Microsoft PowerAutomate.
-
Create a smart group in Jamf Pro.
-
Create a webhook in Jamf Pro.
Creating an automated cloud flow in Microsoft PowerAutomate
Step 1: Navigate to the Powerautomate/Microsoft power platform. Sign in with your corporate credentials and the account that has a valid/trial PowerAutomate license.
Step 2: Select My Flows from the lefthand menu and the + to create a new automated cloud flow.
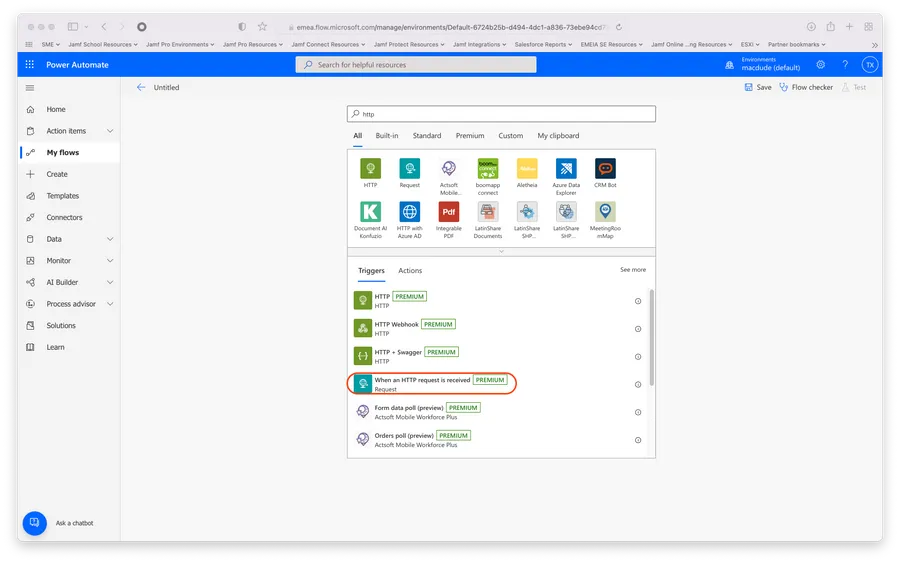
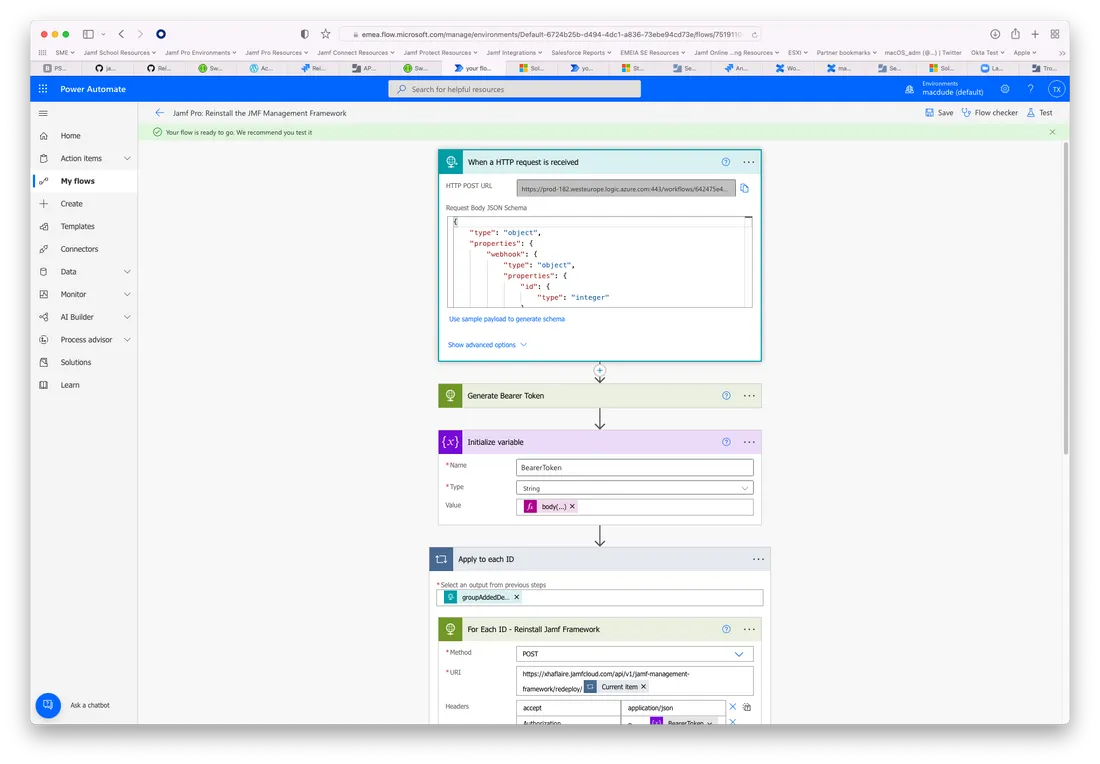
Step 3: Give your flow a name. Search for the flow trigger when an HTTP request is received, and select it as a trigger.
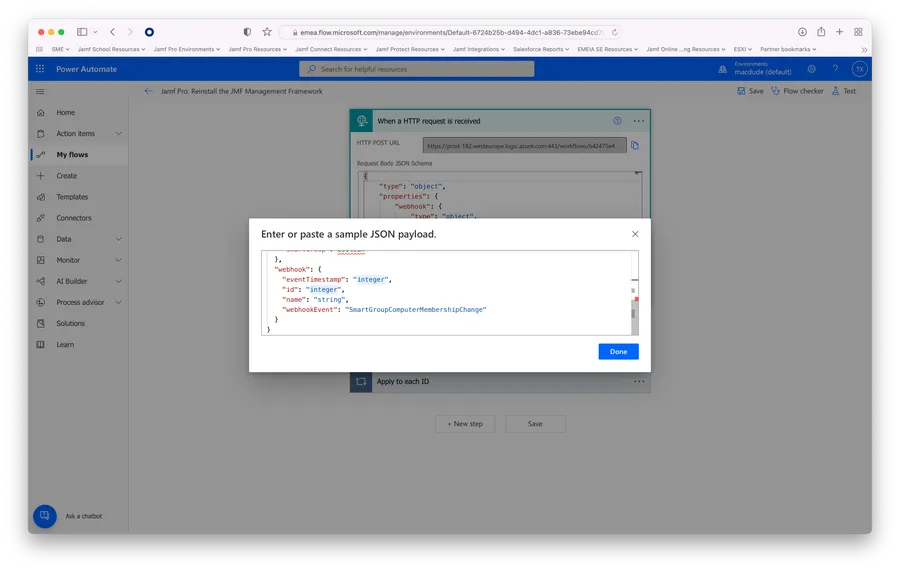
Step 4: Paste JSON sample data
Now we need to generate a JSON template schema. Select Use sample payload to generate schema and copy/paste the values from the webhooks documentation.
*If errors occur for your integer, you'll need to include them in quotes: "integer."
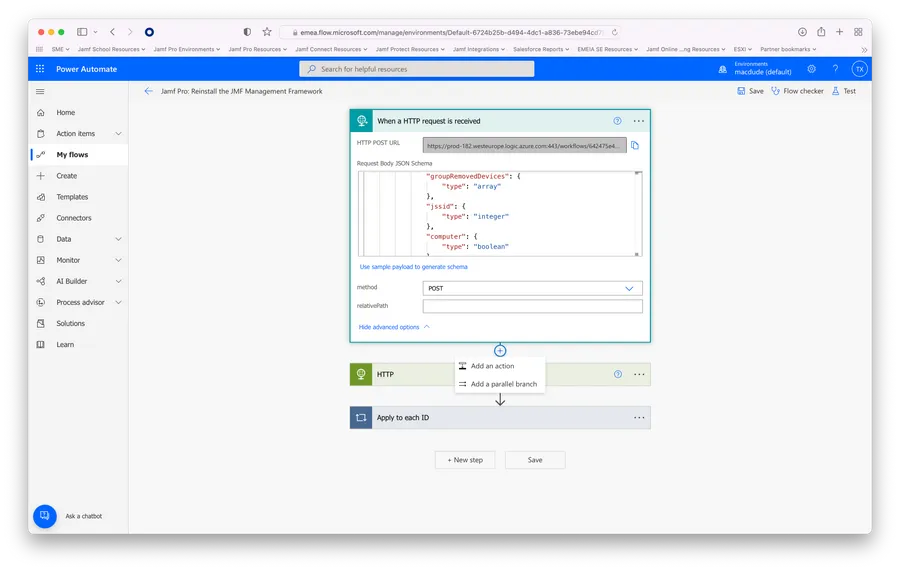
Step 5: Configure advanced options
Select show advanced options and select method POST.
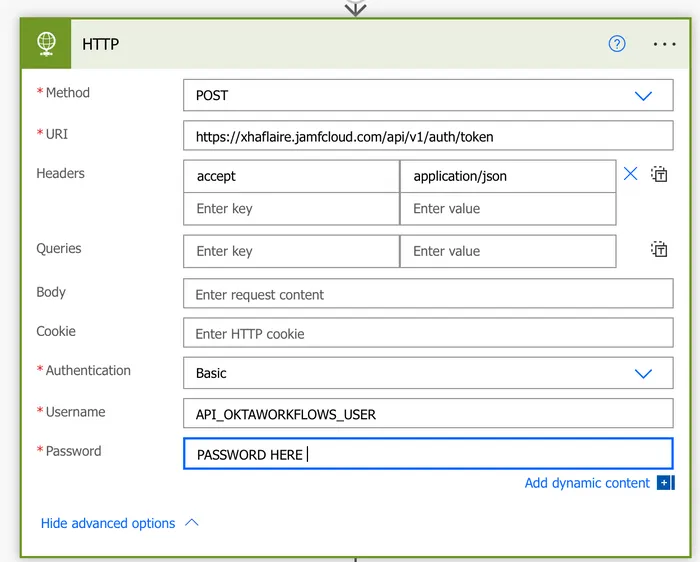
Step 6: Generate bearer token for API authentication
Add new action by selecting the + and the HTTP action.
Configure the following fields:
Method → POST
URI → https://yourJSS.jamfcloud.com/api/v1/auth/token
Authentication → basic
Username → username from Jamf Pro users and groups
Password → jamf1234
TIP: click on the three dots and then Rename to rename the action to a custom value. I did this in a later stage.
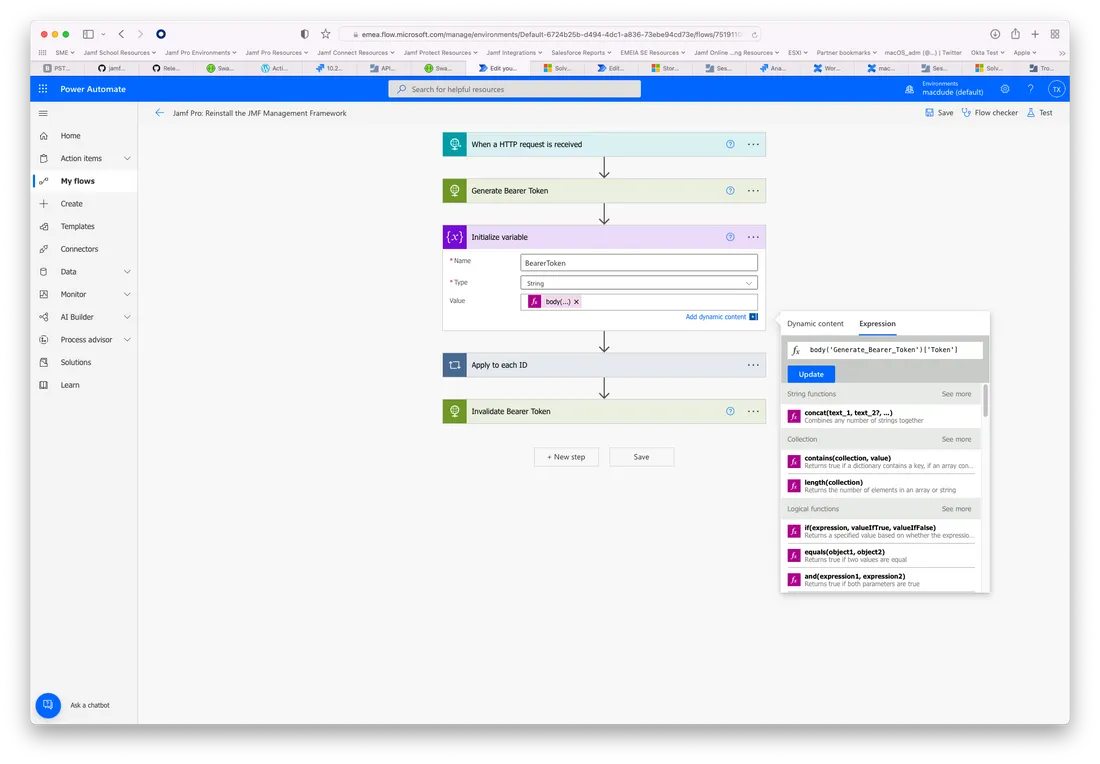
Step 7: Add action to initialize a variable
Add a new action by selecting +. Search for and select Initialize variable. Populate the following variables:
Name → BearerToken
Type → String
Value → body('Generate_Bearer_Token')['Token']
(Note: replace Generate_Bearer_Token with the name of the HTTP action that generates the bearer token; the default is HTTP.)
Step 8: Add new action
Add new action by selecting + and then apply to each action.
Step 9: Configure a for each section
In the required "select an output from previous steps," select groupAddedDeviceIds as data we can use for each step.
When configuring this, if we receive multiple device IDs from the webhook event, PowerAutomate is going to send the MDM command for each Jamf Pro device ID.
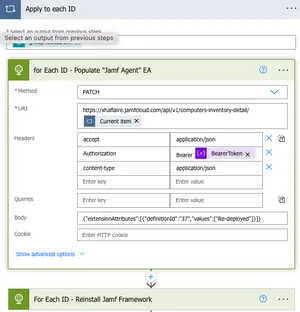
(OPTIONAL): Populate Extension Attribute for each ID
In the Apply to each action, click in the view Add an Action and select the HTTP action.
We assume you have already created an extension attribute in Jamf Pro. Find its ID in the URL of the extension attribute. By populating the EA with a value like “re-deployed,” we can create a smart group that reports on this value and excludes devices from re-executing policies once the Jamf Framework has been reinstalled, causing an enrollment complete trigger.
Configure the following fields:
Method → PATCH
URI → https://yourJSS.jamfcloud.com/api/v1/computers-inventory-detail/ and select the dynamic content Current Item after the / like in the example screenshot. Then, for all device IDs, we will do a PATCH command against the API.
Headers → accept application/JSON
Headers → Authorization Bearer BearerToken
Body → {"extensionAttributes":[{"definitionId":"37","values":["Re-deployed"]}]} ← Replace 37 by the ID if your Extension Attribute, you can also use a custom value instead of “Re-deployed”
Make sure to check the screenshot example to mirror where to position the values.
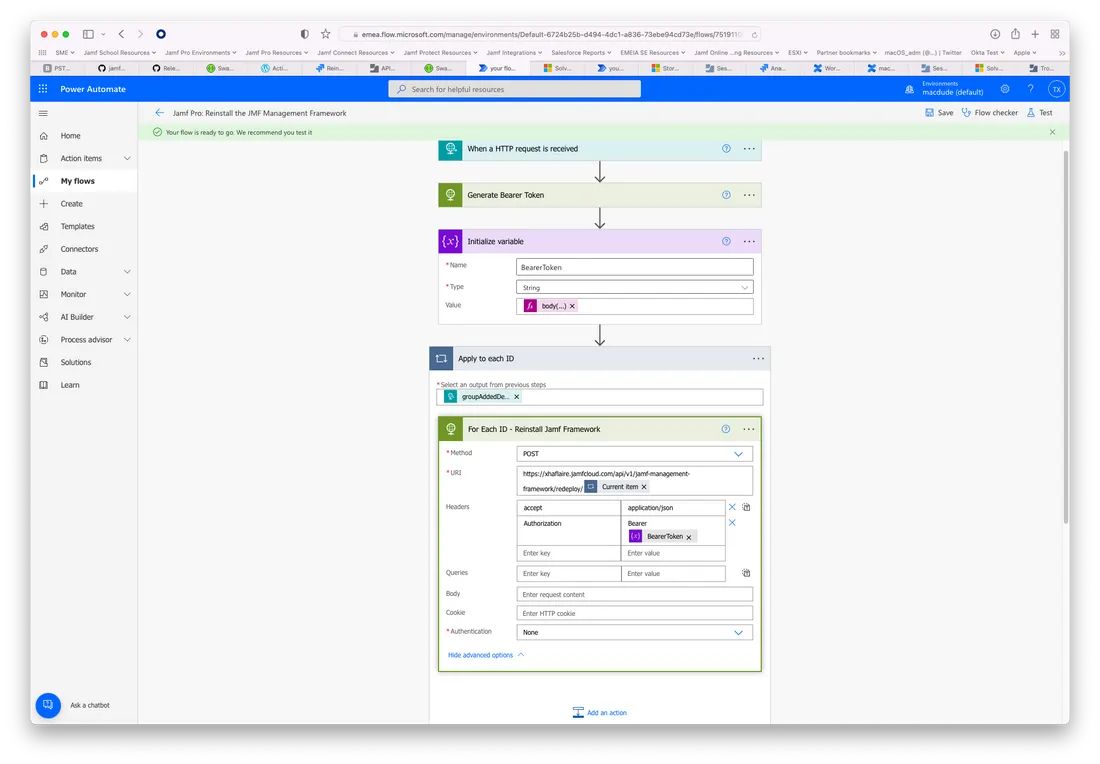
Step 10: Send redeploy command for each ID
In the Apply to each action click in the view Add an action and select again the HTTP action.
Configure the following fields:
Method → POST
URI → https://yourJSS.jamfcloud.com/api/v1/jamf-management-framework/redeploy/ and select the dynamic content Current Item after the / like in the example screenshot. Then for all device IDs we will do a POST command against the API.
Headers → accept application/JSON
Headers → Authorization Bearer BearerToken
Make sure to check the screenshot example to mirror where to position the values.
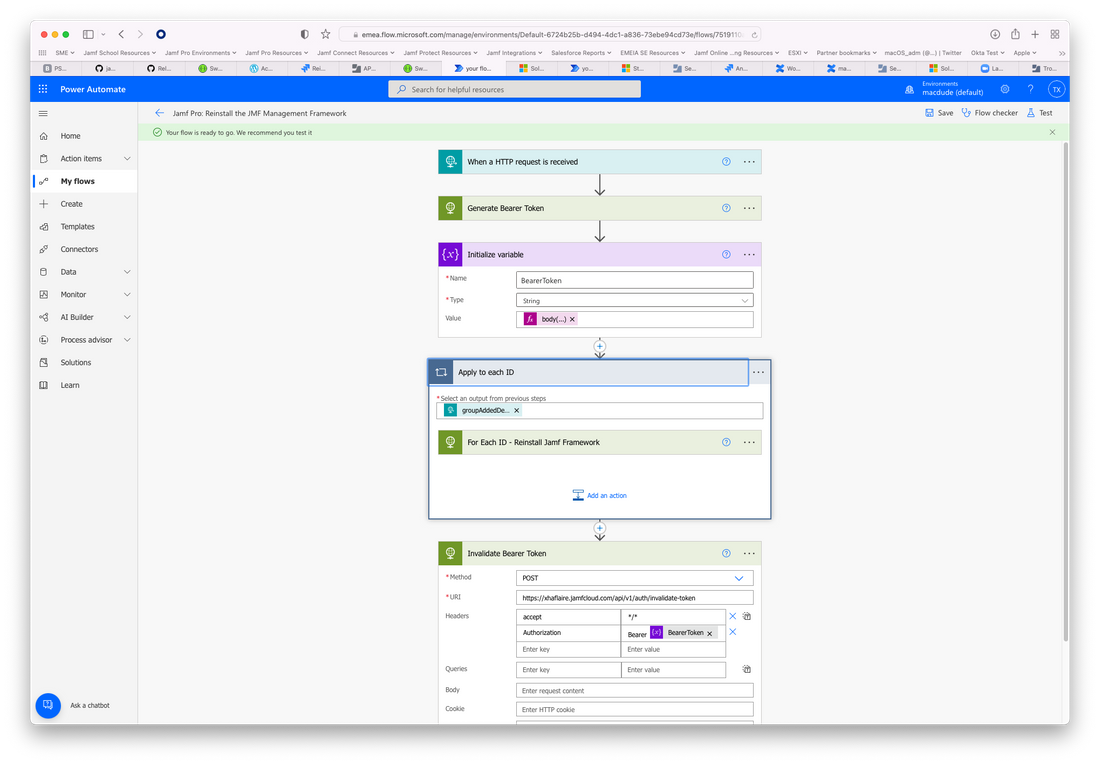
Step 11: Invalidate bearer token
Add new action by selecting + and the HTTP action.
Because we are done, we want to invalidate the used API bearer token.
Configure the following fields:
Method → POST
URI → https://yourJSS.jamfcloud.com/api/v1/auth/invalidate-token
Headers → accept application/JSON
Headers → Authorization bearer BearerToken
Step 12: Now we can save, open the first action and copy/paste/store the HTTP POST URL as we need this value for configuring the webhook in Jamf Pro.
Create a smart group in Jamf Pro
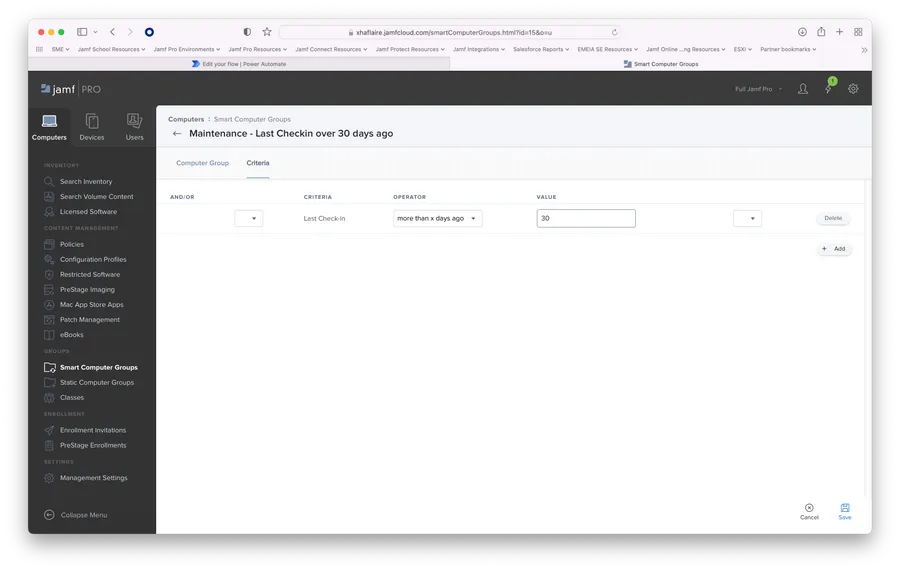
Step 1: Navigate to Smart Computer Groups and select + to create a new smart group.
Populate a display name something like Maintenance - Last Checkin over 30 days ago.
Step 2: Navigate to Criteria and add Last Check-in as criteria with the operator "more than x days ago" and enter your custom value there.
Create a webhook in Jamf Pro
Step 1: Settings → Global Management → Webhooks
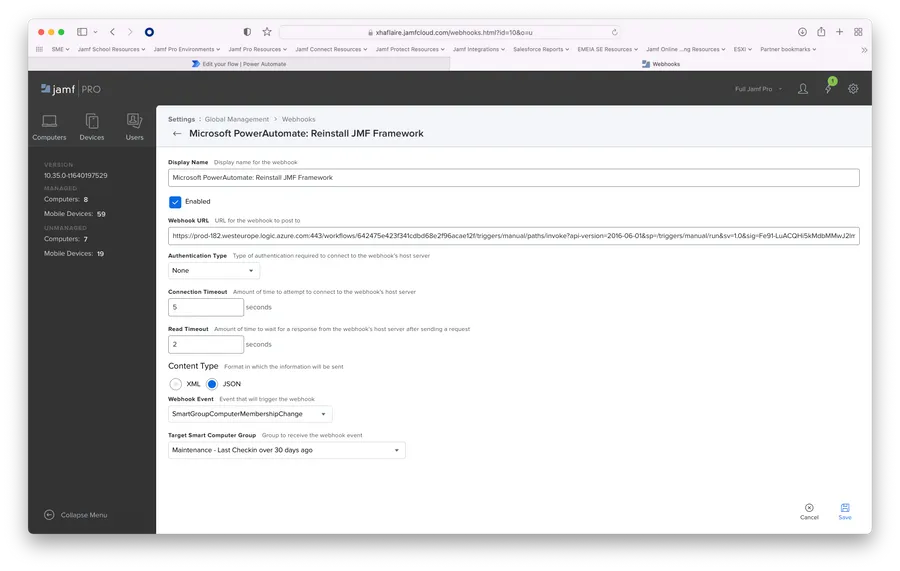
Step 2: Choose to create a new webhook and configure the following values:
Display Name → Microsoft PowerAutomate: Reinstall JMF Framework
Webhook URL → Paste the HTTP POST URL we stored from PowerAutomate in step 11.
Before pasting the value, find and replace all %2F characters in the link with /
Content Type → JSON
Webhook Event → SmartGroupComputerMembershipChange
Target Smart Computer Group → Select the group we created in Create Smartgroup in Jamf Pro.
Save.
Subscribe to the Jamf Blog
Have market trends, Apple updates and Jamf news delivered directly to your inbox.
To learn more about how we collect, use, disclose, transfer, and store your information, please visit our Privacy Policy.