
Prerequisites: The administrator should follow these instructions to create an application in the organization identity provider and create configuration profiles for Jamf Connect. Administrators should be familiar with smart computer groups, scoping of policies and configuration profiles, and creating installer packages with Jamf Composer or a similar tool.
Before You Begin
Jamf Pro and Jamf Connect can provide a highly customizable user experience. By being highly customizable, administrators are advised to document the experience they want before building out the pieces. For example, administrators may consider:
- Enrollment Customization - On enrollment, end users can experience interactive elements like videos, links to help pages, and signing in to the Jamf Pro enrollment with a single sign-on provider. The user short name and the user real name can be passed to Jamf Connect to reduce the number of sign-ins required to onboard a device. Learn more about Enrollment Customization.
- EULA or acceptable use policies - Jamf Connect can present a EULA to a user, and the acceptance of the EULA can be stored in an audit file on the client machine.
- Organizational branding and identity - Jamf Connect can display a wallpaper behind the login window and an organizational logo above the login screen.
- Messaging to the end-user during initial setup - The Jamf Connect notify mechanism can display images, text, and a status bar showing how far the setup is from being done.
No one organization’s onboarding experience is the same as another organization's. Use the features of Jamf Pro and Jamf Connect appropriate for your organization, and consider documenting how you would like the experience to look before beginning the next steps.
Procedure:
- Collect branding assets for the organization
- Prepare the onboarding script for Jamf Connect notify mechanism
- Create an installer package for the customization assets
- Create a configuration profile for run-once mechanisms
- Create a prestage enrollment for computers in Jamf Pro
- Create policies to be run on computer enrollment
- Create a smart computer group to determine that enrollment completed successfully
- Use Scope and Exception groups to disable the run-once mechanisms in Jamf Connect login screen
Collect branding assets for the organization
.png?q=80&w=800)
The Jamf Connect login screen can display a custom background wallpaper and an institutional image. Shown in this example is a Jamf corporate logo with a transparent background in PNG format to show the wallpaper image of the Grand Canyon. The wallpaper will be cropped to fit the screen, so the recommended image size and ratio is that of your largest screen deployed in your organization. Recommended image size for the logo is 250x250 px and will be resized to fit the screen if needed.
Additional assets may include a local help file to show to end-users if no network connection is present. Supported formats are PDF and HTML. The icon for Help can also be customized. Recommended image size for the icon is 16x16 in PNG format with a transparent background.
.png?q=80&w=500)
The notify mechanism can also display images both at the top of the notify screen as well as a replacement for the text in the center of the screen. These images must be loaded locally on the machine.
Prepare the onboarding script for Jamf Connect notify mechanism
Depending on an administrator’s desires, the script deployed to run after a successful login can be as simple or as complex as needed. For maximum flexibility, it is recommended to keep the script as simple as possible and let Jamf Pro and policies take over the onboarding after login. An example script could be:
This example script:
- Changes the default wording in the Notify mechanism (if used) to tell the user what is happening to their new machine.
- Validates that the Jamf client binary is installed in the proper location and waits to be installed on the machine in case of a slow network connection.
- Executes a custom trigger for a policy in Jamf Pro. This can trigger a chain of policies to install software targeted specifically for the user or essential security software like Jamf Protect or other endpoint protection software.
Script Notes: Any supported scripting language is supported, but it is recommended to use a scripting language that will be supported by default with no additional packages installed. For example, Python requires the use of Rosetta on macOS Big Sur machines with the Apple Silicon M1 chip. Native support includes zsh shell and bash shell scripts.
Optional Scripts: Jamf Connect menu bar mechanism can execute scripts on successful and unsuccessful login as well as password change and network state change. If needed by your organization, create these scripts now to be distributed to target devices in the next step.
Create an installer package for the customization assets
Using Jamf Composer or a similar package, create an installer package for the image, help file, scripting, and branding assets.
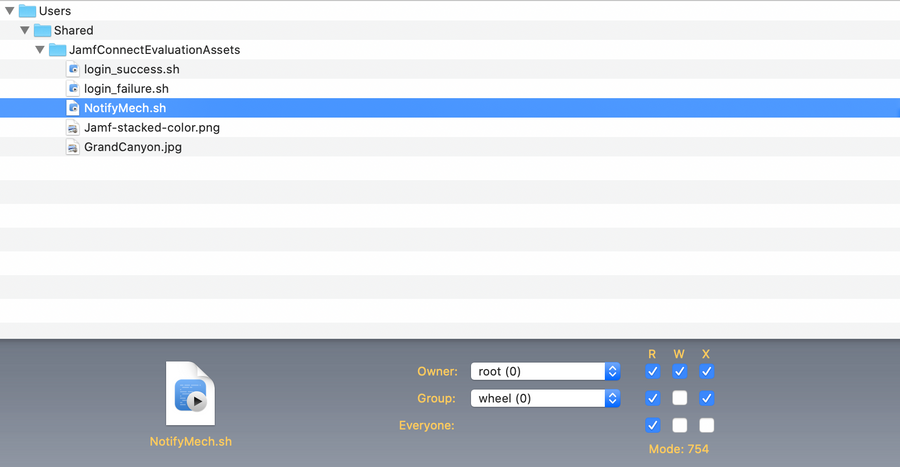
Use a location that will be available for all users and set the permissions for the files and scripts appropriately. Standard locations include a directory inside /usr/local/ , /Users/Shared/ , or /Library/Application Support. With macOS Big Sur, consider that the drive is a combination of a read-only system drive and a read/write user space drive. Your location should be mapped to the read/write user area in case a macOS software update removes the ability to write to a location on the drive.
The onboarding script (shown above as “NotifyMech.sh”) should be owned by root:wheel and permissions should at minimum to read and execute by root:wheel (550 permissions).
Graphics, logos, and local help files should be owned by root:wheel and permissions at minimum to read only for all users(444 permissions).
Optional scripts: Jamf Connect menu bar mechanism can execute scripts on successful and unsuccessful login as well as password change and network state change. These scripts are run with the currently logged-in user permissions, so their ownership should be set to root:wheel and permissions set to read and execute (555 permissions).
Good news, everyone! If you are wrapping JamfConnect.pkg in a metapackage, a special postinstaller script to kill the login window is no longer needed. This logic is now built into the standard JamfConnect.pkg file as of version 2.10 and greater. One less step to worry about.
Signing the customization assets package: Packages installed at a prestage enrollment must be signed either with a developer certificate or a trusted certificate. Learn how to create a signing certificate with Jamf Pro certificate authority.
When complete, upload the customization assets to your Jamf Pro distribution point.
Create a configuration profile for run-once mechanisms
Authchanger
The notify mechanism of Jamf Connect is not enabled by default. It can be enabled in a number of ways with command-line instructions, but the easiest method that does not require any special coding is to push a configuration profile.
The domain for the authchanger configuration profile is com.jamf.connect.authchanger.
The strings in the Arguments array follow the commands documented here. The above example is the equivalent to /usr/local/bin/authchanger -reset -JamfConnect -Notify to activate the notify mechanism. The authchanger command runs as part of the JamfConnect.pkg installer. When the software is installed, the installer package will use the commands sent in the com.jamf.connect.authchanger config profile.
RunScript and EULA preference keys
By default, Jamf Connect login mechanism will display a EULA and run a script if preference keys for those actions are present in the configuration profile for com.jamf.connect.login.
Because administrators will only want these actions and the EULA showing on initial setup of the machine, keep these keys in a separate configuration profile in Jamf Pro. The domain for these keys is com.jamf.connect.login
Note: Administrators should only use the keys needed for their enrollment method. Do not send blank or empty value keys to Jamf Connect to avoid unexpected results.
Note: A computer configuration profile in Jamf Pro can contain multiple Applications and Custom Settings payloads as shown below.
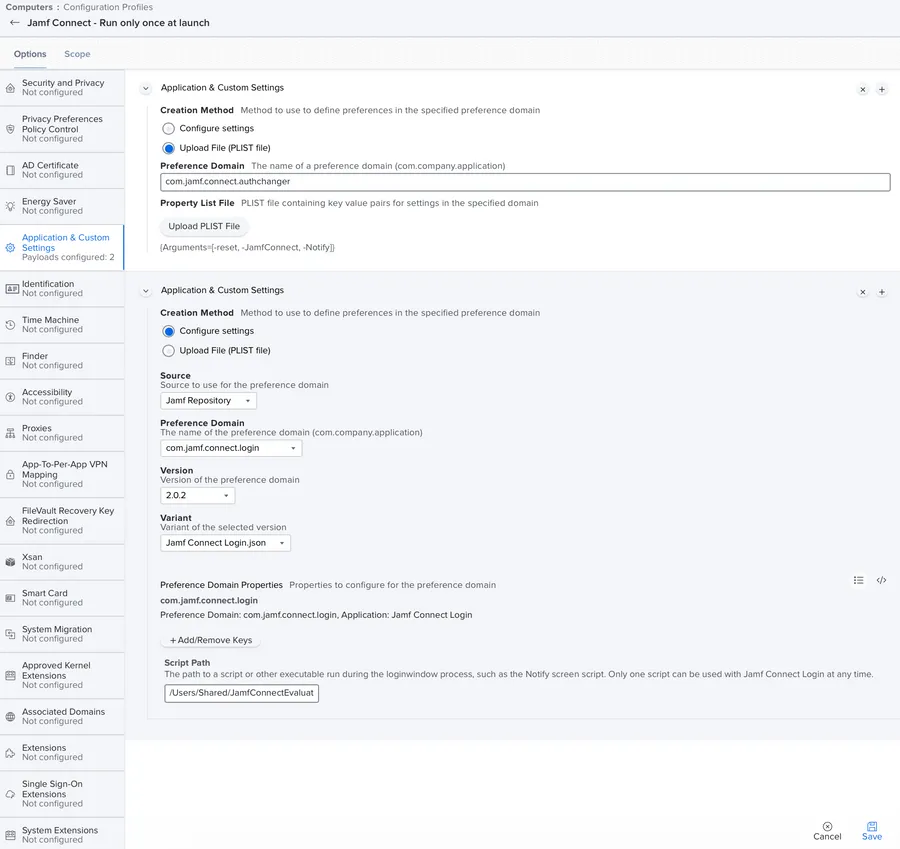
In this example, the payload for authchanger and the payload for the ScriptPath keys are combined into one configuration profile to easily scope run-once payloads to target computers.
Create a prestage enrollment for computers in Jamf Pro
In the Jamf Pro server, create a prestage enrollment with the following payloads:
- Account Settings: Select “Create a local administrator account before the Setup Assistant” and add a username and password. Optionally select “Hide managed administrator account in Users & Groups”. Select Local User Account Type as “Skip Account Creation”
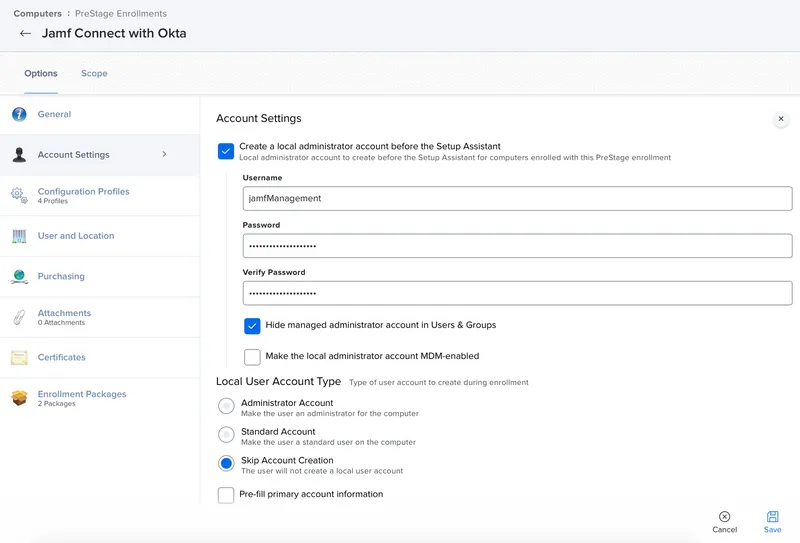
- Configuration Profiles: Select the configuration profiles for Jamf Connect login mechanism, the run-once configuration profiles, the Jamf Connect menu bar agent, and the Jamf Connect license.
- Enrollment Packages: Select the JamfConnect.pkg installer package and the customization assets installer package created earlier in these instructions.
Learn more about Prestage Enrollments.
Create polices to be run on computer enrollment
Once a computer enrolls in the Jamf Pro server, the customization assets package and Jamf Connect installer package is pushed to the machine and installed silently. The user then authenticates with their cloud identity provider credentials, and Jamf Connect creates a local user account based on those credentials. Then, because the RunScript mechanism is enabled and a preference key for a path to a script is in the com.jamf.connect.login configuration profile, Jamf Connect runs the script with administrator privileges.
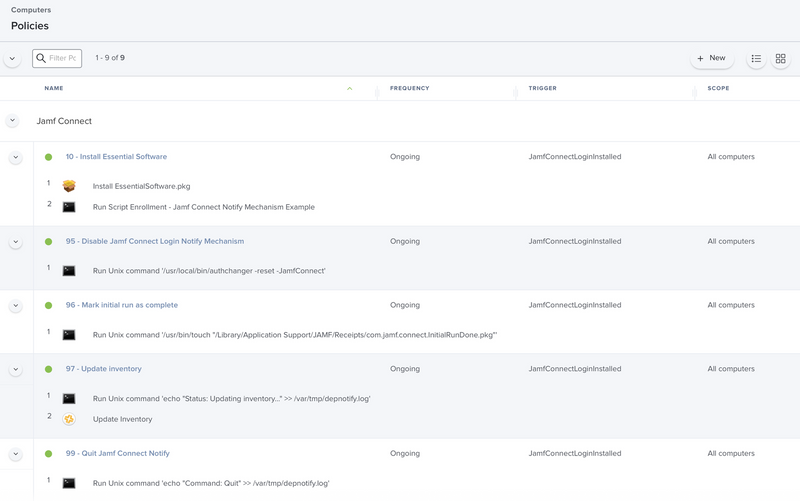
In our example script above, the last line calls a custom trigger for policies. Jamf Pro will execute policies called by this custom trigger in alphanumeric order. In the graphic above, policies are executed numerically lowest to highest to order the operations of onboarding. In this example:
- 10 - Install Essential Software - If there is a mission-critical piece of software that should be installed before any other software like endpoint protection software or conditional access clients, install these first.
- 11 - 95 Any other policies administrators wish to run at onboarding - Jamf Pro will execute policies alphanumerically in order. Administrators can build policies similar to this but with target computers set to specific LDAP groups or departments. The only limits here are the administrator’s management needs and imagination.
- 95 - Disable Jamf Connect Login Mechanism - Once all essential setup is completed, administrators can issue a “Run Unix command” instruction to disable the Jamf Connect notify mechanism. /usr/local/bin/authchanger -reset -JamfConnect restores the login mechanism to the standard mechanisms and disables the notify mechanism.
- 96 - Mark initial run as complete - There are several ways to mark a computer as having been initially set up to be used in the next step “Create a smart computer group to determine that enrollment completed successfully”. In this example, we are writing a file to the Jamf installed software receipts folder, but other options are:
- Use the touch command to create a file and then use an Extension Attribute to determine if that file exists when Jamf collects inventory about a computer.
- Use an extension attribute to determine if a EULA audit file exists in a directory
- Determine if a piece of essential software has been installed with either a package installed or the presence of a file
- 97 - Update Inventory: Jamf will update the inventory record with the state of the computer (and subsequently, will add the information from the above policy for our smart computer group)
- 99 - Quit Jamf Connect notify: To turn off the notify mechanism and continue to the last steps of macOS Setup Assistant, use a “Run Unix command” policy payload to run the command echo "Command: Quit" >> /var/tmp/depnotify.log
After the Jamf Connect notify mechanism receives a quit command, Jamf Connect can optionally enable FileVault for the user and the user is prompted to run any additional setup steps from macOS. Finally, the user is presented to the Finder with a fully configured computer ready for use.
Updating the notify mechanism for users
There are several ways to update the notify screen when a policy runs to keep the end-user informed of what is happening to their computer.
- Automatically read from the Jamf Pro policy logs - Use the Jamf Connect login preference key for NotifyLogStyle set to jamf in com.jamf.connect.login. This will update the status message below the pseudo status bar.
- Run unix command payload in a policy - Update the status individually with a command like echo "Status: Installing a program on your computer" >> /var/tmp/depnotify.log
- Use a script payload with a policy - A policy can run scripts before any other actions are executed in a policy. Add the following script to your Jamf Pro server and use the Parameter values to update multiple pieces of the notify screen at the same time
Create a smart computer group to determine that enrollment completed successfully
Using the attribute you selected in the above step to mark a computer as being fully set up, create a Smart Computer Group to contain all computers that have successfully completed their setup.
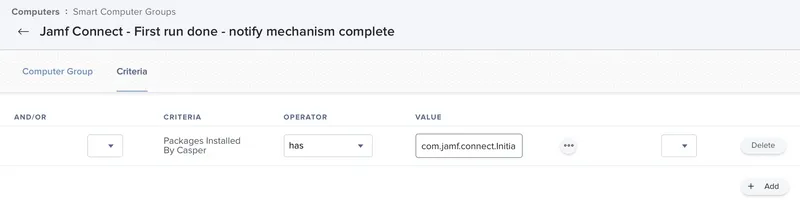
In the above example, the Smart Computer Group contains all computers with a specific package installed as part of the initial onboarding process. Other options can include the state of an extension attribute or other inventory information that determines a computer is in a complete state.
Use Scope and Exclusion groups to disable the run-once mechanisms in Jamf Connect login screen
In the configuration profile payloads for EULA, ScriptPath, and the authchanger preferences, add an Exclusion group to exclude all computers who are in the Smart Computer Group created in the previous step.

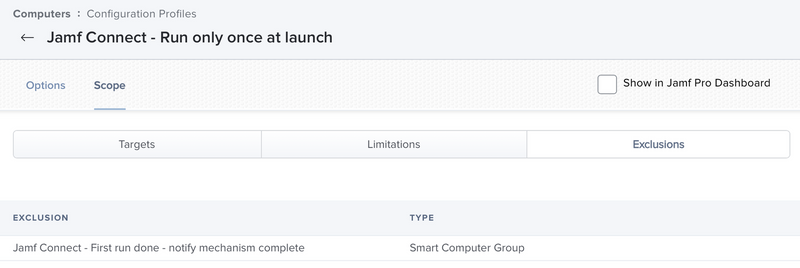
In the example graphics above, the configuration profile payload named “Jamf Connect - Run only once at launch” the keys for com.jamf.connect.login for ScriptPath. By excluding these configuration profiles from a target computer, the Jamf Connect login mechanism will not run a script at successful login.
There are several additional tools that an administrator could use at this point. An administrator could push a separate configuration profile with a different ScriptPath to execute a different custom trigger on every login, perhaps to install essential patches or simply to log when a user logs into a machine. The possibilities are endless. But the result is a fully customized user experience with a fully configured computer.
Subscribe to the Jamf Blog
Have market trends, Apple updates and Jamf news delivered directly to your inbox.
To learn more about how we collect, use, disclose, transfer, and store your information, please visit our Privacy Policy.