

With Jamf Connect 2.7, Jamf and Google introduce a new, simple way to create user accounts just-in-time on a Mac with the Google user name and password, and then keep that password in sync over time.
Until now, organizations using Google as their identity provider have been extremely limited when they wanted to sync their macOS user passwords with the cloud. An admin either had to “trust the user” and the password was the same or they had to do a painful, manual bind to Google’s secure LDAP with all of the problems that binding brings to macOS.Now, Jamf welcomes Google to the list of cloud identity providers it integrates with.
Getting started:
Jamf Connect uses Google Secure LDAP to sync a user’s password. To use this service, your organization needs a Google Cloud Identity or Workspace edition that includes Google's Secure LDAP service, such as the following:
- Business Plus
- Enterprise
- Education Fundamentals
- Standard
- Teaching and Learning Upgrade
- Plus
If you’re setting this up for the first time, you’ll need someone at the organization with administrator rights to your Google Workspace to get you a certificate from the admin interface to distribute to your Macs.
If an administrator has already set up an LDAP client in the past, great! As long as that existing LDAP client has the proper permissions to authenticate users and read group membership information, you will simply need the certificate created for the existing LDAP client.
If an administrator has never set up LDAP at your organization before, refer to the Google documentation on how to add LDAP clients. When your administrator reaches Step 2 - Configure access permissions, you have some decisions to make:
1. Specify the LDAP client’s access level for verifying user credentials which translates to “Select the group of users who will be able to access this password syncing feature.”
Depending on your organization’s security needs, you may want to restrict access to certain groups. For example, you could create an LDAP client containing only students and a second LDAP client containing only faculty members and administrative staff at your school. If you take this route, you will need to create and maintain two separate OIDC applications and Jamf Connect configurations for Google - one for students and one for everyone else. You would then use a feature in your MDM to scope the configuration profile to a group of students and a separate configuration profile to everyone else.
It may sound slightly complicated, but Jamf Pro and Jamf School can easily target a group of machines based on lots of different attributes. We could, for example, target all lab computers with a student profile and all 1:1 issued,faculty machines with a separate profile.
Other organizations may simply want any user to use the feature, so you would grant access to all users. This would create one profile and one configuration for all.
Whatever configuration you decide on, Jamf Support can always help.
2. Specify the LDAP client’s access level for reading user information which translates to “Tell us if you want Google to let the computer know anything about the user.”
When you hit this step, be sure to select the option to “Copy from ‘Verify User Credentials’” to grant access to the exact group of users you picked in the step above. Then, enable the “System attributes” (aka tell us the user’s name, email address, etc) and enable Read Group Information (aka tell us the groups this user belongs to so we can figure out if they should be an administrator or a standard user on the Mac.)
And you’re almost done! When you reach Step 3: Download the generated certificate, we’ll have exactly what we need for Jamf Connect. We’ll distribute the certificate to our Macs so Jamf Connect can create the LDAP connection you just created. Download the .zip file to a Mac for the next step.
Making a certificate for Jamf Connect and your Mac
We need to convert this certificate into a format our Mac fleet can use. We’re going to need terminal to run a command:
To make it simpler, you can drag and drop the files when running this command. This video shows how to do it.
You can name the .p12 file anything you would like, but remember the password you created for the file. You’ll need that for uploading into Jamf School or Jamf Pro later.
Upload the certificate to your Mac fleet
Now we need to get that certificate onto your Macs. You can do this before you install Jamf Connect so, you can make a separate configuration profile or include it in the payload with your Jamf Connect settings. Either way is fine.
In Jamf Pro, navigate to Computers → Configuration Profiles and create a new profile. Name it however you desire so you can find it later and pick a category. On the left side, select the Certificates payload:
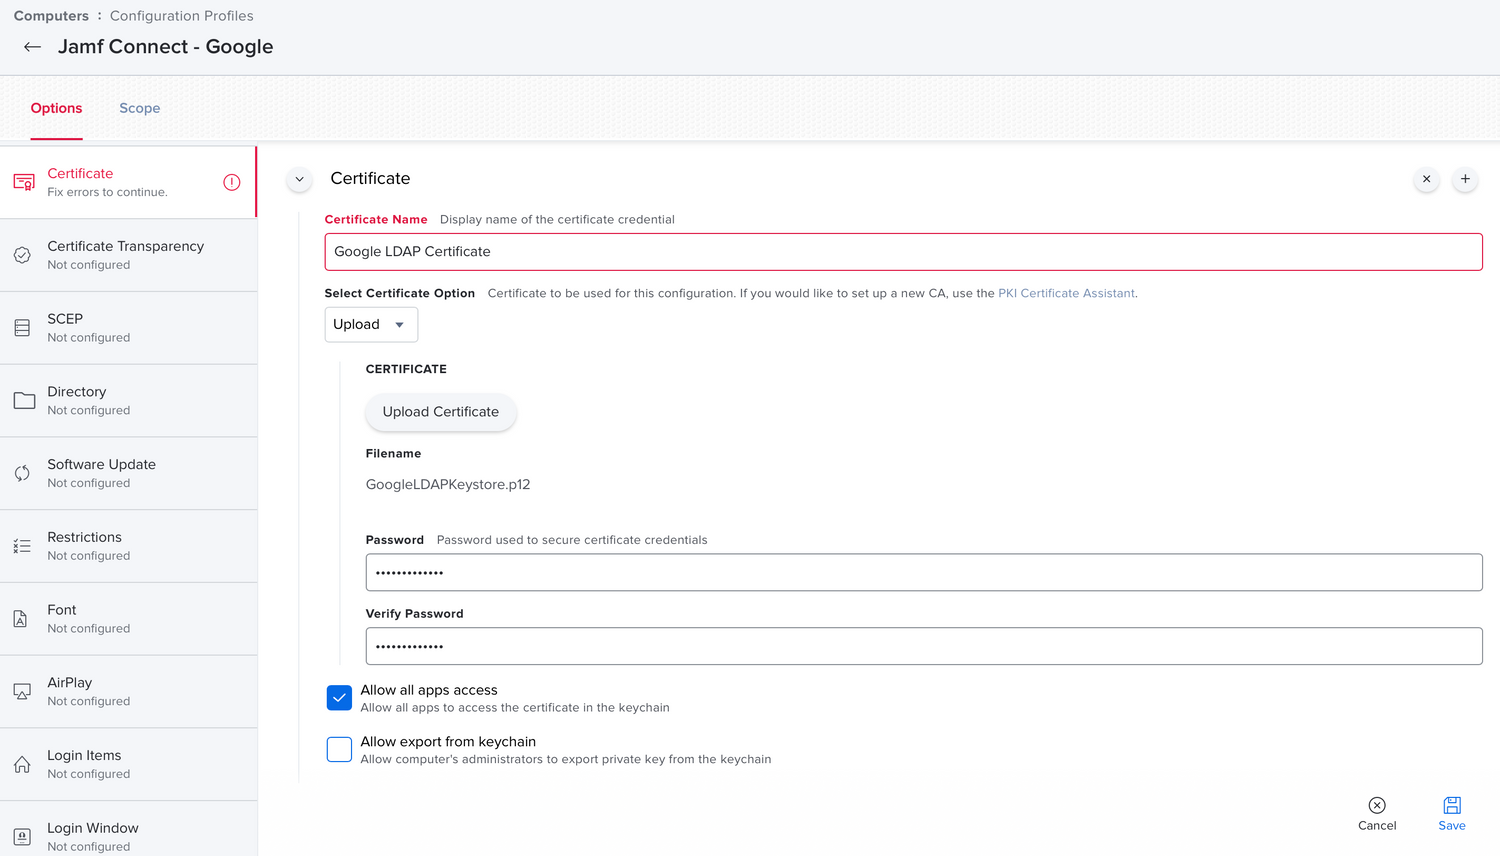
Name the certificate something you’ll remember like Google LDAP Certificate and select the option to upload the cert. Pick the .p12 file you created above and enter the certificate password. Allow all apps to access the certificate and uncheck the option to allow export from the keychain for added security to your distribution.
Scope to your target computers, apply your configuration for Jamf Connect that you create with the Jamf Connect Configuration app, included in the .dmg you download from https://account.jamf.com with your Jamf Nation credentials, and you’re done! Educate your users on what to expect when they log in and how to change their passwords, and your fleet of Macs now use Google credentials to access the computer.
Bring Google Identity and Jamf Connect together today.
Subscribe to the Jamf Blog
Have market trends, Apple updates and Jamf news delivered directly to your inbox.
To learn more about how we collect, use, disclose, transfer, and store your information, please visit our Privacy Policy.