

Towards the start of 2019, Culture Amp moved to a new and larger office in Melbourne. To ensure that all equipment deployed to the conference rooms around the office worked effectively, we wiped all devices before redeploying them into the rooms. The last time I did this, I could push out the Zoom apps to all Mac and iPad devices in the space but needed to log into the Zoom Rooms app manually and then select the room to associate the device with. Thankfully, Zoom released support for Managed App Config on iOS, allowing for custom configuration profiles on macOS to remove the time-consuming step of logging in and configuring manually.
Utilising an Activation Code that is generated by Zoom when creating a new room — you can also regenerate this code if the room had been created prior — the first time Zoom Rooms launches on the device, the app will be automatically configured for that specific room and set to the correct type (iPad Controller or Room Scheduler).
In my case, I’m using Jamf for the deployment of my devices but other mobile device management (MDM) vendors should support Managed App Config (specific to iOS devices) and pushing custom configuration profiles out to Macs.
If you’re interested and want to read on, I’ll take you through the following:
- How to set up Zoom Rooms and generate an Activation Code
- How to set up the required Extension Attributes in Jamf for deployment to devices
- How to use Jamf’s Inventory Preload feature to upload data to Extension Attributes in bulk
- How to configure the Zoom Rooms app on iOS to deploy and auto-activate iPad
- How to configure the Zoom Rooms app on macOS to deploy and auto-activate Mac minis
Setting up the resources in Zoom
Setting up rooms in the Zoom web portal is fairly easy and can either be created from linked calendars or by navigating the Zoom Room hierarchy to the specific office and clicking + Add Room. From there, you’ll be prompted to enter a name for the room and given the option to link the room to a Calendar (optional). Once this room is created, you’ll see it in your list of rooms and an Activation Code will be present that you can use for auto-configuration.
You can find Zoom’s support article on creating Zoom Rooms here.

If you previously created a room and can’t see this activation code, you can click the Regenerate link.

Setting up text Extension Attributes in Jamf to hold the activation data for Zoom
In order to push the Activation Code and Device Type down to your devices, you can use the following steps.
Due to how Jamf handles Payload Variables in custom configurations (more on this later), we’ll be using the Room field under the User & Location section of the devices record to hold the Activation Code. Because the iPad version of Zoom Rooms allows configuration as either a controller or a scheduling display, we’ll create a new Extension Attribute called iPad Type to hold this information.
iOS Devices
1. Log in to Jamf
2. Navigate to Settings
3. Click on Extension Attributes under the Device Management section
4. Click + New
5. Enter the following information
- DISPLAY NAME -> iPad Type
- DATA TYPE -> String
- INVENTORY DISPLAY -> This is up to you
- INPUT TYPE -> Pop-up Menu
- POP-UP MENU CHOICES ->
- controller
- scheduling display
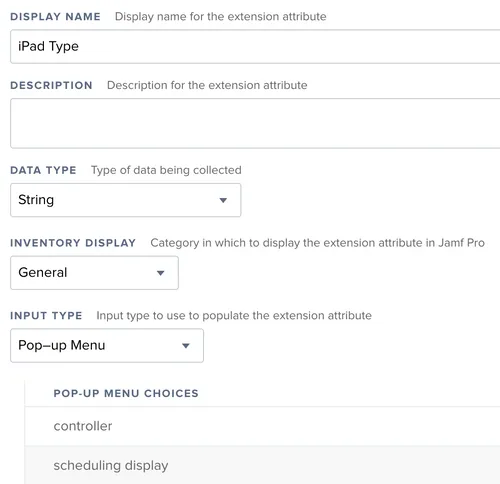
6. Click Save
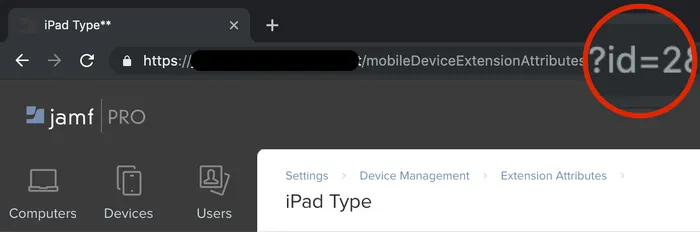
7. You can now grab the ID from the URL of the Extension Attribute (you’ll need this later).
Using Inventory Preload in Jamf to stage information across your iOS/macOS devices
Now that we have the Activation Code from the Zoom portal, created the Extension Attribute required to store, and the iPad Type, we can generate a CSV that we’ll upload to Jamf and preload our data.
As mentioned above, we’ll be using the Activation Code which will link the iPad or Mac to the specific room upon first launch of the Zoom Rooms app, and iPad Type is used to define whether the iPad is a Scheduling Display or a Room Controller. When adding this information to your CSV file, you’ll want to enter either "scheduling display" or "controller" (note the lowercase) in the Extension Attribute iPad Type column.
Once you’ve got the Serial Number for each device (Mac and iPad devices), you can start populating the CSV. If these devices haven’t been enrolled before, this data will be staged with Jamf until they enrol for the first time. If they are already enrolled, you’ll see this data appear in its record the next time it performs a Recon.
Here’s a very small example of how your CSV should be set up to configure one Zoom Room with a Mac and two iPads:
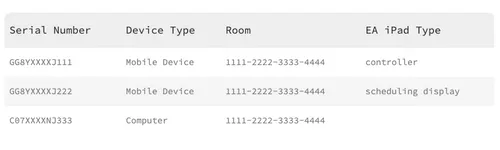
For any Inventory Preload with Jamf, you’ll need to define the Serial Number and Device Type at the very minimum, but there are a wealth of other fields you can preload with data. As you can see in the example above, I’ve prefixed the column header for iPad Type with EA (Extension Attribute); this is so that Jamf knows to put this data in the Extension Attribute we created earlier.
Auto-configuring Zoom Rooms controller on macOS
In order to configure Zoom Rooms on Mac mini to be signed in and associated with a room, we’ll need to push down a Custom Profile. So that we don’t need to craft a profile for each Mac that we’re going to provision, we’ll utilise Payload Variables. By using these variables in the profile, when it is pushed down to a given Mac, Jamf will replace that variable with the value from that device’s record. In this case, we’re using the Room field to hold our Activation Codes so in the plist, we’ll put in the variable $ROOM.
You can see an example of the profile that we’ll be deploying below. In order to upload this to Jamf, you’ll want to do the following:
- Save the below as a plist on your Mac
- Generate a new PayloadUUID (an easy way to do this is to run uuidgen in the teminal)
- In Jamf, navigate to Computers
- Click on Configuration Profiles
- Click + New
- Give your profile a name
- Click on Custom Settings in the sidebar, then click Config
- Preference Domain -> us.zoom.custom
- Upload the saved plist
- Set your Scope
- Click Save
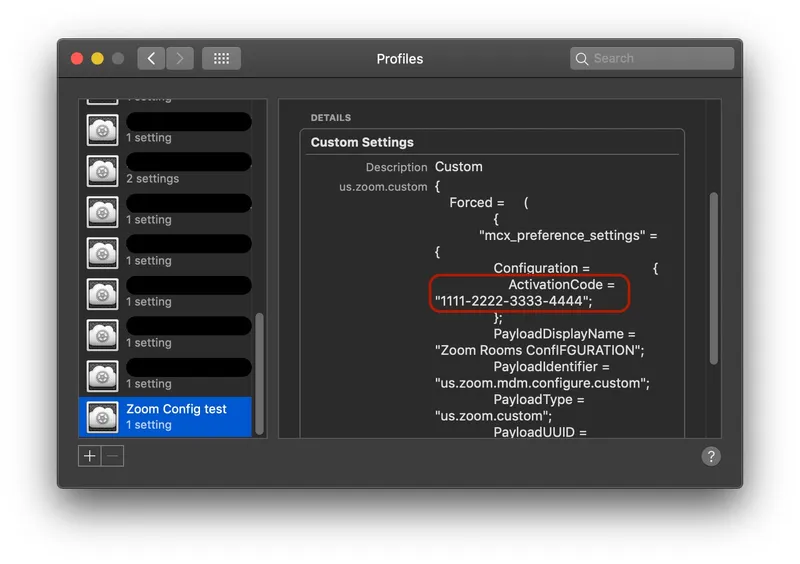
Once the profile pushes down to the Mac, you’ll see that the varible has been replaced with the contents of the Extension Attribute for that Mac.
 <?xml version="1.0" encoding="UTF-8"?>
<!DOCTYPE plist PUBLIC "-//Apple//DTD PLIST 1.0//EN" "http://www.apple.com/DTDs/PropertyList-1.0.dtd">
<plist version="1.0">
 <dict>
 <key>PayloadType</key>
 <string>us.zoom.custom</string>
 <key>PayloadVersion</key>
 <integer>1</integer>
 <key>PayloadIdentifier</key>
 <string>us.zoom.mdm.configure.custom</string>
 <key>PayloadUUID</key>
 <string>338F730B-176E-47CB-819F-A8F3B2008B88</string>
 <key>PayloadDisplayName</key>
 <string>Zoom Rooms ConfIFGURATION</string>
 <key>Configuration</key>
 <dict>
 <key>ActivationCode</key>
 <string>$ROOM</string>
 </dict>
 </dict>
</plist>
Auto-configuring Zoom Rooms controller on iOS
In order to configure the Zoom Rooms Controller on iOS, we’re going to utilise Managed App Config which will deploy a configuration for Zoom Rooms when Jamf pushes the app down to the device. If you already push out Zoom Rooms to your fleet, you’ll want to add the Zoom Rooms app a second time to your catalog of apps to configure with the following settings. You can then get creative with scoping so that the version with the App Config settings only deploys to devices where you’ve added the Activation Code and iPad Type fields.
Once you’ve added the Zoom Rooms app, you’ll need to enter the following on the App Configuration page substituting # at the end of the variable $EXTENSIONATTRIBUTE_# with the ID of the EA you created for Mobile Devices earlier.
 <dict>
 <key>WorkMode</key>
 <string>$EXTENSIONATTRIBUTE_#</string>
 <key>ActivationCode</key>
 <string>$ROOM</string>
</dict>
James is a SysAdmin at Culture Amp and this blog was originally posted on James' Ubiquitous Blog.
Subscribe to the Jamf Blog
Have market trends, Apple updates and Jamf news delivered directly to your inbox.
To learn more about how we collect, use, disclose, transfer, and store your information, please visit our Privacy Policy.