
Below, you will find three different remediation workflows to illustrate how this functionality works. The workflows are set using a threat level classification to determine the method of remediation or response, which allows for easier management of different remedial workflows.
DISCLAIMER: These are sample workflows and should be properly tested before being implemented in your production environment.
Jamf Protect setup
Identify the analytics that you would like to set up responses for:
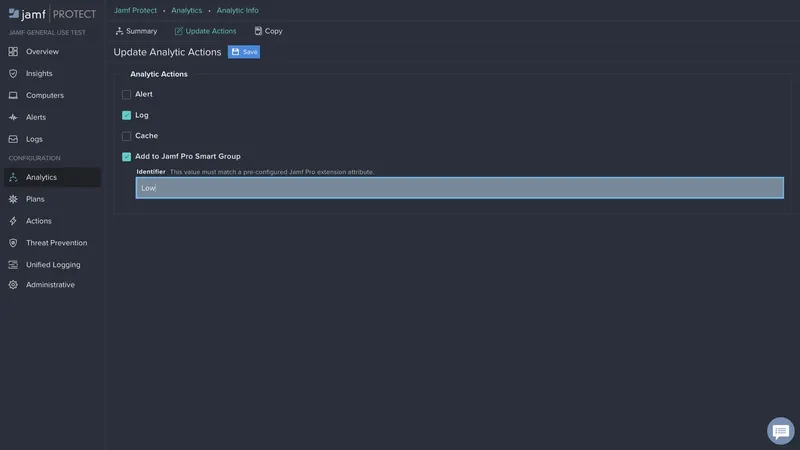
- Open the Jamf Protect console
- Select “Analytics”
- Identify the chosen analytic
- Select the “Update Actions” tab
- Check “Add to Jamf Pro Smart Group”
- In the text pop-up displayed, choose a text value. This will be the extension attribute written to the device by the Jamf Protect agent when detection occurs. (ex. low, medium, high, malware)

Jamf Pro initial setup
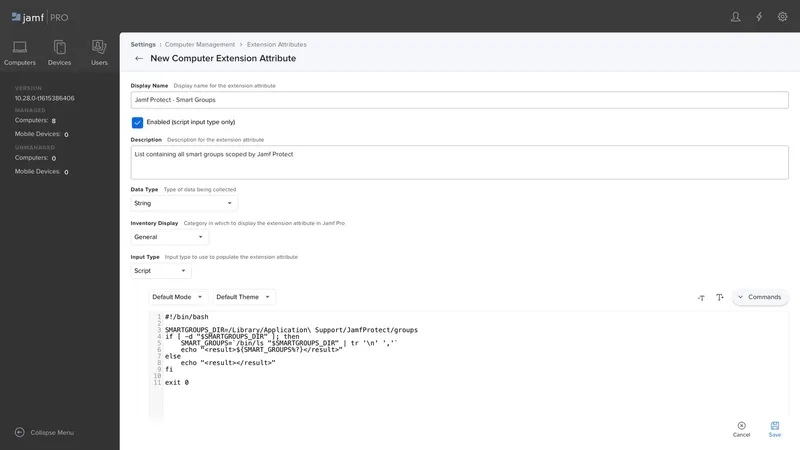
I. Extension attribute script:
- Open the Jamf Pro Settings > “Computer Management” > “Extension Attributes”
- Select “New from Template”
- Open the “Jamf” Section
- Select “Jamf Protect Smart Groups”
- Select “Save” at the bottom of the page
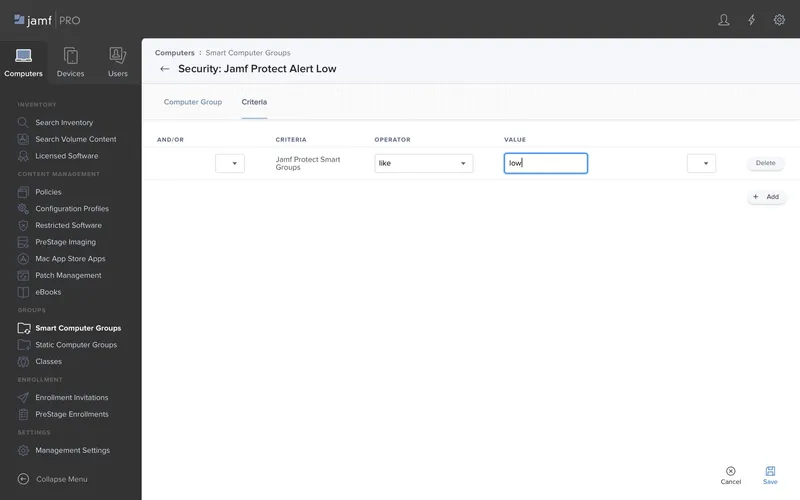
II. Smart Group creation:
- Select “Computers”
- Then select “Smart Computer Groups”
- Select on “+ New” button at the top right
- Enter a name for this Smart Computer Group. (Ex. “Security: Jamf Protect low threat”)
- Select “Criteria” tab
- Select “Add” button, then select “Show Advanced Criteria”
- Find the “Jamf Protect Smart Groups” attribute, select “Choose”
- Enter the text of the extension attribute value (the one created above in the Jamf Protect setup section)
- Select “Save”
NOTE: Once the extension attribute is written to the device by the Jamf Protect agent, the extension attribute must be removed for the device to fall out of the Smart Group. This can be performed by using the script below to clear all extension attributes created by Jamf Protect.
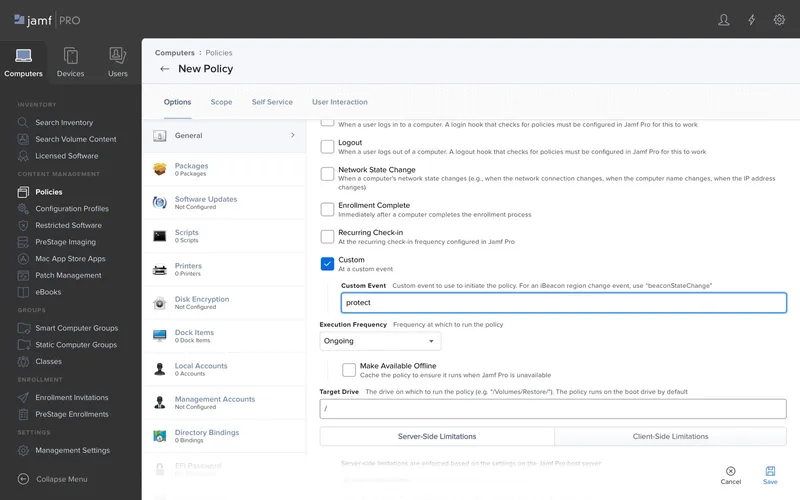
III. Policy Event Trigger:
- Select “Computers”
- Select “Policies”
- Select “New” button
- In the General area, enter a name for this policy and insert a custom trigger of “protect." This will allow the policy to run when the Jamf Protect agent has a detection
- Set the execution frequency to “Ongoing”
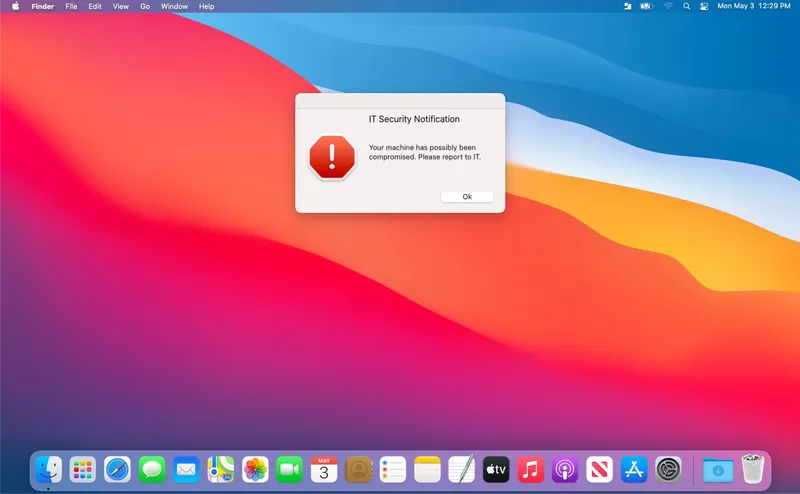
Low-level threat:
In this workflow, you will prompt your end-user with a pop-up message from Jamf Helper, explaining what has occurred on their device. This response is informational only and non-invasive (ie. no file deletion or isolation). This workflow will automatically clear the extension attribute after prompting the end-user.
Jamf Helper policy:
- Create a new policy (follow the policy steps from the Jamf Pros setup section above)
- Add a “Script” configuration. (Sample script found below must first be added to Jamf Pro > Settings > Computer Management > Scripts)
- Select the “Scope” tab
- Select “Computer Group” > “Add”
- Select the new Smart Computer Group that was created for a low-level alert
- Select “Save”
End result example:
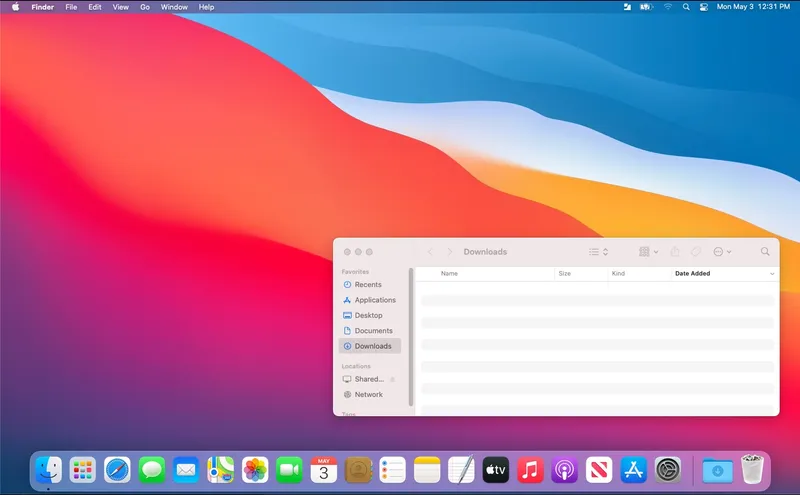
Medium-level threat:
A medium-level threat refers to an occurrence that is unwanted but has minimal impact. For this workflow, when a detection is triggered, the Jamf Helper pop-up message will inform the end-user of what has happened to their device. They will also be required to select “OK” to open Self Service, which will immediately launch a policy-based script that moves items added in the last 24 hours from the Downloads folder to the Trash. This workflow will automatically clear the extension attribute after executing the script.
Jamf Helper Policy:
- Create a new policy
- Add a “Script” configuration (sample script found below)
- Select the “Scope” tab
- Select “Computer Group” > “Add”
- Select the new Smart Computer Group that was created for a medium level alert
- Select “Save”
Self Service command:
- Create a new policy
- Set the execution frequency to “Ongoing”
- Add a “Script” configuration (sample script found below)
- Select the “Self Service” tab
- Check “Make the policy available in Self Service”
- Select the “Scope” tab
- Select “Computer Group” > “Add”
- Select the new Smart Computer Group that was created for a medium level alert
- Select “Save”
End result example:
High-level threat:
A high-level threat is used where a malicious action has occurred but lacks context for what the impact may be. For this workflow, when a detection is triggered, a Jamf Helper pop-up message will inform the end-user of what has happened to their device, additionally stating that their device is being isolated from accessing the network. The device will then be quarantined by excluding it from the network configuration profile. This workflow will NOT automatically clear the extension attribute. Also, there is a risk of the configuration profile exclusion processing before the Jamf Helper script can run.
Jamf Helper policy:
- Create a new policy
- Add a “Script” configuration (sample script found below)
- Select “Before” under Priority
- Select the “Scope” tab
- Select “Computer Group” > “Add”
- Select the new Smart Computer Group that was created for a high-level alert
- Select “Save”
Smart Group exclusion:
- Find your network configuration profile
- Select the “Scope” tab
- Select “Exclusions”
- Select “Computer Group” > “Add”
- Select the new Smart Computer Group that was created for a high-level alert
- Select “Save”
End result example:
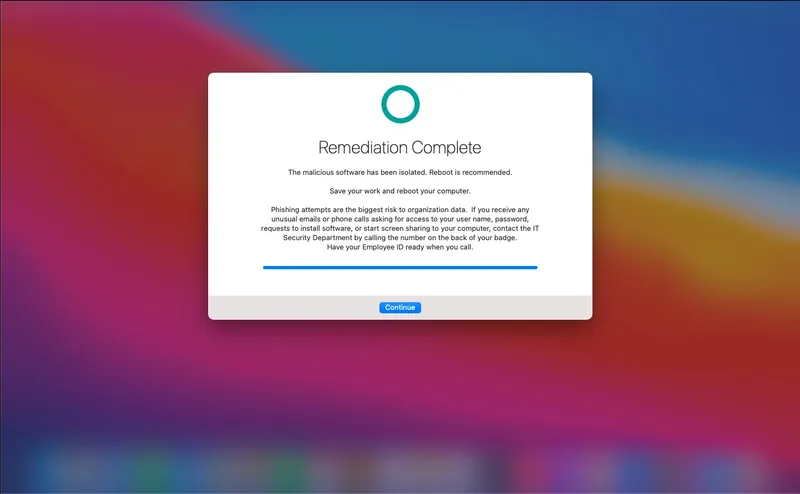
DEPNotify workflow:
Similar to Jamf Helper, DEPNotify allows for customization of alerts and does require a separate package to be installed. In this workflow, when there is a detection of a known threat (or malware) from Jamf Protect’s Threat Prevention feature, the end-users will be locked in fullscreen mode by DEPNotify while a policy-based script runs to clean up the detected threat, sanitizing the device. This workflow requires a custom analytic in Jamf Protect to go beyond the native block and quarantine functionality. Also, this workflow will automatically clear the extension attribute after DEPNotify runs, deleting the DEPNotify application once it is completed.
Jamf Protect custom analytic:
NOTE: This is considered an advanced level administration practice. Please see this section of the Jamf Protect Administrator’s Guide for more information on creating analytics. Upon successfully creating a new analytic, the device will receive the updated plan with the newly added analytic upon subsequent check-in with Jamf.
- Open the Jamf Protect console
- Select “Analytics”
- Select “Create Analytic”
- Add the name “Threat Prevention File Quarantined”
- Add the category “Known Malware”
- Paste the following into the description field “Monitoring for when a process is moved to quarantine from Threat Prevention”
- Set Sensor Type to “GPFSEvent”
- Switch to “Filter Text View”
- Paste the NSPredicate below
- Under Analytic Actions
- Check “Log”
- Check “Add to Jamf Pro Smart Group”
- In the text pop-up displayed choose a text value, this will be the extension attribute written to the device by the Jamf Protect agent when detection occurs. (ex. Malware)
- Scroll to the top and select “Save”
- Select “Plans”
- Select your desired plan
- Select the “Analytics” tab
- Check the new Analytic for “Threat Prevention File Quarantined”
- Scroll to the top and select “Save Plan Analytics”
Add DEPNotify to Jamf Pro:
Upload the latest version of the DEPNotify package into Jamf Pro from the link below. (Jamf Pro Settings > “ComputerManagement” > “Packages.")
DEPNotify policy:
- Create a new policy
- Add a “Script” configuration (sample script found below)
- Select “After” under Priority
- Add a “Packages” configuration, add the DEP Notify package
- Select the “Scope” tab
- Select “Computer Group” > “Add”
- Select the new Smart Computer Group that was created for a malware alert
- Select “Save”
Policy command:
- Create a new policy
- In the General area, enter a name for this policy, and insert a custom trigger of “clearing." This will allow the policy to run from the DEPNotify script.
- Set the execution frequency to “Ongoing”
- Add a “Script” configuration (sample script found below)
- Scope to “All Computers and Users”
- Select “Save”
End result example:
Contact Jamf to learn more about how integrating Jamf Pro and Jamf Protect can help your incident response and remediation team SOAR higher.
Subscribe to the Jamf Blog
Have market trends, Apple updates and Jamf news delivered directly to your inbox.
To learn more about how we collect, use, disclose, transfer, and store your information, please visit our Privacy Policy.