Configuring SSO in Jamf Account
Discover the future of Jamf platform access, how to set up OIDC-based Single Sign-On, enhancements since release and answers to frequently asked questions.

In March, blueprints for device management was released in Jamf Pro 11.15. Blueprints, as well as future features, is built as a service that can be utilized across the Jamf portfolio. To access this platform capability, organizations must implement OIDC-based single sign-on (SSO) by configuring their authentication settings in Jamf Account and enabling the corresponding OIDC protocol within their Jamf Pro environment.
Since the release of blueprints and the SSO requirement, we’ve heard a lot of good questions and feedback from the community. We’d like to take the opportunity to provide more information and education around this new approach, the role it plays in our evolving platform, the benefits it provides, enhancements since release, why it’s required for new Jamf platform features, as well as share some additional resources.
SSO with OIDC is a key foundation in the new Jamf platform.
As many of you know, we've been growing — both through building new capabilities and welcoming new products into the Jamf family. We are bringing these solutions together into a unified platform that allows us to build things once and make them available across our all of our products to benefit customers regardless of which Jamf solution is being used.
For Jamf Pro customers in particular, integration into the Jamf platform will enable faster, more complete access to Apple's management feature set. For now that primarily means declarative management by way of blueprints, but we have big plans for the future, which we'll be sharing at our upcoming events.
When you configure SSO with OIDC in Jamf Account, you get a seamless and consistent login experience across supported products (Jamf Pro, Jamf Protect, Jamf Security Cloud and Jamf Account) and also take advantage of current and future platform features. Because features like blueprints, which allows admins to utilize declarative management, are built as platform services rather than within core products, we can update and improve them more quickly, delivering changes faster while maintaining security and simplifying the administrative experience.
By connecting your organization's identity provider once through Jamf Account, you maintain all your existing access policies, multi-factor authentication and centralized identity management.
Getting started with SSO configuration
Accessing our platform requires an authentication system that not only provides secure administrator access to Jamf applications but also ensures reliable communication between these consoles and Jamf Cloud services. For authentication needs, our customers often choose to connect their identity provider (IdP) to Jamf to achieve single sign-on access to Jamf consoles, but it requires separate configurations for each product in our platform.
Our new approach aims to simplify this process by consolidating integration requirements, providing a consistent authentication method and managing access centrally through Jamf Account, by leveraging OpenID Connect (OIDC). It's important to note that this configuration affects only administrator access to web consoles like Jamf Pro and Jamf Security Cloud, not end-user authentication for applications like Self Service+ or Jamf Trust.
Note: We chose SSO with OIDC for this new authentication capability instead of SSO via SAML because of its modern features and widespread support from identity providers.
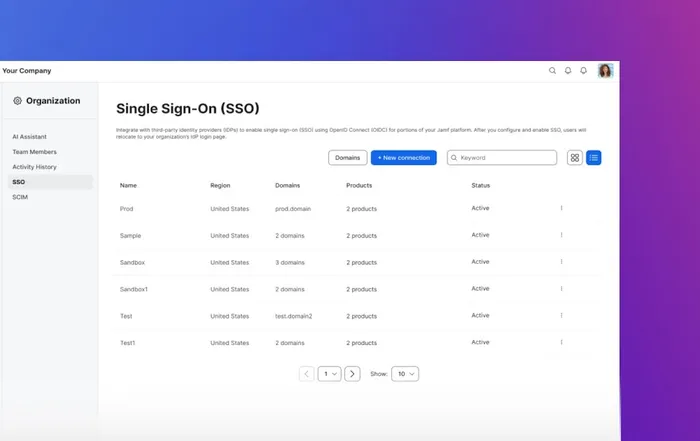
Configuring and enabling SSO
Configuring and enabling SSO
To help you implement this authentication method successfully, we've created comprehensive documentation and step-by-step guides. Your first decision is whether to use Jamf ID or integrate your existing identity provider with Jamf Account.
If you choose to use Jamf ID, you'll need to:
- Ensure users have a Jamf ID tied to your organization in Jamf Account.
- Complete the steps in Enabling OIDC Authentication in Jamf Pro in the Jamf Pro Documentation.
If you're integrating your identity provider with Jamf Account, you'll:
- Create an app in your identity provider.
- Verify your domain in Jamf Account.
- Add an SSO connection in Jamf Account.
- Enable OIDC authentication in Jamf Pro.
For organizations using popular identity providers, our Learning Hub provides specific integration guides for:
- Microsoft Entra ID: written guide, video guide
- Okta: written guide, video guide
- Google Identity: written guide, video guide
- OneLogin: video guide
- PingOne: video guide
- JumpCloud: written guide
Enhancements
Several enhancements have been made to SSO workflows since release to help simplify and improve workflows including:
- Enhanced IdP Integration
- Consistent support across Okta, Google, and Entra ID
- Group membership inclusion in ID tokens for seamless access and privilege mapping
- Custom claim mapping capability for organizations with unique identity management needs
- Flexible Domain Management
- Greater accommodation for diverse organizational structures.
- Improved User Experience
- Enhanced logout mechanisms in Jamf Pro that expire sessions across the platform
FAQ
We've gathered the most frequently asked questions about SSO with OIDC to help you understand this change.
What is an IdP?
An identity provider (IdP) manages user authentication for your organization. If your organization uses an IdP that supports OIDC, you can connect it to the Jamf platform through Jamf Account. This gives you a significant advantage: instead of setting up your IdP separately in each Jamf product, you configure it once in Jamf Account and it works across all supported Jamf offerings.
What is Jamf ID?
Jamf ID is an identity service we provide that gives you a single sign-on experience across Jamf applications without needing to integrate your own identity provider. Beyond product access, your Jamf ID also connects you to Jamf Nation, training and support services. When setting up SSO with OIDC, you'll choose either to use Jamf ID or connect your organization's IdP (like Microsoft Entra or Okta). If you choose an external IdP, your users will log in through that instead of using Jamf ID.
What is Jamf Account and how does it relate to authentication?
Jamf Account is a central hub at account.jamf.com where you manage your organization's settings, user information and more. While you can log in to Jamf Account, it's important to understand that it's not an authentication method itself. Think of it as a management console rather than a type of login credential — there's no such thing as "a Jamf Account" for users. Instead, users either log in with Jamf ID or through your organization's identity provider that you've connected through Jamf Account.
If Jamf Account has an outage, can I still log in to my products?
Yes. While you configure your identity provider in Jamf Account, the actual login process for Jamf Pro, Jamf Protect and other Jamf products happens independently. When users sign in with your organization's IdP (like Okta), they connect directly through our authentication service, not through Jamf Account.
What subscription types/server environments are the platform capabilities available for?
Platform capabilities are not available for:
- Jamf Premium Cloud Plus (GovCloud)
- Jamf Cloud StateRAMP for Education
- Jamf Pro on-premises
How does this work with multiple domains or multiple Jamf instances?
While this solution can support multiple domains and instances, we recognize that each organization's environment and requirements are unique. We are actively gathering feedback to better understand various implementation needs and scenarios. We encourage organizations to engage with their account team to discuss their specific environment and requirements.
Which authentication methods are supported across Jamf services?
- Our community platforms such as Jamf Nation or the Online Training Catalog are delivered by partners and do not support external IdP logins. To log in to these platforms, users must maintain a personal Jamf ID. For employees that never log in to any of these platforms and only use Jamf Pro, Jamf Protect or the other products, Jamf IDs are not required.
- A Jamf Nation profile is not a Jamf ID. Jamf Nation profiles can be migrated to other Jamf IDs if you move companies. Your training certificates can be moved between Jamf IDs in Jamf Account.
- Some of these platforms such as Jamf Security Cloud or Jamf School may support additional authentication methods in addition to an IdP configured in Jamf Account or Jamf ID. If you are using one of these authentication methods, you can continue to use it but platform features that authenticate to Jamf Account may not be available.

In which regions can I configure my organization's IdP for SSO?
- When configuring SSO for your organization's IdP, you must select a hosting region (United States, Europe, Japan or Australia). This choice determines where your IdP configuration details are stored and where authentication traffic is routed.
- Jamf ID is available for users worldwide, though the service infrastructure and data are hosted in the United States.
Can I use the same email address for both my Jamf ID and my organization's SSO?
Yes. When you've configured your organization's IdP and verified your domain, we'll automatically use that for login by default. If you need to use your Jamf ID instead (for example, if your IdP connection is unavailable), you'll see a "Continue with Jamf ID" option. You can manage both identities in Jamf Account through the user menu in the upper right.
How can I control which identities can access my Jamf products?
When setting up an SSO connection in Jamf Account, you select which tenants members of your IdP can access. For users with Jamf ID, you'll need to explicitly add their email addresses to each product they need to access. Additionally, for Jamf Pro, you'll need to map IdP users to administrator accounts in the console.
What should I do when someone leaves my company?
- For users authenticating through your identity provider:
- Remove users from your IdP using your standard offboarding process — this will prevent access to all Jamf platform services.
- If they also have a Jamf ID with their company email address, follow the additional steps below.
- For users with Jamf ID:
- Remove individuals from the Jamf Account Team Members page to revoke their access to your organization.
- Remove their email address from any portals they were accessing.
New features
We're listening to your feedback and are actively working to make this experience better. We're excited to share some new Jamf Account features that include more control over Jamf IDs and expanded privileges for Jamf Account.
Subscribe to the Jamf Blog
Have market trends, Apple updates and Jamf news delivered directly to your inbox.
To learn more about how we collect, use, disclose, transfer, and store your information, please visit our Privacy Policy.