
Many organizations handle lifecycle management of their managed devices manually or from an Excel list or through a configuration management database (CMDB).
But it is possible to automate many of these steps with Jamf Pro and reduce questions about device lifecycle management for not only the Mac admin, but the end user as well.
This blog discusses the options for Apple device management in Jamf Pro for both macOS and iOS/iPadOS devices.
How to use Self Service for Apple device lifecycle management
As you may know, Jamf Self Service can eliminate many tasks or questions for IT related to the MacBook lifecycle. By following the below guide, employees curious about when their MacBook needs replacing can get the answer from a simple button in Self Service.
This blog post explains how to feed Jamf Pro with purchasing and warranty data to enable lifecycle management within Jamf Pro.
There are also many Jamf Marketplace integrations available which can be used to post data to services like ServiceNow or Jira Servicedesk to automate Apple device lifecycle management from those tools.
We encourage you to learn to think out of the box. With Jamf Pro you can be incredibly creative — you don't have to focus on the tools we show here; you can also combine other tools with Jamf Pro to help simplify your IT administration.
Self Service initiated workflow with Jamf Pro.
Automated workflow with Jamf Pro and PowerAutomate
for streamlining device management of mobile devices.
Instructions
Step-by-step guide:
- Feed Jamf Pro with purchasing and warranty data with Inventory Preload
- Build automated reports in Jamf Pro and optional email
- macOS: Display hardware expiration date through Self Service
- macOS: End-user experience in Self Service
- Mobile device: Notify user when device is ready for replacement with Jamf Pro and Microsoft PowerAutomate
1. Feed Jamf Pro with purchasing and warranty data with inventory preload
There are multiple ways to upload data to Jamf Pro for the devices that are enrolled or going to be enrolled. The most used feature for this is inventory preload, which allows you to pre-upload data either by uploading a .CSV template, or by feeding data through the API endpoint /v2/inventory-preload/records.
Below is the .CSV route, but with either method the end result is the same.
Step 1:
Download the CSV template from your Jamf Pro instance under Settings → Global Management → Inventory Preload. With the button on the bottom, download the template.

Step 2:
Populate the template with data as shown below. Save as a comma separated-values (CSV) file, with dates in the YYYY-MM-DD format.
.png?q=80&w=600)
Upload the file to Jamf Pro.


API example for creating records.
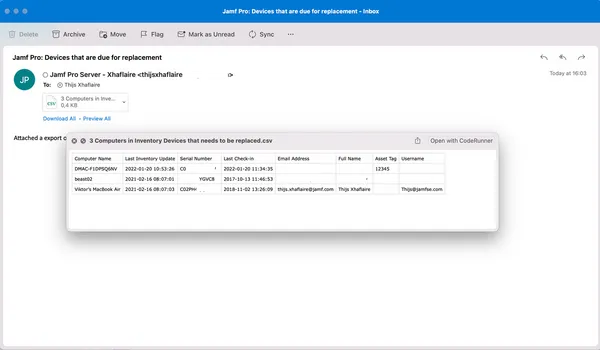
2. Build automated reports in Jamf Pro and optional email
After entering PO/hardware/warranty data into Jamf Pro, we can create advanced searches or smart groups based on these criteria to automate lifecycle management.
While this example is for computers, the same flow can be used for advanced mobile device searches. The same workflow can also be applied to create reports and searches showing devices with expired warranties for warranty lifecycle management.
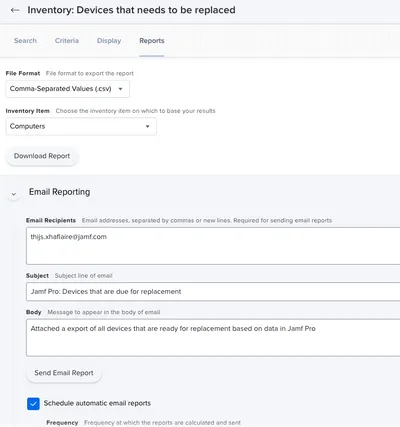
*Requires SMTP to be configured on the Jamf Pro Server. Read our documentation for more info.
Step 1:
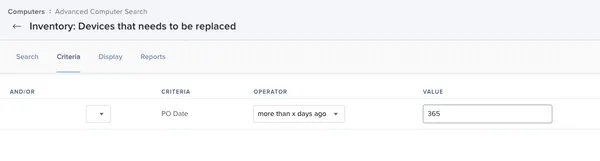
Create an advanced computer search.

Step 2:
For criteria choose PO Date, which is a default identifier in Jamf Pro, or use a custom extension attribute if you used one for populating this data. In this example we determine that a device needs to be replaced after 365 days.
Select the display tab and enable the fields that you want to have included in the report.
Step 3:
Select the reports tab to create and send email report to any IT admin.
Save report.
Example report:
3. macOS: Display hardware expiration date and warranty date through Self Service
In this example, we deploy computer configuration profiles with a custom preference domain to deploy data from Jamf Pro locally to the computer. We use variables like EXTENSIONATTRIBUTE_33 to deploy the values to a custom domain on the device.
From a security point of view, there are several reasons why you do not want to use the Jamf Pro API for pushing this information down locally to the computer. As the information we use is static and does not often change, we can use this method to deploy the values locally to the computer. (Profiles need to be re-deployed once purchasing and warranty information is updated.)
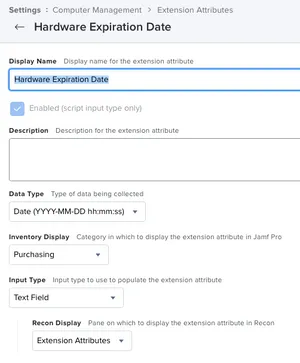
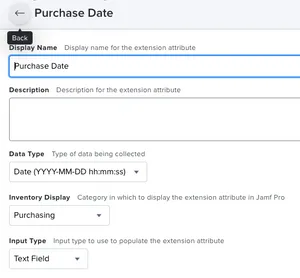
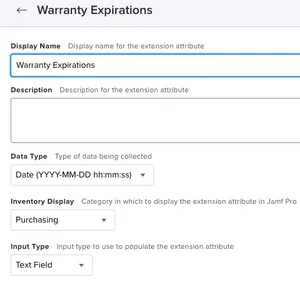
Step 1:
Create the following computer extension attributes in Jamf Pro.
Settings → Computer Management - Management Framework → Extension Attributes → +new
Step 2:
Upload the following JSON manifest to Jamf Pro:
Custom Applications and Settings → External Applications → Custom Schema → Preference Domain com.custom.warranty
Step 3:
Populate the identifiers with $EXTENSIONATTRIBUTE_NUMBER and deploy the config profile to either all your devices or based on a smart group that filters on devices that have data in the extension attributes.
This example uses numbers 33 and 35. When creating your extension attribute, you can check the value in the URL.

To verify, you can check if the values are readable on the device with the profile scoped.

Step 4:
Upload the following script to Jamf Pro that does not use the API to retrieve the data, but instead uses the locally stored values in the /Library/Managed Preferences/com.custom.warranty.plist
When uploading the script, for ease of use give the parameters a proper name.
Step 5:
Create a Jamf Pro Policy with the following:
Trigger: None
Execution Frequency: Ongoing
Scope: To all computers or smart group to devices with have warranty/hardware dates
Add the script and enter the encrypted variables for the API user account.
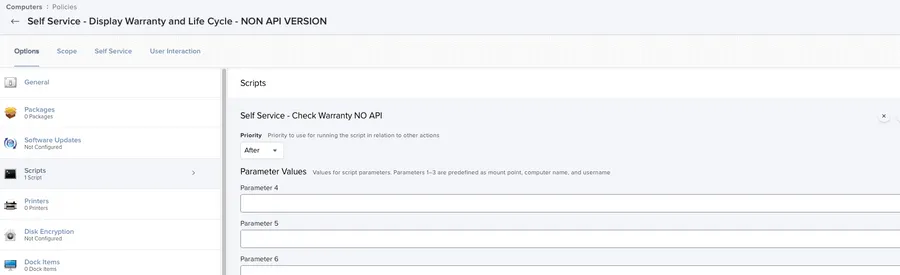
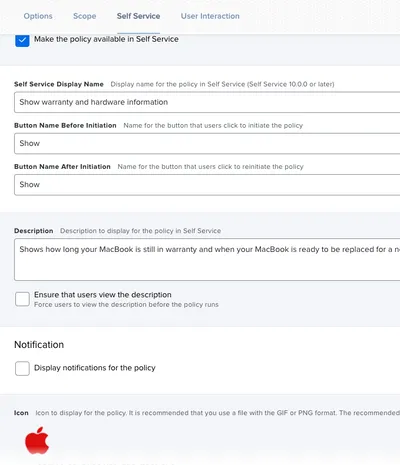
Step 6:
Make the policy enabled for Self Service and add your custom text and icons.
4. macOS: End-user experience
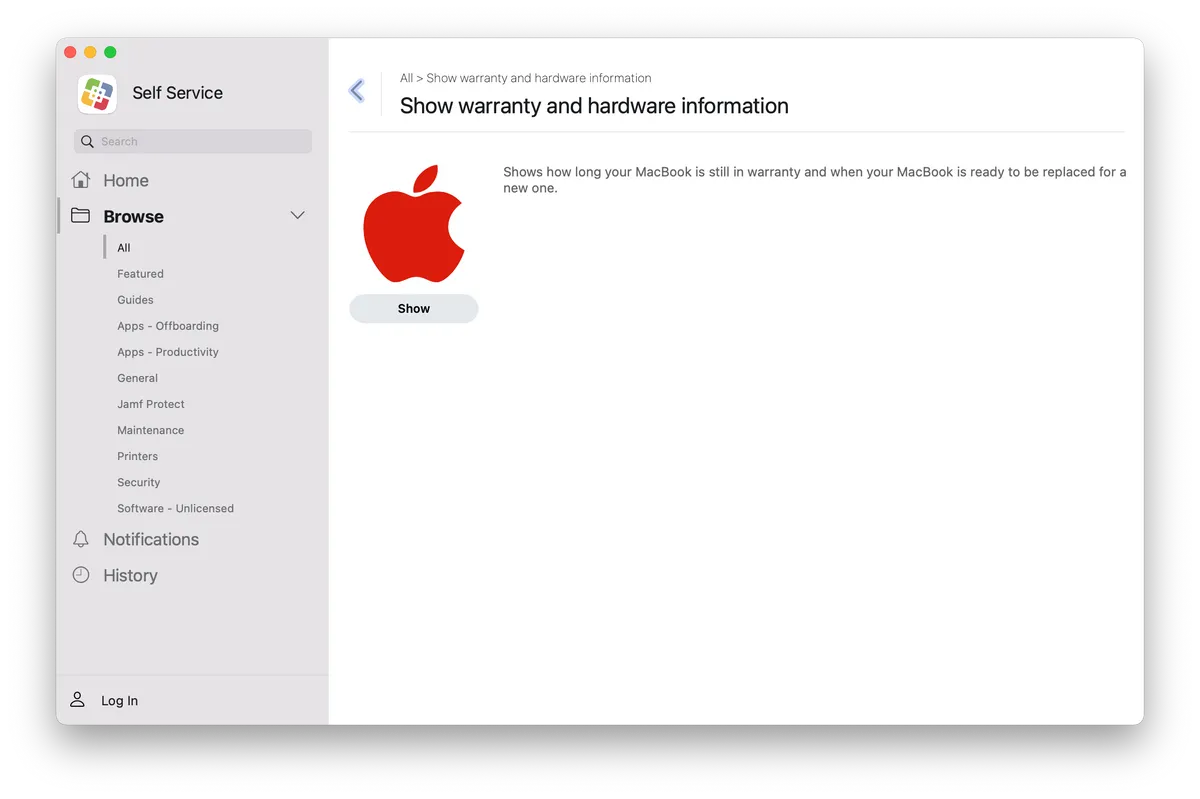
Step 1:
End users can use Self Service of Mac warranty lookup. User navigates to Self Service as a one-stop shop for everything, including an item to show the device warranty expiration and hardware expiration. This reduces requests to IT asking if the device is still in warranty and when the device is ready for replacement.
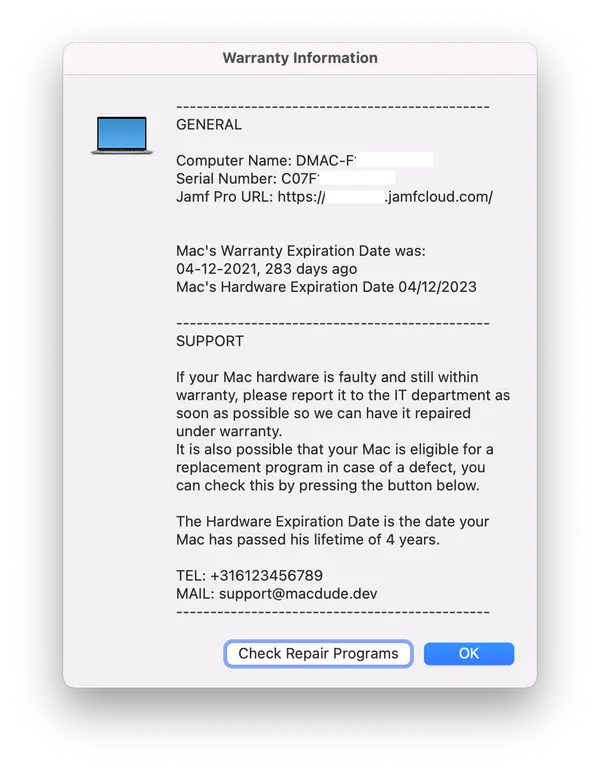
Step 2:
When user selects the button they receive the following output. If they select Check Repair Programs they are redirected to Apple's website.
5. Mobile device: Notify user when device is ready for replacement with Jamf Pro and Microsoft PowerAutomate
Unfortunately, we do not have the same options for mobile devices as we have for computers. For computers we can run scripts or trigger other actions with Jamf Pro Policies to make the user aware their device is end of life.
For mobile devices we need to be a little more creative. In this example, we still use the PO/warranty/hardware data we uploaded in Step 1, but use smart groups, webhooks and Microsoft PowerAutomate to streamline device lifecycle management. You can also use many other tools for notifying the end user, like TORQ, Okta Workflows or Zapier.
This example shows how to send automated emails to the end user and IT if the user has chosen to have the device replaced. This could also send direct messages to MS Teams, or interact with chatbots if created in Azure.
Step 1:
If you followed Step 1 regarding uploading data via inventory preload, you already have the data for the mobile devices.
Now create two mobile device extension attributes.
Navigate in Jamf Pro to Settings → Device Management → Extension Attributes and create the extension attributes as shown.
Step 2:
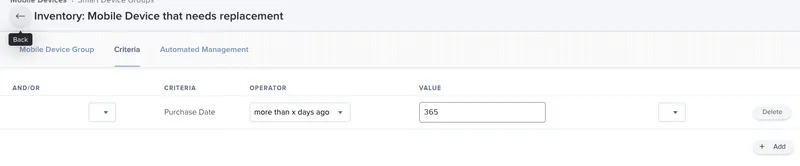
Now we need to create a mobile device smart group as shown in the example.
This example shows 365 days for having devices expired, or one year.
Step 3:
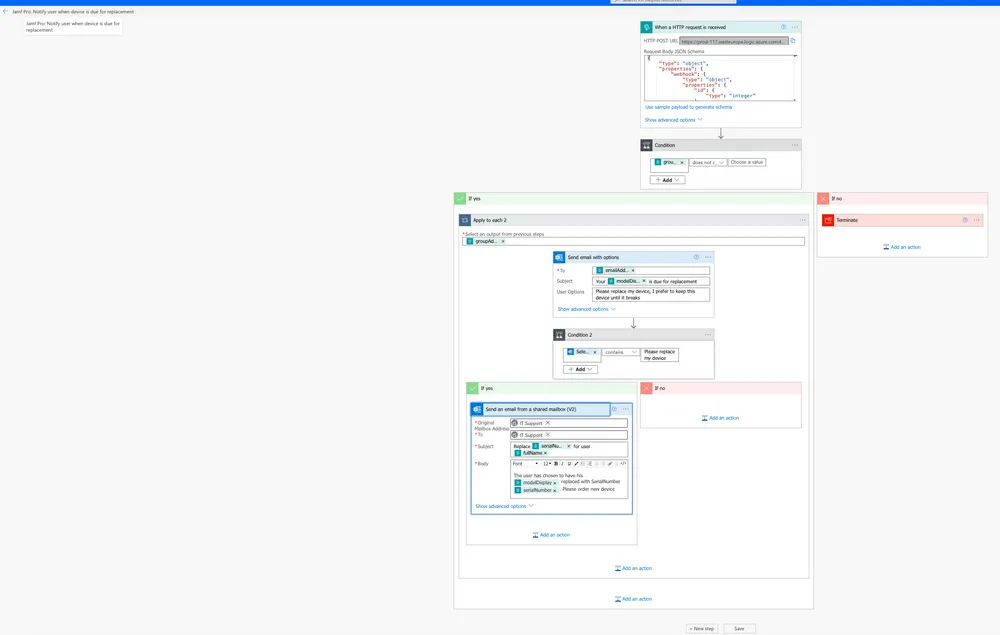
Now we need to create a Flow in Microsoft Flow. For step-by-step directions, refer to How-to: Send Webhooks from Jamf Pro to Microsoft Teams with PowerAutomate.
Save the HTTP POST URL you get by saving the flow; we need this later.
Use the following as example PAYLOAD data to generate the scheme.
Step 4:
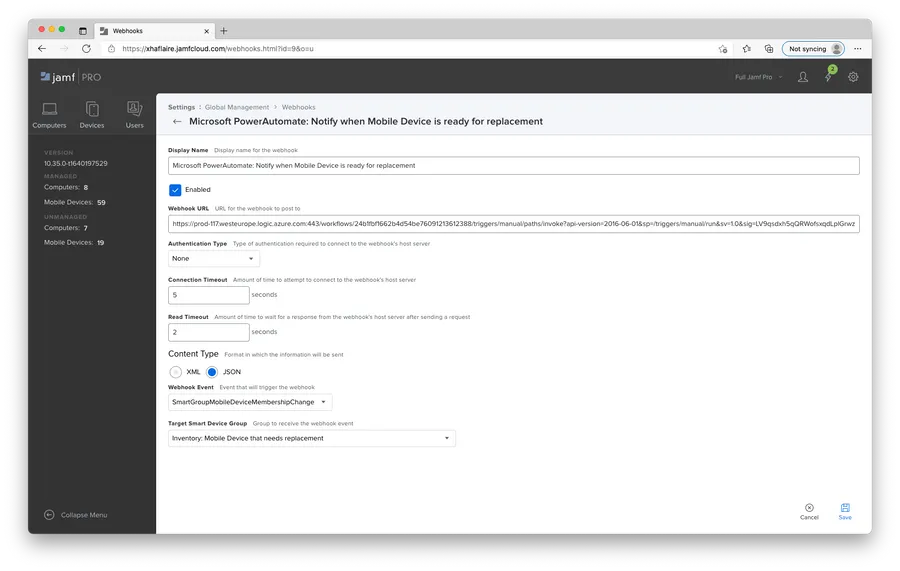
Create the webhook in Jamf Pro. Navigate to Settings → Global Management → Webhooks and create as shown below. Choose the smart group created during Step 2.
Enter the HTTP POST URL saved from MS PowerAutomate.
Write down the ID of the webhook, found in the URL bar on top of your browser.
Step 5:
We need to modify the webhook with the API to include more data in the JSON output.
Use the following code. Enter your Jamf Pro server URL and a bearer token with valid permissions to edit webhooks.
Step 6:
The result: when the purchase date of a device is longer ago then X number of days, device is added to a smart group, which triggers a webhook to send relevant data to Microsoft PowerAutomate. Automate sends a ready for replacement email to the end user. If the end user opts to replace the device, a secondary email is sent to IT.
Subscribe to the Jamf Blog
Have market trends, Apple updates and Jamf news delivered directly to your inbox.
To learn more about how we collect, use, disclose, transfer, and store your information, please visit our Privacy Policy.